Dutch Windmill
Description
This section is from the book "Busy Hands: Construction Work For Children", by Isabelle F. Bowker. Also available from Amazon: Busy Hands: Construction Work for Children.
Dutch Windmill
Material: Stiff paper 12 in. x 18 in.; string 15 inches long; scissors, paste and ruler. For wheel: stiff paper 11 in. x 11 in.; collar-button.
Dutch

Place the 12 x 18 sheet of paper on the desk, long edge toward you, and 7 7/8 inches from the lower right-hand corner, on the short edge, make a dot. The same distance from the lower left-hand corner, on the short edge, make another.
Bisect the lower long edge. Join by slanting lines this bisecting dot with the two dots on the short edges.
Make a small loop in one end of the string.
Twelve inches from the outer end of the loop, make a knot.
With the thumb, hold the knot on the bisecting dot.
Place a pencil in the loop, and with the string stretched tight, draw a curved line joining the ends of the slanting lines. (A-B, Fig. 1.)
Make a knot in the string five inches from the end of the loop. (A pencil mark on the string will answer for a knot.)
With the thumb, hold the knot on the bisecting dot.
Place the pencil in the end of the loop, and draw a curved line cutting each slanting line, {x-y, Fig. 1.)
Make a knot 1 1/2 inch from the end of the loop, and holding it with the thumb on the bisecting dot, make another curved line cutting the slanting lines, (o-m, Fig. 1.)
Draw a parallel line 3/8 inch inside each slanting line.
Make five dots 3 1/4 inches apart on the longest curved line.
Join each dot with the bisecting dot, by a slanting line.
Make a mark on the string 6 1/2 inches from the end of the loop, and in the manner described above, draw a small curved line (1/2 inch long) in the middle of each section, (s, Fig. I.)
One inch below these make a second set of curved lines.

Fig 1
Make a third set 1 1/2 inch below these, and one inch farther down a fourth set.
Now cut along each curved line, and make an up-and-down slit from the first to the second row of curved lines; also between the third and fourth rows.
Bend the cut parts back, as in Fig. 2. These form the windows.
Cut along each outside slanting line, and the longest curved line of the large figure.
Cut out the smallest curved part. (Fig. 3.)
Cut each slanting line from the small curve to the middle curve.

Fig 2.
Crease the remaining portion of each slanting line, so that the line is outside.
Crease the curved line so the line is inside.
Crease the roof pieces within 1/2 inch of the walls. (This crease should be made so that the end of the roof pieces are pressed inward.)
Paste the end of the roof pieces together. (There will be open spaces in the roof, but a pattern that would make a solid roof would be too difficult.) Paste the slanting ends of the walls together.
To make the wheel, take the 11 x 11 sheet of paper; 4 3/4 inches from each corner, on each edge, make a dot, and connect opposite dots by lines.
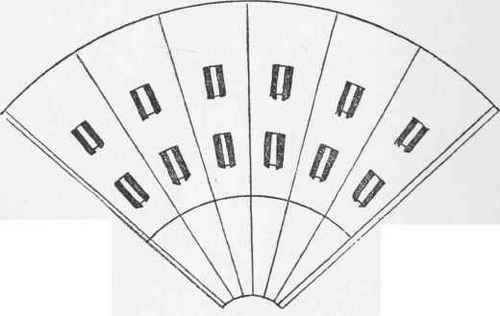
Fig. 3
Draw a square 1/2 inch inside of the small center square.
(Fig 4.)
Connect each corner of this smallest square with the end of the two shafts nearest to it. (Fig. 4.) This gives a tapering shape to each shaft.
With the collar-button attach the wheel to one side of the roof. Or fasten it on with a twig running through both sides of the roof.

Fig. 4.
Continue to:
My Books

