


Bookcraft. Part 2
Description
This section is from the book "Arts And Crafts In The Elementary School", by Joan Dean. Also available from Amazon: Arts And Crafts In The Elementary School.
Bookcraft. Part 2
Another simple binding, a progression from the last, is the single-section binding. For this it is necessary to have the pages of the book joined in pairs and folded round each other. This binding can be used satisfactorily to bind an ordinary exercise book. If a book made in single sheets is to be bound in this way, then it is necessary to arrange them in order, cut a series of strips of thin paper (typing paper is useful for this), and paste the pages together in pairs. If the book has an even number of pages, then one can start by joining the first and last pages and working in to the centre. If there is an uneven number of pages, then an extra page must be added at the end. The pairs of pages should be interleaved with scrap paper and left to dry out under a light pressure.

The single sheets are joined in pairs
While the pages are drying, decorative endpapers can be made. Two sheets are necessary and they should be of the same size as the double pages—those made from two pages pasted together. Endpapers can be made from plain coloured paper, or they can be patterned in one of the ways suggested earlier. Paper for the cover itself can also be prepared and decorated, and the relationship between cover paper, endpaper and book-cloth for the binding of the spine of the book, carefully considered and discussed.
When the pages of the book are dry, the pages and endpaper can be sewn. They should be folded together and a strip of book muslin about two inches shorter than the length of the book and about three inches wide should be folded round the back of the book. If there is no book muslin available, any strip of white material will do—old bandage makes a good substitute. Round this again we need another sheet of plain paper the same size as the endpapers. Sewing can then be carried out with linen thread as in the diagram at the top of page 153 and the ends knotted together.
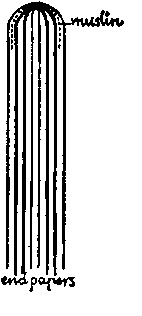

Sewing a single section book
Cover boards are then cut. These should be approximately one inch longer than the page size and the same width. They are, once again, best cut with a knife and steel rule, but a guillotine can be used, or they can be made from thinner card and cut with scissors. If thin card is used, great care is needed with drying. It must always be done under pressure. It is, of course, quite satisfactory from many points of view, to cut two pieces of thin card and to paste them together.
The cover board is laid in position, as shown in the diagram. It should overlap the book by an equal amount top and bottom and at one side, the side at which the book opens. When it is in position, a line is marked on the outside pages of the book on both sides, showing where the card ends. This should be half an inch from the spine of the book, but the children can be encouraged to judge first and check by measuring. Newspaper is inserted between the outside page of the book and the endpaper to protect it, and the outside page is thoroughly pasted, care being taken to go over all the edges and so to paste them thoroughly. The newspaper is removed and the card placed in position. This is done at both ends of the book and the lining up of the cover boards checked carefully.

Cover board in position


A strip of bookcloth for the spine is marked and then pasted into position
A strip of bookcloth is then cut for the back of the book. This should be at least one and a half inches longer than the length of the cover boards and of a width which looks well in proportion to the book size. Mark the centre of this, where the spine of the book will go, with a line. Apply paste to the book-cloth and place the spine of the book on the line. Lay the cloth lightly against the book on each side. Now lay the book flat and raise the bookcloth on the side uppermost. Place it carefully into position on the exposed part of the book where there is no cover board. Press it into position against the edge of the cover board, then lay the remaining cloth on the cover board and press it into position. Turn the book over and do the same on the other side. If you place the cloth into position on the cover board and then press the cloth into the hollow left at the edge of the cover board, it will stretch to this while wet and later shrink again, with unsatisfactory results. The overlapping ends of bookcloth should then be turned over and tucked inside the book.
If it is desired, cloth can be used for the outside edges, either in a strip, or as a triangle at the corners, or the binding can be finished in paper. The process is roughly the same whether cloth or paper is used. If paper is used two sheets are cut to envelop the remaining part of the cover. These should allow for one-eighth of an inch overlap of the cloth and about three-quarters of an inch overlap at the outside edges and at the top and bottom. The position of the cover board should be marked on the cover paper and a line drawn across the corners allowing for the thickness of the cardboard (see diagram). The paper is then pasted and placed on the cover boards. The outside corners are cut off along the line marked and the sides folded over the thickness of the cover board.


Marking the cover paper
Cover paper in position
When the cover is lifted now, the first thing inside the book should be the strip of book muslin, and behind it the back of the endpaper. The muslin should be pasted to the cover of the book. Next insert newspapers between the endpapers and paste the back of the endpapers. Remove the newspaper and close the book. Do not open it again until it is dry, for this will stretch the endpaper. Put clean newspaper between the endpapers and round the covers and leave the book to dry out under a light weight for at least twenty-four hours.

The finished single section book
A rather simpler form of book cover is the loose-leaf folder. Folders can be used for all sorts of work and have the advantage that they can be made before the work is actually begun and used to house it as it progresses.

Pieces of cloth and card required for folder
Two pieces of card are needed, both of the same size, and slightly larger than the paper which the cover will eventually contain. Four strips of bookcloth are needed. Three should be about one and a half inches longer than the cardboard, and one half an inch shorter. Two of the long pieces should be of the same width, probably one and a half to three inches depending on the size of the cover. These are to go on the outside edges of the cover. The remaining long piece and the short piece should be the same width as each other, this time about twice the width of the other pieces (about three to six inches). These are for the centre of the cover. On the back of the long narrow strips mark the length of the pieces of card in such a way that there is equal overlap of cloth at each end. Measure this overlap at one end, and on the long narrow pieces draw a line the length of the cloth at this distance from the edge. On the long wide piece mark the overlap at top and bottom and also draw lines about half to one inch in from each long edge. These lines mark the position of the card.
Continue to:


My Books

