II. Book Problems. Part 5
Description
This section is from the book "Paper and Cardboard Construction", by G. F. Buxton, F. L. Curran. Also available from Amazon: Paper and cardboard construction.
II. Book Problems. Part 5
d. Fold right edge to left edge.
e. Fold bottom to top.
f. Unfold sheet and place in such a position that A is in the upper left hand corner, and B in the lower left hand corner.
g. Number pages as indicated in drawing.
h. Reverse sheet so that B will be under the upper left hand corner and A under the lower left hand corner. i. Number pages on back of sheet as indicated in drawing. j. Refold sheet in same manner as it was first folded. k. Cut cover 4 1/2"x 5" and fold. 1. Insert folded sheet in cover and sew as before.
Note: - These problems furnish opportunity for the teacher to explain to the pupils how a book is printed, folded, sewed, trimmed, and bound. Booklets with 16, 18, 32, 36, or 48 pages may be worked out as supplementary problems. The printer usually prefers to fold into 8, 16, or 32 pages in order that the folding may be done from edge to edge. Some of the other foldings and pagings are given below. The stock for each book is 9"x 12" and a cover is planned to allow J" projection.

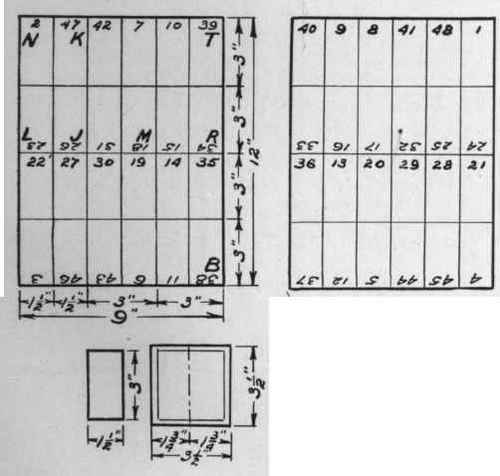
Section Of 16 Pages.
A section of 16 pages may be made by folding R to L, T to B, M to C.
The illustration shows the paging on both sides of the sheet.
In the two lower drawings are shown a single page and the open book in its cover.

Section Of 24 Pages.
A section of 24 pages maybe made by folding R to L, M to T, B to C, L to T.
This is a difficult fold and not often employed. A printer would more commonly use two sheets, one of 16 pages and one of 8 pages.

Section Of 32 Pages.
A section of 32 pages may be made by folding B to T, R to L, M to K, J to K.
This is as many pages as usually fold well together in a single section, altho thin book paper may sometimes be folded into 64 pages or more in pamphlet work.

Section Of 36 Pages.
A section of 36 pages may be made by folding M to T, B to C, K to L, T to N, L to N.
In place of this sized section it is more practical to fold two sections of 16 pages and one of 4 pages. The practice here in careful folding, however, is worth the attempt at 36 pages in school.
Section Of 48 Pages.
A section of 48 pages may be made by folding B to T, M to L, R to J, J to K, N to K. Three sections of 16 pages each, or one of 32 pages and one of 16 pages are more generally used by printers.
Colored cover paper, 1 piece, 9"x 12".
Gray cover paper, 3 pieces, 9"x 12".
Glue.
Rule, pencil, scissors.

Gray Cover Paper Ready To Fold.

Steps In Assembling Scrap-Book.
Directions: a. Lay out three pieces gray cover paper like sketch, center lines to be 1/2" apart and finished pages 5 1/2"x9". These are for the leaves of the scrap-book.
b. Fold left edge towards right, creasing along the left of the three center lines, and unfold.
c. Fold right edge towards left, creasing at right line, and unfold.
d. Turn paper over and fold left edge to right edge.
e. Lay out and cut colored cover paper 9"x 112". This is for the cover of the scrap-book.
f. Fold left edge of cover nearly to the right edge (allow about 1/2") and unfold. See third drawing from the top at right.
g. Fold right edge nearly to the left and unfold.
h. Glue leaves into cover, spreading glue for nearly half an inch along the inner edge of cover and press. See two lower drawings at the right.
Note: - This book may be used for mounting magazine clip-

Scrap-Book pings or pictures illustrative of school work. The covers may be made to open more freely if an extra piece of cover paper 1"x 9" be inserted at front and back as shown in second drawing from the top at the right.
Book paper, 3 pieces, 9"x 12".
Cover paper, 1 piece, 6"x 9".
Binders' thread, 30".
Glue.
Rule, scissors, pencil, needle.

One Section Book Paper 4 1/2 "x 9" Cut From 9"x 12"

Cover 4 3/4" Square Cut From 6"x9"

Steps In Sewing - 4a And 9a Show Appearance When Two Sections And Three Sections Are Completely Sewed
Directions: a. Lay out and cut three pieces book paper 4 1/2"x9" from 9"x 12", saving the larger pieces for another pamphlet b. Fold bottom to top and left to right.
c. Sew as shown in steps 1-8, beginning inside of section A, sewing across the back of sections A and B near the bottom, into section B, out thru the middle of the back of section B, and continue as illustrated, finishing by carrying the thread into the middle of section A, shown at "8", and tying to the starting thread with a square knot.
d. Cut cover 4 3/4" square, fold as in number 311, glue edge of sections into cover, and press.
e. Put simple line design on front cover.
Note: - Step marked 4a shows the appearance after step 4 has been completed. Step 9a shows the appearance after step 9 has been completed.
Continue to:
My Books

