Dress - Practical Millinery
Description
This section is from "Every Woman's Encyclopaedia". Also available from Amazon: Every Woman's Encyclopaedia.
Dress - Practical Millinery
How to Cover the Shape - Cutting the Material - Stretching and Fitting the Cloth over the Brim Slipstitching the Edges - Joining the Crown to the Brim
The last article dealt entirely with the elementary details of shape making, and left the spartra shape wired ready for covering. This process must now be carefully followed. For the autumn season cloth may be taken as the most seasonable and most popular fabric, with the exception of "mirroir" velvet. The latter material, how-ever, is much more costly and difficult to manipulate. A thin, smooth cloth should be chosen, and it is unwise to give less than 3s. 1 Id. a yard (double width), three-quarters of a yard being sufficient.
Place the spartra shape on a square of the cloth, which should be sufficiently large to allow for turning over the brim. Placing the corner of the cloth to the front, mark its position on the s p a r t r a shape (see sketch). The right side of the material must face the brim, as this piece of cloth is intended, after the necessary fitting has been completed, for the top of the brim. The necessary fitting is carried out as follows: . Pin flatly round the edge, and avoid . using many or coarse: pins, as. they are apt to mark the cloth. Pin firmly round the head marks. These operations are clearly shown in the illustrations, which should be closely followed

Fig. 1

Fig. 2

Fig. 3

Fig. 4
Cut circle one inch within the head mark.

Fig. 5
Snip up as far as the head marks, being very careful not to cut beyond. Then remove the pins.
Mark the front, back, and sides with pins or pencil marks, then cut the cloth round the edge of the brim, not forgetting to leave one inch for turning. Then remove the pins, and take the cloth off the brim. The cloth should now be replaced on the top of the brim, placing the front, sides, and back marks in their proper, positions. The right side of the material must be outside, and the snips will then fit all round on to the side band.

Fig. 6

Fig. 7

Fig. 8
Sew snips firmly round the head band.

Fig. 9
The difficult task of stretching and fitting the cloth over the brim is now commenced. The material must always be pulled on the straight grain, so that the point of the material lies in front (sketch 1), the straight grain will then be at the points (a) illustrated in the accompanying sketch.
When the material has been sufficiently stretched on the straight, it can then be stretched on the cross, i.e., at the front, back, and sides.

Fig. 10
After stretching, which may make the brim appear uneven, turn over the half-inch of cloth which is beyond the brim on to the under-brim, and pin firmly, then sew (as illustrated), being very careful to pick up one thread only of the spartra, to prevent the stitches coming through on the top of the brim.
The top brim being now complete, we take the point of the remaining material and place it on to the front of the under-brim exactly in the same way as in Direction figure 1, and carry out Direction figures 2, 3, 4, and 5, the only difference being that the right side of the material must, of course, be on the outside, and the pins must not be removed after carrying out Direction figure 5.

Fig. 11

Fig. 12
Pull and pin the cloth, first on the straight and then on the cross, in the same way as directed for the top of the brim; and it may at this point be found that an alteration in the head pins will improve the fit. Now sew the snips firmly inside the head, cut the cloth half an inch larger than the brim, and turn it in to meet the edge of the cloth at the top of the brim, pinning it ready for slip-stitching.

Fig. 13
Slipstitching is one of the most important items in practical millinery, and it is usually found advisable to practise on bandeaux before attempting the edge of a cloth or velvet hat.
The needle must be taken through the piece of material turned over from the top brim, being very careful not to take the stitch through the spartra. Pull the cotton through the back of the under-brim edge, then back again to the top, and pull the edge together.
There are several ways of finishing the edge, such as binding it with a plain or gauged piece of velvet or cloth; or the rouleau, which is made by working a piece of wire in at each edge, thus forming a neat piping on each side.

Fig. 14
For the crown of the hat, which should now be taken, cut a circle of the cloth large enough to fit over the top, with an inch beyond for turning, and then pin firmly on.
Turn over the surplus, and sew the edge on to the side band. Then remove the pins.
To form the side band, cut a strip of material on the cross 26 inches long and
5 inches wide. Join the ends so that the circumference is 24 inches, the necessary size to fit the spartra shape.
Place over the spartra. This allows three-quarters of an inch for turnings top and bottom of the band of a 3 1/2-inch-high crown. Then slipstitch the edges together at the top

Fig. 15

Fig. 16

Fig. 17
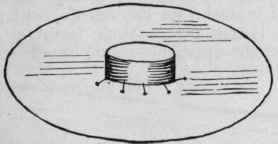
Fig. 18
Pin the crown firmly in the centre of the hat, so that the join in the side band is where it will be hidden by the trimming, and slipstitch again on to the brim.

Fig. 19
Take every p r e c aution when slip-stitching the crown on to the brim to take up only the material of the upper brim, and not the spartra (as illustrated).
The pattern shape, which is now almost flat, can be quite successfully covered without putting any pleats in the brim to make it set well; but for a mushroom shape it is necessary to put pleats in the under-brim to ensure accurate fitting. These are cut down the centre, and one side is made to lap over the other until the fullness has all disappeared (as illustrated).
Slipstitch the cut pleats down the join. Sew as neatly as possible.
The top of the brim hardly ever requires a pleat, as it can be stretched over the shape until the fullness is all pulled away.
The last sketch (No. 22) shows the model hat when finished and ready for trimming, which process will be the subject of the next article. To be continued.
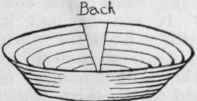
Fig. 20

Fig. 21
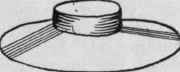
Fig. 22
Continue to:
My Books

