Gauge
Description
This section is from the book "Woodworking For Beginners: A Manual for Amateurs", by Charles G. Wheeler. Also available from Amazon: Woodworking For Beginners.
Gauge
There are many kinds of gauges in the market, but they all depend on the same principle, having a block, head, stock, or fence, to slide along against the edge of the wood, and a bar, beam, or stem, which slides through the block, can be set to project from it at any required distance, and which has near its end a spur or marking point (Fig. 533). The stem has the divisions of a rule marked upon it, so that the spur can be readily set at the required distance. In some gauges the spur or marking point is sharpened to an edge parallel with the head, rather than to a point, as it is more certain to make a clear, sharp line, and is best when slightly convex on the side toward the head (Fig. 527). This gives the spur a tendency to run the line away from and not toward the edge where the head is, thus helping to keep the head close up to the edge. Sometimes a round point is used, and occasionally a knife point or blade for cutting thin stock into strips ; and sometimes a wheel with sharpened edge. A form of gauge adapted for gauging from curved as well as straight edges is also made. Do not trust the accuracy of the scale marked on a common gauge, for if the spur is at all out of place, as is sometimes the case, you cannot rely upon the scale. Test by measuring from the head to the spur with the rule.
The mortise-gauge has two spurs, one of which is movable and can be set at any required distance from the other, so that two lines can be marked at once, as for a mortise. This is a time-saving tool, and very convenient,but not a necessity for amateur work.
There are gauges with long beams or stems and with long heads for gauging across wide spaces, but when you need anything of the sort you can easily make it and use with it either pencil, awl, or knife, as may best suit the case in hand.
If you wish to draw a line two inches from the edge of a board, for example, you can mark off two or more points at the required distance and with a rule and pencil draw the line through these points. If you were to make the points so near together as to touch, you would have the line without needing the ruler. This is what the gauge does. It makes a continuous measurement and a continuous mark, which is of course the line required.
The only gauge you need for rough work is a rule (or even a stick) and a pencil. To draw a line, for example, two inches from the edge of a board, take the rule in one hand, and lay the end flat on the surface of the board so that it laps over two inches from the edge (Fig. 528). Place the forefinger underneath, against the edge, so that the end of the rule will remain two inches from the edge, and simply slide rule and finger along the edge, holding a pencil at the end of the rule with the other hand to make the mark. The finger must be kept evenly pressed against the edge. This is only suited for rough work, or for getting out stock approximately to shape, and of course cannot be depended upon for accurate measurement.
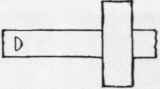
Fig. 527.
Something more accurate, with which you cannot get splinters in your finger, can easily be made, when needed, in this way. To run a line two inches from an edge, for example, and parallel to it, simply take any short stick and cut a piece out of it at one end so that the distance from the shoulder to the end will be just two inches, as shown in Fig. 529. Apply this to the edge of the piece and slide it along on the same principle as the rule and finger, being careful to keep the shoulder pressed up to the edge and the pencil or knife held firmly against the end. Instead of cutting out a piece you can nail one piece on another (Fig. 530). The latter is better for straight work because the head or fence is longer and so can be more securely pressed against the edge. An objection to this gauge is the need of making a new one for every measurement, but where there is occasion to keep repeating a measurement it is particularly convenient and quickly made.
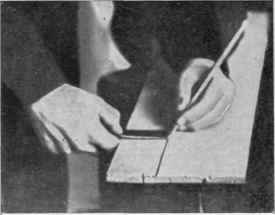
Fig. 528.
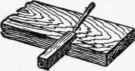
Fig. 529.
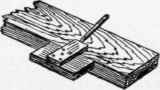
Fig. 530.
For another home-made gauge (Fig. 531) cut a recess in one side of a block just wide enough to hold the rule and just deep enough so that the flat side of the rule will project a trifle above the surface of the block. On this side of the block fasten a small strip, with a screw, so that when the two pieces are seized in the hand the rule will be held fast at the point to which it is adjusted. This is more accurate than to use the hand alone. You can readily contrive such arrangements, which will be quite accurate if carefully used, but it is not worth while to spend much time over such makeshifts (except in case of necessity), for a fairly good gauge can be bought for a small sum.
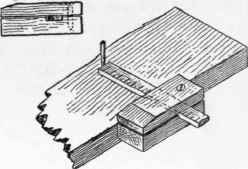
Fig. 531.
Fig. 532.
The gauge is usually an awkward tool for the beginner to use. He finds it hard to keep the stock firmly against the edge while sliding it along, and lets the spur dig or plough deeply into the wood - the spur tends to follow the grain of the wood and when the grain runs toward the edge the result is often as shown in Fig. 532, the stock being pushed from the edge. The stock is then pushed back and the wobbly process continued. To-avoid these errors, the gauge, held well in front of you in one hand, should be tipped or inclined from you so that the spur will be drawn along the surface (Fig. 533) and will make but a slight scratch. Then, keeping the stock or head firmly pressed against the edge, push the gauge steadily from you, watching carefully to see (1st) that the spur does not begin to dig into the wood instead of lightly scratching it, and (2d) that the head does not slip away from the edge. This will prevent the point catching or jumping and will insure a good mark, which can easily be deepened by going over the line a second time if necessary.

Fig. 533.
It is easier to mark a line when the spur is near the head of the gauge than when it is run out to some distance. The guiding power of the fence or head is greater over a point near to it than over a point at a distance, from which you can readily see that, conversely, the longer the head or fence, the easier the gauging becomes - that is, for straight lines, which is much the most common use of the gauge. In gauging from a curved edge, a long fence, unless curved, would be impracticable.
Where it will injure the work to have the gauge marks show (as when the work is to be finished with shellac or varnish), be careful not to carry them farther than necessary, as very slight scratches show plainly after finishing. Otherwise, in cases where the marks will not show or do no harm, as in rough framing, it is as well to run them past the required points, as it is quicker to do so and the juncture of lines which cross is more distinct.
Gauge from the same side of the wood in laying out mortises or any lines intended to be in the middle of a piece of wood, or at a fixed distance from one edge, else if the edges are not exactly parallel (as is often the case) the markings will differ. See also Scribing.
Continue to:
My Books

