Saw
Description
This section is from the book "Woodworking For Beginners: A Manual for Amateurs", by Charles G. Wheeler. Also available from Amazon: Woodworking For Beginners.
Saw
Saws are used for cutting across the grain and with the grain and there are various kinds for special purposes.
The cross-cutting saw is used, as the name indicates, for cutting across the grain of wood and for ordinary work. The blade is usually thicker at the teeth than at the back, to stiffen it and to enable it to pass through the wood more freely. From 18" to 24" is a good length for a cross-cutting saw (or more commonly called panei-ssLw) for your work, with about eight to ten teeth to the inch.
Examine the teeth (Fig. 652) and you will see that they are pointed and sharp, somewhat like the point of your knife, and that they cut across the fibres much the same as your knife does when you hold it upright and draw it across a board.
You will notice, also, that the teeth are alternately bent outwards,-one tooth being bent out to one side, the next to the other side,-this spreading of the teeth (which is called the " set ") making the saw wider at the points of the teeth than elsewhere. You will also notice that the sharp cutting edge of each tooth is on the outside. This set, and the way the teeth are sharpened, makes the cut wider than the thickness of the blade, thus giving the saw " clearance " and enabling it to slip back and forth easily and without "binding" (Fig. 653). As a practical matter of fact, however, it is nothing uncommon for a saw to bind in the cut, either from not sawing straight or from the wood closing on the saw (see Fig. 695). The teeth not only cut or break off the fibres in parallel lines at the points of the teeth, but also tear off and remove the bits of wood (i. e., the sawdust) between these parallel cuts.
Fig. 652.

Fig. 653.
The degree to which the teeth are set and the number of teeth to the inch depend upon the use to which the saw is to be put and the kind of wood to be used. Of course the finer the teeth the smoother the cut. Cross-cut saws are usually sharpened differently for soft and for hard wood, but little set being required for the latter, while the former needs a wider set to give the blade clearance, because the fibres of the looser-textured soft wood are bent aside by the tearing action of the saw teeth and are not so cleanly cut off as in the hard wood.
We have examined the teeth of the cross-cut saw and have seen that they cut across the grain of the wood very much as the point and edge of a knife, and that the fibres, being cut or broken or torn off in fine pieces, are removed from the kerf by the teeth. Now to saw in the direction of the grain, instead of across it, we use a saw based on a different principle. As we used little knives to cut across the grain, so we use little chisels to cut with the grain. Look at the teeth of the ripping-saw and you will see that they are little chisels sharp only at the end (Fig. 654), though not as acute as chisels for obvious reasons. These sharp ends, which are square (Fig. 655, showing set) or may be oblique, cut or tear off the fibres, and the front edges of the teeth push the pieces out of the cut. The teeth of the cross-cut saw are filed so that the front cutting-edge is drawn across the wood in the most effective way, much as you would draw the knife-point across, while the teeth of the ripping-saw are pointed forward at a more acute angle so that the cutting-edge is pushed through the wood, somewhat as you push a chisel.

Fig 654.
Fig. 655.

Fig. 656.
The ripping-saw cuts only on the down stroke. It is not suitable for use directly across the grain, as it tears the fibres when pushed across them much more than the cross-cut saw. The ripping-saw usually has larger teeth than the cross-cut saw. From 5 1/2 to 8 points to the inch will do for your work. The ripping-saw usually cuts best when held slanting rather than at right angles with the board (Fig. 656), as you can easily understand when you think how a chisel works best in paring at the end of a board.
If the cut closes up after the saw so as to "bind ' it, drive a wedge (or even a screw-driver or chisel) into the crack so as to open it enough for the saw to work freely. Binding of the saw from this cause is very common in making long cuts. When you come to a hard knot in splitting you can sometimes gain by taking the cross-cut saw to cut through it.
You will probably get most of your splitting done at a mill and will not have to depend on hand ripping-saws so much as your grandfathers did.
The back-saw should have, for your use, from 10 to 16 teeth to the inch and be perhaps 12 inches long. The blade is very thin to insure a finer and more accurate cut than can be made with the common saw, and therefore requires care in using. It has a back (whence the name) made of a thin piece of brass or iron put on so as to give the blade the necessary firmness.
This is an exceedingly useful tool, with which and a common panel saw you can do a great deal of work without any other. The back-saw must be used with care, for the blade is so thin that a little wrenching will spring it out of shape in spite of the strengthening back.
In the compass-saw the blade is very narrow, being about one inch at the broadest part and diminishing gradually to about a quarter of an inch at the other end. It is about fifteen inches long and is employed in cutting curved forms. As the blade is narrow and tapers towards the back and the teeth have a wide set it will cut a small circle. Notice that the teeth of the compass-saw are a sort of a compromise between those of the ripping and cross-cut saws, which enables them to cut freely either way of the grain, as is of course necessary in sawing curves.
The turning- or bow-saw is much better for any work with which the bow will not interfere, and is a very useful tool at times. Get one with handles which turn so that the blade can be turned to saw at an angle with the frame. You will need a few extra blades of different widths. The main thing to be borne in mind is to make the cut square with the surface. It is easier to follow the line than to secure a cut at right angles to the surface,
The keyhole-saw, which is even smaller than the compass-saw. is used for cutting quicker curves, as for a keyhole. It has a handle like that of a chisel, with a slot cut through from end to end. There is a screw on one side, so that the blade may be fixed at any length, according to the size of the hole to be cut
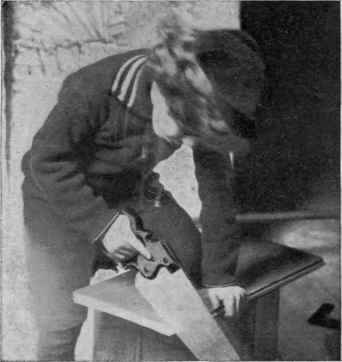
Fig. 657.
A good kind, which can be used for both compass- and keyhole-saws, has a handle into which various blades can be fitted.
Compass- and keyhole-saws are difficult for beginners to use without bending, twisting, or breaking their thin and narrow blades. Most of your curved sawing can be done better with a turning-saw or at a mill by a band- or jig-saw. If done at the mill, have a piece of waste wood put on the under side to prevent the burr, or ragged edge, left by the sawing.
A common way to test saws, when buying, is to take the handle in one hand and bend the point of the saw around in a curve sideways and then let the blade spring back, which it should do without being permanently bent or sprung.
Do not saw from one side of the line. Have your eyes above the line so that you can look on both sides of the saw (Fig. 657).

Fig. 658.
This will help you to keep the saw-blade at right angles with the surface of the wood.
Hold the saw firmly with the forefinger pressed against the side of the handle to help guide and steady it (Fig. 657).
Having placed the saw just at the outside edge of the line and on the farther side of the piece, seize the wood with the left hand and hold the thumb against the blade {above the teeth) to help start the cut in the right place (Fig. 658). Aside from the danger of the saw jumping and damaging the wood unless guided by the thumb, it is liable to cut your left hand.
You can make a little notch with the knife or chisel on the outside of the line, to help start the saw, in the case of nice work, if you wish. Cut straight in just on the line and then make a sloping cut to meet this from outside the line (Fig. 659). First draw the saw gently backwards, guiding it by the thumb, with as little pressure on the wood as possible until you see that the cut is started right, then push it gently forward, and after a few easy strokes in this way to get the cut started right, keep on with long, steady strokes, but not long enough so that the end of the saw enters the kerf, lest it catch and the saw buckle. The saw should cut most on the downward motion, not on the up stroke.
With a sharp saw, there is nothing gained by bearing down heavily on the teeth, which may spring the saw and make crooked work. Rather let the saw run of itself with an easy, light stroke, guiding it carefully, and not letting it press on the wood on the up stroke. The more hastily and furiously you saw the poorer the result will probably be. When you begin to run off the line, as you will be pretty sure to do, twist the saw a little with the wrist as you go on, which will bring it back to the line, because of the kerf being wider than the thickness of the saw-blade.
Beginners are apt to bend the saw over to one side. You can tell whether it is cutting at right angles with the face of the board by testing with the try-square as shown in Fig. 660. Such a test as this is, however, too inconvenient for ordinary practical work and you should learn as quickly as you can to hold the saw-blade correctly.

Fig. 659.

Fig. 660.
At the end of the cut, as at the beginning, saw gently with quick, light strokes, and hold the piece which is being cut off with the left hand, lest it break off and splinter oneof the twopieces.
If the saw " binds " or does not work easily, you can for your rougher work put a little tallow, butter, lard, or lubricating oil on the blade, but beware of doing this for your nice work, or it will deface it when done. If the binding is caused by the springing together of the wood (Fig. 695) the crack should be wedged open.
Do not get into the habit of sawing a little way outside of the line and then trimming off the superfluous wood with your knife or a chisel. That is not a good way to learn to saw by a line. Try your best to make the cut where it should be (even if you do make mistakes for a good while) and thus get into the habit of doing it right without having to rely on any other tool than the saw.
Many pieces of wood can better be screwed in the vise for sawing instead of being laid on the horses, and this position is often preferable. In this case you grasp the wood with the left hand and use the saw as already described. (See Sharpening).
Continue to:
My Books

