Windmills
Description
This section is from the book "Woodworking For Beginners: A Manual for Amateurs", by Charles G. Wheeler. Also available from Amazon: Woodworking For Beginners.
Windmills
These are made in a great variety of forms. A few patterns which can be readily constructed of wood are given below. Bear in mind to make them strong, as they are under very great strain in a violent wind, and, also, that the larger they are the stronger they must be; for little models, you know, are much stronger in proportion than large structures made after the same designs. Dimensions are given merely to help illustrate the principles of construction. The windmills will work just as well if made larger or smaller, within any reasonable limits. They should be made of straight-grained white pine, whitewood, or some wood easy to work.1 fig. 148.
Before beginning work read carefully Marking, Rule, Square, Saw, Knife, and Paring, and look up any other references. In case of using heavy stock, see also Drawknife, Spokeshave, and
Plane. To make a very simple form (Fig. 149), take two sticks, say 8" x 1" x 1", and halve or notch (see Halving) each piece at the centre (Fig. 150), so that when put together they will form a cross with arms of equal length. Bore a hole through both pieces at the centre to loosely fit the pin upon which the vanes are to turn (see Boring). Upon the ends of each stick mark diagonal lines (Fig. 150) slanting in opposite directions, or so that, if you revolve the cross edgeways and look in turn upon each of the four ends, the lines will all slant the same way. This is essential, for the next operation is to shave each of the sticks down towards these lines until perhaps 1/8" thick (Fig. 150), and you can readily see that if these vanes are not turned the same way the windmill will not revolve. When this shaping is done fasten the sticks together with brads (see Nailing). The remaining part is very simple (Fig. 151), perhaps 1' long and 1/2" thick, with the broad vane made thin, as the only object of this is to act as a weather-vane to keep the windmill headed toward the wind, and if made thick and heavy the whole affair will not balance well.
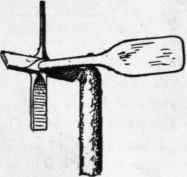
Fig. 149.
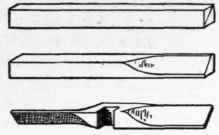
Fig. 150.
1 You can attach your windmill to a building or set it up on a pole, or you can easily make a small trestle-work tower, built of small sticks, on the top of which you can place the windmill, with a small keg (to represent a hogshead or tank), and thus have a very good imitation of the large mills used for pumping water. Small windmills, if you wish to go further into the subject than comes within the scope of this book, can be used to do any light or "play" work by having them turn a bent shaft (or any eccentric movement), connecting with a piston-rod or revolving drum ; or various other attachments can be applied, according to your ingenuity.
The revolving cross you can now fasten with a nail or screw upon the end of the part last made (Fig. 151) so that it will revolve freely. Find the point at which the whole windmill will balance over your finger or a stick, and bore a vertical hole through the horizontal stick at this point. Through this hole loosely screw or nail the windmill on the end of a stick, slightly rounded to prevent friction (Fig. 151). Sandpaper the whole with rather fine sandpaper (see Sandpaper).
You can paint in one or more colours, if you wish (see Painting). The vanes can be painted in light and dark bands crossways, causing an appearance, when revolving, of concentric rings (like a target). By having two axles or spindles (Fig. 152) two sets of vanes can revolve at once, and, by slanting the vanes of the two sets in opposite ways, the two will revolve in contrary directions.
The weather-vane can be made of two pieces (Fig. 153).
A more elaborate affair (Fig. 154) is made on similar principles, but requires more care. The construction is obvious. Before beginning work read carefully Marking, Rule, Square, Saw,
Plane, Knife, Spokeshave, Draws have, Hounding Sticks, and look up any other references. The general dimensions of the one illustrated are: length of main frame (in which spindle turns) 9", height of one end 41/2", height of the other end 2 1/2"; length of weather-vane (from main frame) 10", width at end 4 1/2"; length of revolving fans 1', width at ends 2". The spindle is held in the main frame on a slant (Fig. 155) to lessen any tendency to slip out, so the hole through which it passes should have a corresponding slant (see Boring). The revolving fans or vanes are reduced to round pins at the small ends and fitted tightly into holes bored in the head of the spindle, all the vanes being turned to have the same slant. Care will be required to bore these holes so that the vanes will be equidistant and revolve in the same line.
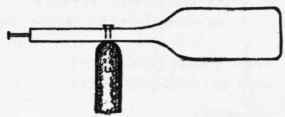
Fig. 151.
Fig. 152.
Fig. 153.
The weather-vane is set in a slanting groove cut in the bottom of the main frame (Fig. 155), and fastened with a couple of nails or screws. You can cut this groove by making two saw-kerfs and paring out the wood between with a chisel. The bent nail or wire shown on the top of the spindle in Fig. 154 is to keep the latter from jumping out of the frame from a sudden change of wind. The vanes should all be shaved down until they are quite thin at the ends.
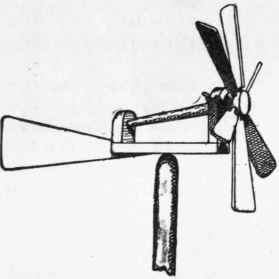
Fig. 154.
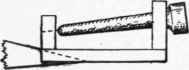
Fig. 155.
Set up and finish this windmill like the one just described.
A form which is good practice in whittling, and upon which you can also exercise your artistic faculties, is the " Happy Jack " shown in Fig. 156. Before beginning work read carefully Marking, Rule, Square, Saw, Knife, Rasp, and File, and look up any other references. Fourteen inches is a good height for the figure itself. The outline of body and head can be sawed from a 3/4" board and the edges trimmed and rounded and the details cut with a knife, or rasp and file can be used for the edges. The arms are made of separate pieces. Bore holes in the outer ends of the arms to hold the paddles (see Boring). Also bore holes lengthways into the arms, from the ends next the body, and into these holes tightly drive the ends of a stiff metal rod long enough to also pass through the body at the shoulders (Fig. 156). Before actually driving this rod into both arms you must bore the hole through the body. The holes in the arms should be smaller than the rod, so that it may drive in tightly without danger of getting loose, but the hole in the body must be larger than the rod, that the latter may revolve easily in it. Bore in from the centre of each shoulder as carefully as you can, until the holes meet, rather than attempt to bore clear through from one side, Put in the rod and drive on the arms, but not quite up to the shoulders. In driving on the arms be sure to keep the holes for the paddles in the right positions, so that the paddles will be in line as shown - that is, so that when one points directly upwards the other will point directly downwards. Also bore a hole upwards between the legs for the rod upon which the figure turns, and screw or nail a piece of metal (Fig. 157), with a hole for this rod, on the bottom of the legs (Fig. 156). Fig. 158 shows a way to put on the hat. The paddles can be made from a shingle, which will save the labour of tapering the thickness towards the ends. The paddles must be set obliquely, or turned part way around, as in the case of any windmill. When set at the proper angles the man will spin around while the paddles are revolving. Sandpaper the whole (see Sandpaper), and paint in various colours (see Painting).
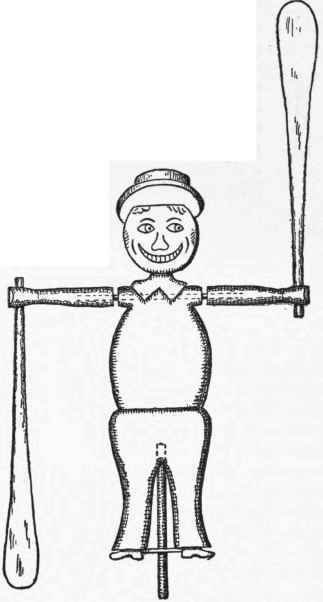
Fig. 156.
A set of boats to sail around in a circle is not hard to make (Fig. 159). Before beginning work read carefully Marking, Rule, Square, Saw, and look up any other references.
Take two sticks from 2' to 4' in length, and from 3/4" to 1 1/4" square, of any fairly strong wood. Halve these sticks at the middle (see Halving) and fasten them together in the form of a cross, strengthening the joint (weakened by the halving) by nailing or screwing on a piece of board above or below, as shown in Fig. 159. The boats can be whittled from a piece of board on edge and fastened to the ends of the sticks by halving (Fig. 160), as well as nails or screws, or they can simply be flat pices of board shaped as in Fig. 161 and screwed or nailed on top of the sticks.
Fig. 157.
Fig. 158.
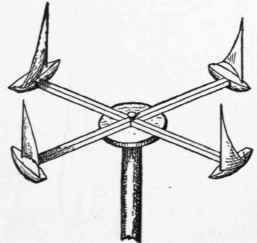
Fig. 159,
In the first case the halving had best be done before the sticks are fastened together. One mast with a simple leg-of-mutton sail will answer for each boat. A little experimenting will show you how much to haul in the sheet. Each boat must, of course, "come about" and "jibe" once in every rotation of the apparatus. Sandpaper with rather fine sandpaper (see Sandpaper), and paint as you wish (see Painting). The whole affair is balanced and pivoted on top of a pole in the same manner as the windmills just described, which see.
A steamer with screw propeller can be made from a piece of board on edge, shaped as shown in Fig. 162, a small windmill with short and broad fans (Fig. 163), serving for the screw. Before beginning work read carefully Marking, Rule, Square, Saw, Knife, Spoke shave, and look up any other references. This boat must be made of a board so as to give a thin section (Fig. 164), in order that the screw may not be shielded from the wind, for this vessel must always head to windward or the screw will not revolve. To ensure this the fore and aft sail must always be kept set and the sheet close-hauled. This sail answers the purpose of the weather-vanes of the windmills just described. It can be made of tin or any sheet metal, or even of thin wood. The rest of the rigging and the smokestack you can arrange as you wish. The bottom of the rudder can be supported by a little strip extending aft from the keel. For the other details of the work, see the windmills already described.

Fig. 160.

Fig. 161.
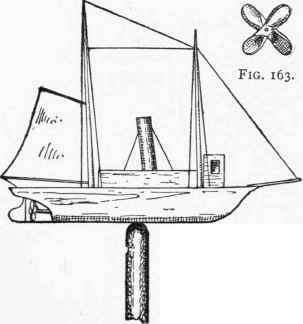
Fig. 162

Fig. 164.
Continue to:
My Books

