


Mitered Half-Lap Joint
Description
This section is from the book "Shop Projects Based On Community Problems", by Myron G. Burton. Also available from Amazon: Shop Projects Based on Community Problems.
Mitered Half-Lap Joint
Paragraph 65. The mitered half-lap joint is not used as commonly as the half-lap or mitered joint. However, it is sometimes desirable where the face of the work should show the appearance of a mitered joint, and a little more strength is desired than can be secured with the plain miter. This joint consists in half the thickness of the material being made into a miter joint while the remaining portion is cut to form a half lap.
This joint may be used in making window frames, small panel doors and almost any other sort of rectangular frame construction. It is sometimes used in picture frame construction, though not commonly, because the edge of the picture frame is in view and the half-lap joint would be rather unsightly. To lay out the half-lap joint be sure the material is exactly square. Piece A may be first cut in the miter box or laid out with the T-bevel and cut with the back saw at the regular miter cut (as shown in Paragraph 64). With the marking gauge set to one-half the thickness of the material, gauge the depth to which the lap is to be cut. At exactly the point where the inside of the miter starts square a line across one face of the material A. With a try-square, square this line down to the gauge line. With the back saw carefully saw out as indicated by the line just described. With a keen chisel smooth this work. Lay this joint in position on piece of material B and, with the sharp point of a knife, mark the point where the miter is to start. With the T-bevel lay out this miter. Square these lines down on both edges. With the marking gauge set exactly as it was when piece A was laid out, gauge the depth which is to be cut away in material B. Saw this miter down to the gauge line. (Notice that in this case you do not saw more than one-half way through.) Saw out this triangular piece as already laid out. Smooth with a keen chisel. If properly executed these two pieces of material should fit perfectly at a right angle. Assemble with glue and brads or as the nature of the work may demand.
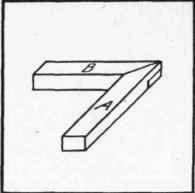
Figure 50.
Continue to:


My Books

