Lesson XV. To Make A Bevelled Box Or Card-Receiver
Description
This section is from the book "Elementary Woodwork", by George B. Kilbon. Also available from Amazon: Elementary woodwork.
Lesson XV. To Make A Bevelled Box Or Card-Receiver
IN this lesson, we will treat of surfaces which are bevelled with respect to each other, and for a project make a box with bevelled sides.
Problem I. The Bevelled Joint
Fig. 179 is two views, a plan and elevation of the joint to be made. Fig. 180 is a perspective view.

Fig. 179.

Fig. 180.
Draw the plan and elevation full size, and the slant height
B C will be found to be 3 3/16 in.
According to instructions given in Lessons VII. and VIII., finish a board 10 in. X 3 3/16 in. X 7/8 in.
On a waste board having a true edge, E B, Fig. 181, draw the line A D square with the edge, make the distances A C = 3 in., A B = 1 in., and draw the line B C, which will = 3 3/16 in.

Fig. 181.

Fig. 182.
Set the bevel to this line, as in Fig. 182, and plane one edge of the 10 in. X 3 3/16 in. board to fit the bevel so set. The work will appear as in the outlines of Fig. 183, which shows two views of it.
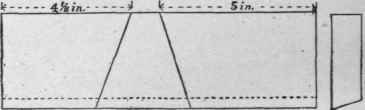
Fig. 183.
On the waste board, Fig. 181, make a second standard angle by making A E = 1 in. and A F = 3 3/16 in., and drawing E F. Set the bevel to this second standard angle, use it to draw the two bevelled lines shown in Fig. 183, continue these lines square across the bevelled edge of the work, use the bevel on the back side of the work, and finish by drawing such lines as are required, having a direction of their own on the squared edge. Saw near to the lines, plane exactly to them, and Fig. 183 will appear as Fig. 184.

Fig. 184.
Brad-awl three holes in the longer piece L, giving them a direction parallel to the bevelled end and edge, and, using 2 in. No. 13 steel-wire finish nails, nail it to the shorter piece S. Cut away the small portion of L that now stands above the plane of the upper edge of S, and the work will appear as in Fig. 180.
Fold a small piece of No. 1/2 sand-paper over a small block, and sand the work, being careful not to disturb the corners. Apply a coat of clean, thin shellac, using a camel's-hair brush about 1 1/4 in. wide. Let it dry an hour or more, sand off all roughness, and apply a second coat of shellac.

Fig. 185.
Continue to:
My Books

