Fig. 10. Table Mat
Description
This section is from the "Handbook In Woodwork And Carpentry" book, by Charles A. King. Also available from Amazon: Handbook in woodwork and carpentry.
Fig. 10. Table Mat
New subjects: Frame saw. Compass saw. Direction of grain to obtain maximum strength. Different forms of bitbraces. Wood: Poplar, or oak.
Preparatory.
A. Make working drawing.
B. Cut piece about V' larger each way than required dimensions Exercises.
1. A. Locate the center by diagonals, without planing the edges.
B. Draw circle of required diameter.
C. Before sawing, space off on the diagonals the centers of the holes as indicated.
2. A. Place piece in vise to prevent splitting while boring holes. See
Ex. 6, Fig. 2. Be sure that sufficient pressure is not exerted to split the piece by buckling. B. Bore the holes as indicated. (If the line of centers of those holes is parallel with the grain, the piece will be apt to split.)
3. With the compass
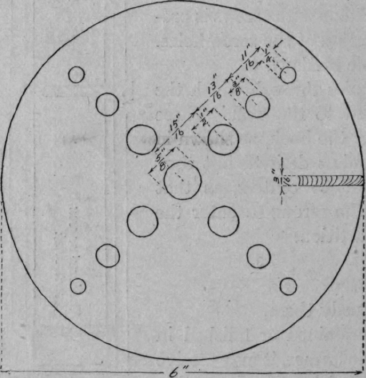
Fig 10 saw, or preferably with the frame saw, cut the circle, about 1/8" outside of the line. Place the piece in the vise, the flat surfaces parallel with the vise jaws, the grain running at angle of about 45° with the surface of the bench. This will minimize the danger of splitting while sawing, which will be almost certain to happen if the grain is parallel with the bench top. If the grain stands vertically, the same result will be attained. The saw must run very lightly, or the piece will be apt to split, regardless of all precautions. 4. Finish edge to exact dimensions by spokeshave and wood file. Be sure that the contour of a perfect circle is maintained.
5. Smooth both sides with jack plane. The model will be found a somewhat awkward shape to hold ; to make neat work possible, a form may be made by making two pins somewhat smaller than the outside hole, and setting them in a piece of scrap wood large enough to support the entire model in such a way that two of the holes will fit over them. Allow the pins to project above the scrap piece a little less than the thickness of the model. Place the model over these pins, and plane both sides in the usual way.
6. Sandpaper both sides and edges. Maintain correct corners.
7. Inspect for defects and remedy them.
8. Stain and finish to taste.
Continue to:
My Books

