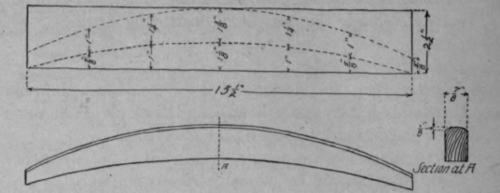
Fig. 18. Coat Hanger
Description
This section is from the "Handbook In Woodwork And Carpentry" book, by Charles A. King. Also available from Amazon: Handbook in woodwork and carpentry.
Fig. 18. Coat Hanger
See C, Topic 82.
New subject: Laying out curves by points.
Wood: Poplar.
Preparatory: Same as in Fig. 1.
Exercises.
1. Same as Exs. 1, 2 of Fig. 1 and Exs. 3, 4 of Fig. 5.
2. A. Lay out points as indicated, by intersection of lines.
B. Draw curve; with elbow resting on bench and forearm as radius, a pencil held in the fingers will approximate the correct curve.
3. With compass, or with frame saw, cut to curved lines, allowing about 1/8" for working. Keep the saw square with the face of the piece, and use the try-square frequently to insure accuracy.
4. With spokeshave, make inside of curve true and square with sides.
5. With spokeshave, round the top to given dimensions ; be sure that the corners of the curved edges are clean and sharp, and that no lumps are visible.
6. Plane the sides, and sandpaper the model all around. In this lies a fruitful source of trouble, as the majority of the students
will round the corners, thus destroying the character and the grace of the curves.
7. Inspect for defects.
8. Finish in the natural wood, with two coats of shellac rubbed in oil. (The teacher should guard against the tendency to make the model too small, which is more apparent in this than in many other models.)
•
Continue to:
My Books

