Fig. 36. Letter Box
Description
This section is from the "Handbook In Woodwork And Carpentry" book, by Charles A. King. Also available from Amazon: Handbook in woodwork and carpentry.
Fig. 36. Letter Box
New subjects: Cutting in hinges. Hinges.
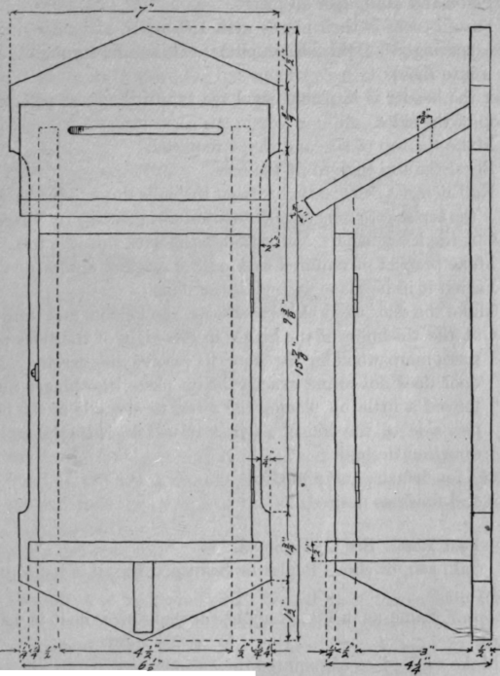
fig36
Wood: Poplar, or oak.
Preparatory: Same as in Fig. 1, applied to all pieces. Make stock list. Exercises.
1. Make all pieces of the required shape and size. Original designs preferred.
Do not bevel the top of the header, or the piece which is above the door.
2. A. Plane and sandpaper all pieces.
B. Fasten them in their places with 1 1/2" brads, and with glue used sparingly. Hold sides in place while nailing through the back into them.
3. After the header is in place, bevel the top to the same pitch as the top of the sides.
4. A. Make the top of size and shape required.
B. Bevel the top edge to fit the back.
C. Nail it in its place. Be sure that the nails through the back into the top are not long enough to interfere in cutting the letter hole.
D. Cut the letter hole. Nail through the back into the top.
5. A. Make bracket of required size, and of original design. B. Fasten it in its place with glue and nails.
G. A. Make the door to fit closely between the bottom and header. B. Cut the thickness of the hinges in the edges of the sides. This gives more wood in the door to receive the screws. If the door does not swing exactly in its place, the hinges may be moved a little by placing the screw to one side of the hole in one side of the hinge, so that it will push the hinge in the direction desired.
7. Inspect for defects, and remedy.
8. Stain and finish as desired.
Continue to:
My Books

