


Chapter VII. Mortising And Tenoning
Description
This section is from the book "Our Workshop", by Anonymous. Also available from Amazon: Our Workshop.
Chapter VII. Mortising And Tenoning
THE ordinary and simplest form of mortise and tenon is shown in fig. 79. We have already observed that the tenon must not be less than one-third the thickness of the scantling, or it will be weaker than the shoulders or sides of the mortise. On the other hand, the tenon must never exceed one-half the thickness of the "stuff," and this proportion can be allowed only when the mortise occurs at some distance from the ends of the material, the risk of splitting the work being then greatly diminished.
When the pieces to be united are of considerable thickness, or the scantling is square in section, it is better to make two small tenons instead of one of large size. This subdivision imparts much more stiffness to the framing, and enables it to withstand a raching or side strain much longer than it could otherwise have done. The extremity on which the tenons are to be formed, must be divided into five equal parts, and the central and two exterior portions, or cheeks, removed by the tenon saw, thus leaving two tenons and three shoulders, as in fig. 78. The outside "cheeks" can be separated entirely by the saw, which may be applied with equal facility to both shoulders and sides, but the shoulder or root of the central portion must be wrought by a mortising chisel, or a hole may be bored, the diameter of which must not, however, exceed the thickness of the wood to be removed, and if the hole be made a trifle above the line of the shoulders, the square corners may afterwards be cut with a chisel.
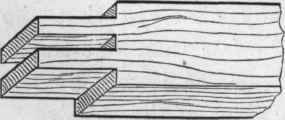
Fig. 78.
The practical application of mortising and tenoning may be better understood if we consider the construction of a simple rectangular frame such as fig. 79. The long pieces, A B, C D, are called the styles, and the cross bars, A C,B D, which are usually shorter, are named the rails. No invariable rule can be given for the proportions of the several parts of the framing, as its strength must be regulated in a great measure by the character of the work, and the purpose for which it is intended. In joining, the styles and rails vary from about one-fourth to one-fifth of the internal width of the frame; but in cabinet-making, less strength being required, one-sixth is the most usual proportion. The thickness of a style varies from one-third to one-half of its width, but the joiner is guided more by the size of the work, the nature of the material, and his own experience, than by any actual rule.

Fig. 79.
Having determined upon the size of the frame and the material of which to construct it, the styles and rails must next be cut out with the hand-saw, being careful to allow something for planing up, and also a little excess in the length of the pieces for trimming off after the frame is united. If the frame be small, the "stuff" should be planed up as one piece, and afterwards cut into the required lengths. Sometimes it may be difficult to procure wood long enough to do this; but perhaps two pieces can be found from which either a pair of styles or a pair of rails may be cut, or one style and rail from each piece. Before cutting off the lengths, one side of the stuff must be marked by a pencil from end to end, to enable us to distinguish it from the other after the wood has been divided.
The internal dimensions of the frame must be marked on each of the four portions, the length on the styles and the width on the rails. Great care must be taken to make the lines correspond exactly on the respective pieces, as any want of truth will mislead us when cutting the mortises and tenons; the frame, also, when put together, would be crooked. This contingency may be avoided by laying the styles side by side on the bench, and scribing the lines across them both with a square and scriber. The lines should be equidistant from the ends of the styles, as both extremities require a little allowance for finally trimming off. The length of the frame being thus marked on one side, the styles must be taken separately, and marked on the remaining sides, or all round, by the aid of the square and scriber. The rails must be subjected to similar treatment.
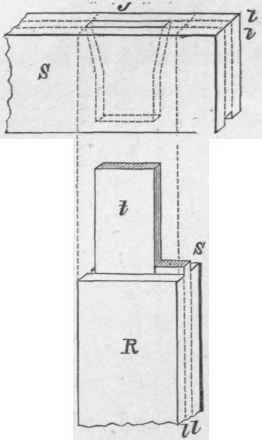
Fig. 80.
The mortises and tenons must now be marked out and worked. Fig. 80 is an enlarged view of the mortise and tenon, the former being made in the style S, while the latter is formed on the rail R. The thickness of the tenon should not exceed one-third of that of the rail; but a little latitude may be allowed in this, and the mortise-chisel which is nearest to the required thickness may be selected.
The mortise-gauge (fig. 81) is provided with two points, which may be adjusted to the required width of the mortise. The chisel chosen for the work may be lightly stuck into the edges of the styles and rails to mark its own thickness, to which the gauge can be then readily set. The common marking-gauge may be employed, but it must be adjusted twice, as the gauge must be applied only to the "face" side of the work, which was marked previously to cutting off the four pieces. These lines, shown at l, I, fig. 80, must be marked on both the edges and across the ends of the four members of the frame.

Fig. 81.
It is evident that the tenons must be narrower than the rails, otherwise they would break through the extremities of the styles when the ends of the latter are trimmed off. By inspecting fig. 80 it will be seen that the tenon t is cut back from both the edges of the rail R, but much more from the outer than from the inner edge. It is not, however, cut off close to the shoulder on the outer edge, but is allowed to stand up about half an inch, as shown at S. The amount, however, is regulated by the size of the work or some peculiarity in it.
Continue to:


My Books

