


Hardwood Carving. Continued
Description
This section is from the book "Wood-Carving. Design And Workmanship", by George Jack. Also available from Amazon: Wood-Carving (Design and Workmanship).
Hardwood Carving. Continued
In small pieces of furniture like these, which are made of comparatively thin wood, the carving need not have much depth, say the ground is sunk 1/4 in. at the deepest. As oak is more tenacious than pine, you will find greater freedom in working it, although it is so much harder to cut. You may find it necessary to use the mallet for the greater part of the blocking out, but it need not be much used in finishing. A series of short strokes driven by gentle taps of the mallet will often make a better curve than if the same is attempted without its aid.
It will be well now to procure the remainder of the set of twenty-four tools if you have not already got them, as they will be required for the foliage we are about to attempt. The deep gouges are especially useful: having two different sweeps on each tool, they adapt themselves to hollows which change in section as they advance.
Fig. 32 contains very little foliage, such as there is being disposed in small diamond-shaped spaces, sunk in the face of the doors, and a small piece on the bracket below. All this work should be of a very simple character, definite in form and broad in treatment.
 Fig. 32. Half, Fig. 33. Half
Fig. 33 is more elaborate, but on much the same lines of design varied by having a larger space filled with groups of leaves. Fig. 34 gives the carving to a larger scale; in it the oak-leaves are shown with raised veins in the center, the others being merely indicated by the gouge hollows. There is some attempt in this at a more natural mode of treating the foliage. While such work is being carved, it is well to look now and then at the natural forms themselves (oak and laurel in this case) in order to note their characteristic features, and as a wholesome check on the dangers of mannerism.
It is a general axiom founded upon the evidence of past work, and a respect for the laws of construction in the carpenter's department, that when foliage appears in panels divided by plain spaces, it should never be made to look as if it grewfrom one panel into the other, with the suggestion of boughs passing behind the solid parts. This is a characteristic of Japanese work, and may, perhaps, be admirable when used in delicate painted decorations on a screen or other light furniture, but in carvings it disturbs the effect of solidity in the material, and serves no purpose which can not be attained in a much better way.
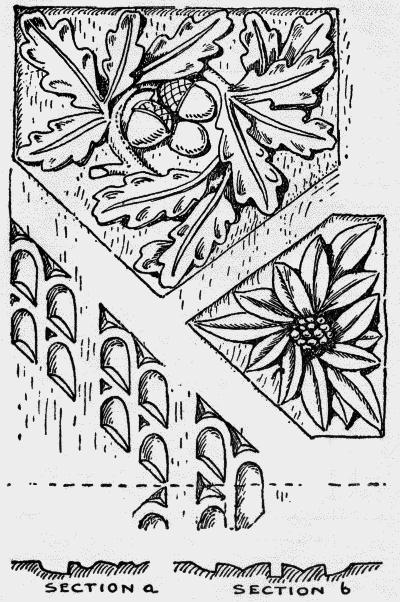 CARVING IN PANELS OF FIG 33 Fig. 34.
Expedients have been invented to overcome the difficulty of making a fresh start in each panel, one of which is shown in Fig. 34, where the beginning of the bough is hidden under a leaf. It is presumable that the boughmaygo on behind the uncarved portions of the board to reappear in another place, but we need not insist upon the fancy, which loses all its power when attention is called to it, like riddles when the answer is known.
 Fig. 35., Fig. 36
In Fig. 35, like the last, the treatment is somewhat realistic. This is shown to a larger scale in Fig. 38. Nevertheless, it has all been "arranged" to fit its allotted space, and all accidental elements eliminated; such, for instance, as leaves disappearing in violent perspective, or even turned sidewise, and all minute details which would not be likely to show conspicuously if carved in wood. In Fig. 39, (a) is an outline of a group of vine-leaves taken from nature, as it appeared, and in which state it is quite unfitted for carving, on account of its complicated perspective and want of definite outline; Fig. 39 (b) is a detail also copied from nature, but which might stand without alteration provided it formed part of a work delicate enough to note such close elaboration in so small a space. This, of course, would entirely depend upon the purpose for which the carving was intended, and whether it was meant for distant view or close inspection. As there is arrangement necessary in forming the outline, so there is just as much required in designing the articulation of the surfaces of the leaves, which should be so treated that their hollows fall into a semblance of some kind of pattern. Fig. 36 is a more formal design, or, to use a very much abused word, more "conventional," in which such leafage as there is only serves the purpose of ornamental points, marking the divisions of the general design. The gouge work upon the leaves should be of the simplest description, but strict attention is necessary in drawing the grooves, so that their forms may be clear and emphatic, leaving no doubt as to the pattern intended. Designs of this kind have no interest whatever except as pieces of patterned work, to which end every other consideration should be sacrificed. It must not be cut too deep - say 1/4 in. at the deepest - and the sides of the panels should be very gently hollowed out with a flattish sweep (see section on Fig. 37) in order to avoid any appearance of actual construction in what more or less imitates the stiles and rails of a door. Fig. 37 shows a portion of the leafage to a larger scale, and also a plan explaining the construction of all these cupboards.
 Fig. 37.
 Fig. 38.
 Fig. 39 (a).
Fig. 40 is designed upon the barest suggestion of natural foliage, the wavy stem being quite flat, and running out flush into the flat margins at the sides, connecting them together. The leaves in this case should be carved, leaving the veins standing solid; grooved veins would have a meager look upon such rudimentary leaves. Of course a more natural treatment may be given to this kind of design, but in that case it would require to be carried all over the door, and replace the formally ornamental center panel. The pierced pattern in cresting should be done as already described for Fig. 24.
 Fig. 39 (b).
 Fig. 40., Fig. 41.
Fig. 41 is a variant on the last design. In this case a little more play of surface is attempted, making a point of carving the side lobes of the leaves into little rounded masses which will reflect points of light. This is shown better on Fig. 42.
 Fig. 42.
 Fig. 43.
In carving foliage like that of the vine, where small dark holes or eyes occur, enough wood should be left round them to form deep dark little pits. They are very valuable as points of shadow. In doing this, cut the rim all round with a very slight bevel as in section, Fig. 43. Whenever leaves run out to a fine edge they also should have a small bevel like this in order to avoid an appearance of weakness which acute edges always present. As a general rule leave as much wood as possible about the edges of leaves as you want shadow from them - dipping them only where you are sure the variety will be effective. In the execution of bunches of rounded forms like grapes there is no special mechanical expedient for doing them quickly and easily; each must be cut out separately, and carved with whatever tools come handiest to their shape and size. It is a good way to begin by cutting triangular holes between the grapes with the point of a small chisel (see Fig. 44), after which the rough shapes left may gradually be formed into ovals. When the work is very simple in character, and does not require a realistic treatment, the grapes may be done in a more methodical way, as in Fig. 45. First cut grooves across both ways with a V tool, dividing the grapes as ata a, then with a gouge turned hollow down round each line of grapes into rolls as atb b. Do this both ways, and afterward finish the form as best you can.
 Fig. 44.
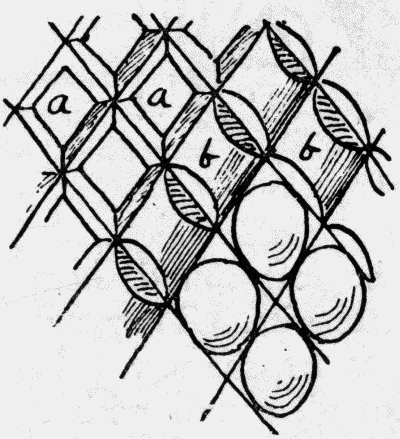 Fig. 45.
Continue to:


My Books

