


Drills and Drilling. Sharpening Twist Drills
Description
This section is from the book "Workshop Receipts For Manufacturers And Scientific Amateurs. Supplement Aluminium To Wireless", by The Chemical Publishing Co.. Also available from Amazon: Workshop Receipts For Manufacturers And Scientific Amateurs.
Drills and Drilling. Sharpening Twist Drills
The correct sharpening of twist drills, in the absence of a special machine, is very seldom attained, but if the following details be considered, and the suggested method adopted, no trouble should be found in easily getting twist drills to cut freely and truly. Now a new twist drill will be found to have an angle of 59 degrees on the cutting edge when viewed as shown in Fig. 60.
If a drill be either ground, or softened and filed straight across at right angles to its length, it will show a section as Fig. 61, A being the cutting edges, which show as curves, but if the drill be ground or filed to give the above mentioned angle of 59 degrees, then the section becomes as Fig. 62, the cutting edges now showing as straight lines, while if the drill be further ground or filed to decrease the angle of 59 degrees considerably, then the section becomes as Fig. 63, and the cutting edges now show as curved lines running the reverse way to those shown in Fig. 61.
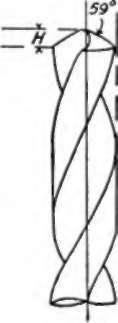
Fig. 60.
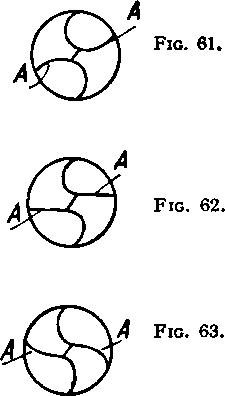
It is found that straight edges as in Fig. 62 are best, and therefore should be worked for. A hand or power-driven grindstone should be used, this will generally be so mounted that a line can be chalked or marked on the bench, etc., by its side, this line should be at an angle of 59 degrees to the side of the grinding wheel as shown in Fig. 64. The operation now is to so grind the drill that the cutting edges will have the desired angle of 59 degrees, be equal one with the other on opposite sides of the drill, and have the necessary clearance given to the cutting edges. It will be found a great convenience to fix a drill or tap holder on to the drill in such a position that the centre line of the holder comes in line with the cutting edges of the drill, so that when the drill is held horizontally the drill holder is vertical, also the cutting edges of the drill are vertical one above the other, see Fig. 65, which shows A as the cutting edge, and the drill holder, any form of drill holder will do that can be made to hold the drill firmly during the operation. The drill is now held against the rotating grindstone, etc., at the side thereof, and held at an angle about 10 degrees less than the marked angle of 59 degrees on the bench. The drill is then rotated (starting with the holder being vertical) in a counterclock direction until the holder is nearly horizontal, and at the same time the starting angle at which grinding commenced is gradually increased until when the drill holder is nearly horizontal the angle between the drill and the grindstone has increased to 59 degrees, and so the centre line of the drill lies over the marked line on the bench.
The above operation will result in the cutting edges being at the angle of 59 degrees, will give also the necessary cutting clearance, and will also give straight cutting edges.
The drill should be held horizontally during the whole operation. It is, of course, possible to carry out the above directions and still get the two cutting edges unequal in length; this can be avoided either by inspection of the two edges, or by measurement of the distance H, see Fig. 60, on both sides of the drill. The length of the back edges will be more than that of the front cutting edges when the above operation is completed, and this shows that the cutting clearance has been given.
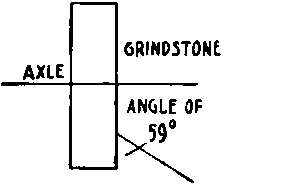
Fig. 64.
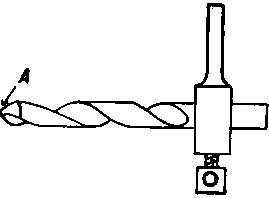
Fig. 65.
In twist drills it is important that the angle of the point should be correct, and this should also be inspected after grinding. When twist drills become much shortened by grinding, the centre will be found to become gradually thicker, and it may be necessary to cut or grind away there, to bring the centre to the original thickness; this is not possible to perform properly without either a special grinding wheel, or else by softening, filing, and rehardening, and this latter is generally not worth the time and trouble, as the prices of good twist drills are now low enough to make it less costly to buy a new one.
It should be noted that the above directions apply only to a twist drill so made that it is rotated in a clockwise direction when in use, and when viewed from the back end, i.e., what is known as a right-hand drill. For grinding a left-hand drill, the drill should be held on the other side of the grindstone, and the drill rotation while grinding should be clockwise.
Recessing Or " Wobble " Drill
Very often a drilled hole has to be recessed out at the bottom, usually when the hole is to be tapped, so that a good thread hold is obtained the whole length of the hole, except for the small amount taken up by recess.
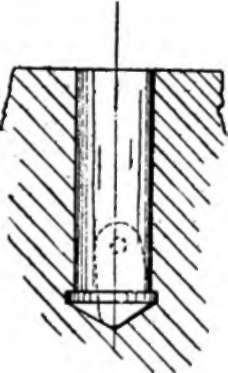
Fig. 66.
Such a hole is shown in Fig. 66. On the face of it, the operation of recessing out at the bottom of a small hole looks practically impossible, but as a matter of fact it is quite a simple operation with the tool about to be described, which may be called a recessing or wobble drill.
Such a drill is shown in Fig. 67, showing a front and side view. It consists of a bar of steel, a good sliding fit in the hole drilled, and has a slot milled in the end to take small piece of cutting steel shaped as shown in the sketch. This cutting tool is pinned in position and should be a fairly easy fit. It is important to note that the vertical axis of cutter is set eccentric to that of the drill or bar of steel. It is from this fact that the drill gets its name.
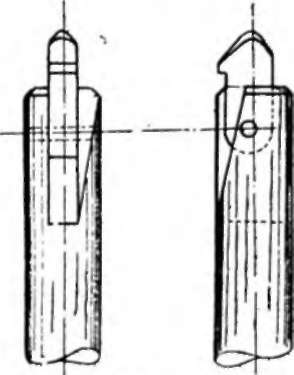
Fig. 67.
To cut the recess, first drill hole as usual. Then lower wobble drill into hole. As soon as the swinging cutter strikes the conical (120°) bottom it swings over by means of its contact, thus allowing other cutting edge to cut into cylindrical wall of hole and produce such a recess as shown in sketch. The bottom of cutter, while being shaped to fit the seating of drilled hole, should have the corner nicely rounded off to prevent it digging into bottom of hole.
Continue to:


My Books

