Construction In Cardboard. Third Year. Fourth School Year. Part 2
Description
This section is from the book "Raphia And Reed Weaving", by Elizabeth Sanborn Knapp. Also available from Amazon: Raphia and Reed Weaving.
Construction In Cardboard. Third Year. Fourth School Year. Part 2
Model VII. - Hat Box
Material. - Manilla paper; size, 6 in. x 6 in.
Laying the rulers along the edge of the paper, place dots at every one and one-half inch space. See Fig. 7. From these dots draw slanting connecting lines to the right and left. Draw these in either as dotted or light lines. Now make heavy all lines reaching from the outside edge to the first point of intersection, and cut to these lines, as shown in the drawing. Cut in on the diagonal lines at points A, B, C and D. The triangles thus formed are used for laps. The square touched on the corners by these triangles forms the bottom of the box. Crease on the lines around this square and turn the paper up to form the sides of the box. Now crease and fold over for the covers. An opening is made in two adjacent corners and through these the pointed end of the tongue is passed. This model requires no gluing.

Fig. 7.

Model VII. Hat Box.
Model VIII. - Tabourette I
Material. - Strawboard; size, 10 in. x 8 in.
From the upper and lower left corners measure off the vertical spaces (two inches each), and draw lines across; now add the one-half-inch space for the lap and cut to this line.
From the upper corners measure down one-half inch and draw a line across; this space forms the top lap. From this line measure down three inches, draw a line across and cut to this line. From the top edge measure down one and one-half inches and draw a light line across. This line is crossed by the vertical lines. Measure one inch to the right and left of the point of intersection and here place a dot. With a compass describe a circle one-half inch in diameter, using the dot as a center. From the lower left corner measure in one-half inch and place a dot. Measure one-half inch to the right and left of the lower ends of the vertical lines and here place dots. From these dots draw lines to the center of the corresponding circles and cut to these lines, and then cut out the remainder of the circle. Score all vertical lines, and score and turn to a right angle the one-half-inch space, first cutting in on the heavy lines. Glue to shape.

Fig. 8.
From the waste piece cut a square four inches by four inches. Draw a line one inch in from all edges. This line indicates the position of the framework. Glue the four-inch square to the top of the framework.

Model VIII. Tabourette I.
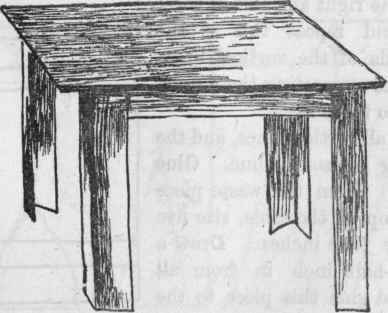
Model IX. Kitchen Table.
Model IX. - Kitchen Table
Material. - Straw board; size, 16 in. x 8 in.
From the upper and lower left corners measure off the vertical spaces, three, four, three and four inches, and again one-half inch. See Fig. 9. Draw lines across, and cut to the last line. From the upper corners measure down one-half inch and draw a line across. Cut in on the heavy lines above this horizontal one. From this line measure down three and one-half inches and draw a line across. Cut to this line.
From the horizontal line measure down one-half inch and draw a line across. Locate points A, B, C and D. Measure one-half inch to the right and left of these points, and repeat this at the lower ends of the vertical lines. Draw lines connecting these dots, and cut to these lines.
Score all vertical lines, and the remaining horizontal line. Glue to shape. From the waste piece cut the top of the table, size five inches by four inches. Draw a line one-half inch in from all edges, and glue this piece to the foundation.

Fig. 9.
Model X. - Tabourette II
Material. - Essex bristol; size, 8 in. x 8 in. From the upper corners measure down one-half inch and draw a line across. From this line measure down three inches, draw a line across and cut to this line. See Fig. 10.
From the upper and lower left corners measure to the right for the vertical spaces of one and one-half inch each, and the one space one-quarter inch wide. Draw lines and cut to the last line. From the horizontal line measure down one inch and draw a line across. Locate points A, B, C and D.
Measure three-fourths inch to the right and left of these points and here place a dot.
From the lower left corner measure to the right one-quarter inch and also measure one-quarter inch to the right and left of the lower end of each vertical line and place dots.


Fig. 10.
Draw lines from these dots to the dots at points 1, 2, 3 and 4.
Find the middle of these lines and draw a compound curve. Cut to these curved lines. Score all vertical lines, and also the line forming the edge of the top lap. Glue to shape. From the waste piece cut a circular top, four inches in diameter, and glue it to the framework.
Continue to:
My Books

