Raphia With Slats, Wire, Etc
Description
This section is from the book "Raphia And Reed Weaving", by Elizabeth Sanborn Knapp. Also available from Amazon: Raphia and Reed Weaving.
Raphia With Slats, Wire, Etc
Materials used. - Pith, raphia, slats, wire, long wire hairpins, and brass rings of various sizes. Tools, one pair of flat pliers, one pair of wire cutters, and a quantity of coarse darning needles.
Model I. - Mat
The slats used in this model are six inches long and one-half inch wide. Use four strips six inches, and one four inches in length. Place one above the other, with the shorter one inside, and fasten them together in the middle, using a slender brad or a large pin. This is to be removed when the mat is finished.
Now lay this foundation on the desk, and spread the rays equally apart. With the raphia weave over one, under one, until within one-half inch of the end of the slats, and finish the end by sewing it into the edge of the mat; notch the ends of the slats. A second one may be made by weaving the raphia to the ends of the slats, and then sewing the edge, as indicated at Fig. I. The ends of the slats are notched, and below this notch a hole is bored (see Fig. I.), through which the needle passes in sewing. Sew over and over, until the ends of the slats are covered.

Fig. 1.
Model II. - Book Marker
For the foundation use kindergarten "pasting slats." These are ten inches long and one-quarter inch wide. Use two strips, cutting one into three equal pieces, and crossing as indicated at Fig. 2.
With a strand of raphia, begin at 1 and weave over 1, under 2, over 3, under 4, over 5, under 6, over 7, and here change and pass under two slats (Nos. 8 and 1); pass under two each time around but always make this change one slat ahead of the last change, i. e., under 2 and 3, 4 and 5, etc.
This is necessary when using an even number of foundation rays. The work would be more simple if an uneven number were used, and these fastened together as in Model I. Finish off by notching the ends, and sewing the end of the raphia into the edge of the marker.
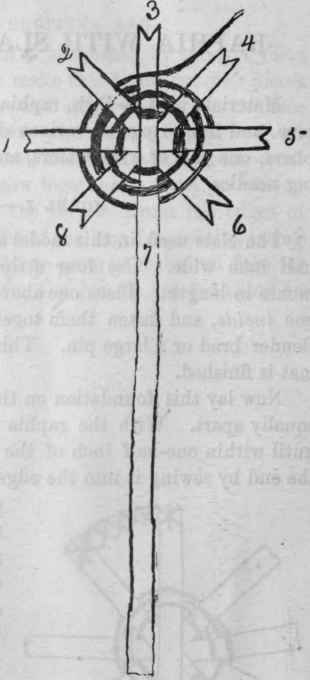
Fig. 2. Detail of Book Marker.
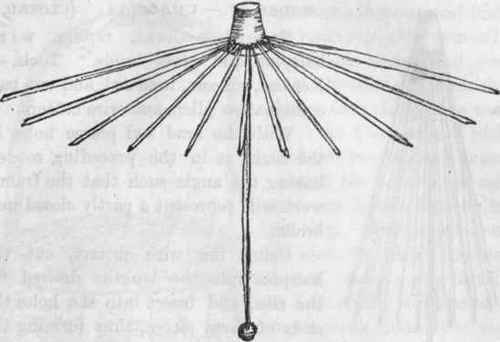
Fig. 3. Detail of Open Umbrella.
Model III. - Umbrella
Material. - Corks (one inch long, one-half inch in diameter); toothpicks, heads and raphia.
Tools.- Brad awl, scissors and needles.
Place the small end of the cork on the desk, and with a coarse brad awl pierce holes around it about one-fourth inch from the end, being careful to insert the brad awl at an angle outward.
Into these holes are placed wooden toothpicks; these are to form the ribs of the umbrella. It is now readily understood why the holes are to be at an angle. (So that the umbrella, when covered, will have the correct slope.) Cover this framework with strands of raphia, proceeding in the same manner as in raphia and wire mat. Fasten the end of the raphia by sewing it into the edge of the work and then slip a colored glass bead over the end of each rib. Insert another toothpick into the large end of the cork. This will form the handle. Slip a larger bead over the end of the handle to form the knob.

Fig. 4. Detail - Umbrella, Closed.
Model IV. - Umbrella. (Closed.)
Materials. - Corks, raphia, wire hairpins and glass beads. Tools. -Needles, scissors, brad awl, and one pair combination pliers and wire cutters.
With the brad awl pierce holes in the cork, as in the preceding model, having the angle such that the framework will represent a partly closed umbrella.
Using the wire cutters, cut the hairpins into the lengths desired for the ribs, and insert into the holes the ends of these pieces, thus forming the framework.
Now cover this foundation with raphia, as in the preceding model. Insert another length for the handle, and with the pliers, shape the end into a crook.
Model V. - Basket, With Handle
Use for the framework seven pieces of pith, one-quarter inch wide and eight inches long, and one piece five inches long.
Place a dot at the middle of each eight-inch piece, and one inch from the end of the five-inch piece; fasten all together at this dot, using a fine brad, half-inch, No. 20. Lay this framework on the desk, and spread the rays to equal distances. Draw a line across the width of each, one and one-half inches from the center. With a single strand of raphia, proceed to weave over one, under one, until the pencil lines are reached.
With a sharp knife score these lines lightly, and from this point turn up the rays for the sides. For the weaver, we now use a three-strand braid of raphia (tightly braided), and weave under and over until the sides are two inches deep; then fasten the end. Take two strips of pith, each one long enough to pass around the basket, one outside, one inside, allowing for the lap. Holding one end of each in place, proceed to sew, crossing the threads at each spoke, and also passing it along from ray to ray, as shown in the drawing. Use a darning needle, with a strand of raphia for the thread.

Fig. 5. Basket, with Handle.
For the handle, use a piece of pith, twelve inches long. Insert the ends well into the sides of the basket, and, winding a strip of raphia back and forth, cover the pith. Fasten the handle firmly into the sides of the basket by sewing the raphia across and through, as when binding the top.
Continue to:
My Books

