


Lantern For Enlarging Photographs
Description
This section is from the book "Cassell's Cyclopaedia Of Mechanics", by Paul N. Hasluck. Also available from Amazon: Cassell's Cyclopaedia Of Mechanics.
Lantern For Enlarging Photographs
An ordinary lantern for 3 1/4-in. slides could be used for enlarging negatives of that size or smaller, hut the condenser should always equal in diameter the diagonal of the plate. For vignettes, where only the centre of the negative need be evenly illuminated, a smaller condenser can be used. Artificial light enlargements, especially those made with a condenser, are always inferior to daylight enlargements, as the working up of the negative is always made more or less visible, and there is. besides, a certain amount of hardness and granularity apparent. The illustration shows a method of fitting up, the negative being projected on to the bromide paper in the same way as slides are shown. It is essential that the negative and bromide paper be exactly parallel. To ensure this, make a board A 40in. long, and screw down parallel rails on which an upright board 13in. by 11 in. may run. Screw a block 13 to fix the lantern also parallel and central. The distances between board and slide may be marked out in inches and fractions of an inch. An achromatic lens or one corrected for photography must be used, or the enlargements will always be fuzzy, even if the extension is corrected for the chemical rays. Use the full aperture of the lens, which may be about I-in. or 5-in. focus.
To enlarge from 2 in. to 12 in. by 10 in., the distances with a 4in. lens will be: From slide to lens stops, 4 2/3in.; from lens stops to bromide paper, 28in. Carefully centre the light after setting the distances, and insert the negative and focus sharply on the white board. Then cap the lens and pin up the bromide paper, and expose. Find the best exposure by first trying a small piece of paper. Cover the lantern lest extraneous light should reach the bromide paper. Develop, etc., as usual.
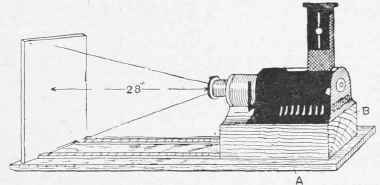
Lantern for Enlarging Photographs.
Continue to:


My Books

