How To Make Raffia Baskets
Description
This section is from "Every Woman's Encyclopaedia". Also available from Amazon: Every Woman's Encyclopaedia.
How To Make Raffia Baskets
Dyed Raffia - Raffia Baskets, and How to Make and Shape Them - Stitches Explained - Suitable
Linings
Making raffia baskets is both interesting and quick work, the materials required are few and inexpensive, and, given neatness and accuracy, the result is artistic and quaint. This form of raffia work also lends itself to the making of a variety of useful articles, such as wash hand-stand mats, tumbler holders for travelling, flower carriers, string baskets, etc. It is very durable, and by the use of dyed raffia, in conjunction with the natural coloured fibre, pleasing effects can be achieved.
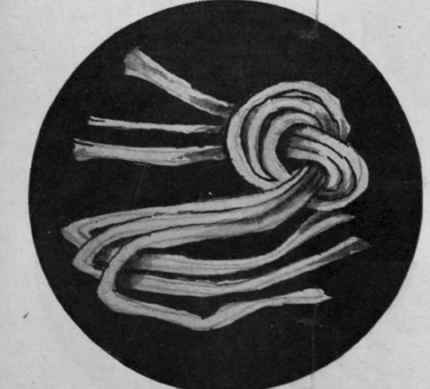
Fig. I. Three uniform strands of raffia are folded and knotted to form a foundation tail of six strands
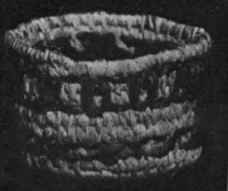
Small basket in raffia work with decoration of coloured strands
Raffia can be purchased in hanks ready dyed in a variety of colours at oilshops or kindergarten depots, or the dyeing can be done by the worker herself quite easily at home.
Directions for this process were given on page 2010, Vol. 3. For working, use a large darning needle, or a rug needle ; and to take away any stiffness of the raffia, it is advisable to slightly dampen it before using. Dyed raffia is genera'ly sufficiently pliable without this latter operation being necessary.
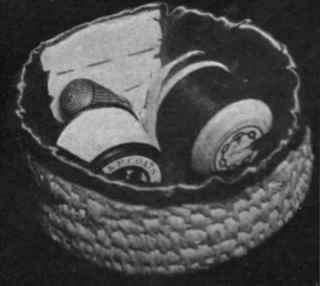
Raffia work-basket lined with silk and fitted to hold cotton and needles, etc
Take three or four long strands of raffia and, after folding them in the centre, make a small knot, as indicated in Fig. 1. The six strands now form the tail, to be worked over, which is gradually wound round.
Thread the needle with a strand of raffia, and then draw it through the knot, leaving a short end to be worked in with the tail. Work over the knot twice, and tighten it into a small hole : this forms the foundation.
When working the first round over the tail, take the needle twice under it, making two small stitches, then form a long stitch by securing the needle into the hole. See Fig 2.
When the tail is being worked over for the second and succeeding rows, take the long stitches into the edge of the first or previous round, as shown in Fig. 3.
Always keep the working strand smooth and even, and the basket will then be a good shape : this is done by pressing the bast with the nail. Hold the work firmly, and tighten each stitch as it is made. Avoid any pulling of the raffia, otherwise the result will be disappointing; and, instead of working outwardly, work inwardly - i.e., to the worker.
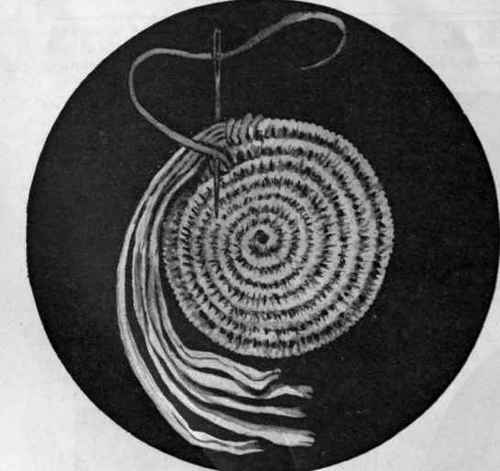
Fig. 3. In succeeding rows long stitches are taken into edge of previous round
Should the length of the tail not be sufficient to complete the size of the basket required, a new one can easily be joined by leaving a short end, and laying the new strand over it,
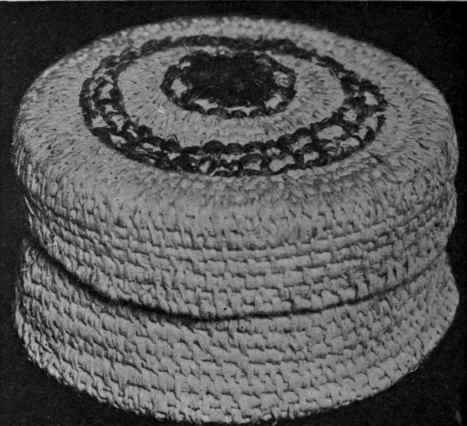
Raffia basket with cover. Decorated with a design in coloured raffia worked on the surface holding them in position, and working closely over them, as before.
To shape the basket, place it on a table, or on the knee, gently tighten the tail, and push back the stitches now and then with the ringer and thumb. After two rounds have been worked in this way, the basket will clearly show its shape. The top and bottom of the basket are, of course, worked separately, the top being made slightly larger than the bottom, over which it is placed when closed.
To work the pattern after the basket is finished, thread the needle with a long strand of coloured raffia, and pass it in and out of the small holes, as shown in finished specimen. Refrain from making large stitches, or the effect will be clumsy and uneven.
To add a neat and smart appearance to the basket, line it with soft silk, or any thin material.
Fig. 2. Take the needle under the tail twice and secure into centre hole
Continue to:
My Books

