Bench-Vise
Description
This section is from the book "Woodworking For Beginners: A Manual for Amateurs", by Charles G. Wheeler. Also available from Amazon: Woodworking For Beginners.
Bench-Vise
The kinds shown in Figs. 50, 56, 57, though not as good as some more improved forms, are in common use by carpenters, and will answer your purpose very well for ordinary work - until you get to the point of building a first-class bench.
At a distance of about 14" from the end of the bench and in the middle of the side board mark the point a (Fig. 45). Bore a hole at this point (see Boring) if you have a bit a trifle larger than the screw of the vise. If not, using this point as a centre, describe a circle (see Compasses) with a diameter a trifle greater than that of the vise screw, and remove the wood within the circle (see Boring and Paring.) Now take the piece of 1 1/2" or 2 ' plank which is to make the movable jaw of the vise, and mark a line lengthways along the centre of each side (Fig. 51). At a distance of about 8 * from one end mark a point upon this centre line and make a hole for the vise screw as before. The nut for the screw must now be fastened in position on the inner side of the bench, the vise screw passed through the movable jaw and the side board, and the handle plate fastened upon the face of the jaw.
You can now open and close the vise by the screw, but the movable jaw needs to be made steady and the end projects above the top of the bench. Screw the vise tight together and slide the movable jaw around until it is in the position shown in Fig. 52, when the centre line on the back side of the jaw will cross the edge of the leg a few inches from the floor, according to the width of the jaw and the degree of slant given it. When the jaw is in this position, mark from the back side the lines indicated in Fig. 52, and saw off the projecting ends of the jaw by these lines, which will give the shape shown in Figs. 37 and 50.
Next take the small strip, and marking points upon its side as shown in Fig. 53, bore holes with a 3/2" or 1/2n bit. Screw the end of the strip to the edge of the movable jaw (being careful to get it at right angles with the vertical edge of the jaw), as shown in
Figs. 50 and 53 (see Screws). Just above and below where this strip crosses the post of the bench nail small blocks (a trifle thicker than the strip) so that it will pass easily between them. Cover these with a longer piece, making a slot, as shown in Fig. 53, through which the strip can slide freely. If the two blocks are no thicker than the strip, you can put pieces of pasteboard between them and the post to make the slot wide enough to let the strip slide through freely. Fit a pin or piece of dowel to the holes in the strip. The use of these holes and the pin is to keep the face of the jaw approximately parallel to the side of the bench. Contrivances for this purpose can be bought. After the jaw is all fitted, bevel or round the edge on the face side at the top (see Bevelling), and you can also bevel or round all the front edges if you wish. The vise is now in working order.1
Fig. 51.

Fig. 52.

Fig. 53.

Fig. 54. Right.

Fig. 55. Wrong.

Fig. 56.
1 This vise is fitted slanting, so that the slide at the bottom comes on the outside of the leg and at the same time in the centre line of the movable jaw in line with the screw, A common form has the movable jaw upright, the sliding
The important point with this vise (and in fact with any vise) is to have the inside surface of the jaw parallel with the surface of the side of the bench, so that the wood will be pressed equally at all points, else it will slip just when you wish it to be securely held. Be sure that the vise is not open more at the top than at the bottom (see Figs. 54 and 55).

Fig. 57.

Fig. 58.

Fig. 59.
The holes bored in the side of the bench are to support the end of a long board (Fig. 50).
If you cannot afford to buy a vise, or have to work where there is none, there are a number of makeshifts with which you can get along quite well, though not as rapidly or conveniently.
Bar being mortised into it and sliding through a mortise cut in the leg, as shown in Figs. 56 and 57. If you wish to make this kind, study Mortising, in Part V., and lay out and cut the mortise in the leg before nailing the cross-board to it (Figs. 41 and 42). This is the most difficult part of the bench to make nicely, and you can spend a good deal of pains upon it. If you have not yet the proper tools to make this mortise you can mark it out and have it cut for a very small sum at a wood-working mill or shop. When nailing the cross-board upon the legs, bear in mind to put this leg in the right place. Fig. 58 shows a simple arrangement with an additional post, or two posts can be put together and one half the notching done in each (Fig. 59).
Carpenters often nail a piece on the side of the bench (Fig. 60), which holds boards for planing fairly well, for common work, but tends to bruise the ends of the boards a little against the cleat, and requires a knife, or something, driven in at the other end of the boards to hold them with any degree of security. Another cheap substitute is shown in Fig. 61.
This holds boards of regular sizes quite well. Thin pieces can be held tighter by wedging, as shown.
Another simple contrivance, and more of a vise, is easily made by boring a couple of holesin aboard, say 6 ' wide and
12" long, and screwing it loosely to the side of the bench (Fig. 62), making the holes in the board larger than the diameter of the screws so that it will be free to play. By inserting the piece to be held in the end and double wedging the opposite end (Fig. 63) the piece will be held fairly well (see Wedges). For thin boards, blocks can be inserted to make the jaw parallel with the side of the bench. An upright vise made on this principle is often used to hold saws for filing. If you can find an old wooden hand-screw, you can use one jaw (sawing off the ends if necessary) for the nut to go inside of the bench,leavingthe other for the movable jaw, using one screw to tighten or loosen the vise and the other to keep the jaw parallel with the side of the bench. You will require no description to contrive something of this sort. Vises on somewhat this principle can be bought, attachable and detachable at will.

Fig. 60.

Fig. 61.

Fig. 62.

Fig. 63.
The jaw in Fig. 64 can be hinged upon the strip at the bottom and the latter fastened to the side of the bench. The jaw can then be tightened or loosened by the screw. This gives a square grip only when the jaw is vertical (Fig. 65). You can put in blocks, however. The longer the jaw the less objectionable the slanting grip becomes, of course.
Always try to devise some such expedients, which you can think up for yourself, when you are without the regular appliances, for even a poor vise is better than to hold pieces in the hand or to push them against chairs or tables or the wall.
For nice work by far the best vise of moderate cost is that shown in Fig. 143, which has been in use for a long time by wood-workers of the better class.
There are a number of excellent iron vises (some with jaws of wood, and also with an " instantaneous grip "). Some of them are admirable, but quite costly compared with the common screw.

Fig. 64.

Fig. 65.
You can work quite well with a good-sized common iron vise by fitting wooden blocks or leather or rubber to the inside of the jaws, to save marring your woodwork, though a regular vise for wood is much to be preferred.
Bear in mind when doing work that requires to be held at unusual angles, or in fashioning odd-shaped pieces, that you can usually get the angle or position required by a combination of hand-screws or clamps with the bench-vise as suggested in Figs. 66 and 67.

Fig. 66.
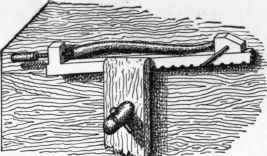
Fig. 67.
Continue to:
My Books

