The Work-Bench. Continued
Description
This section is from the book "Woodworking For Beginners: A Manual for Amateurs", by Charles G. Wheeler. Also available from Amazon: Woodworking For Beginners.
The Work-Bench. Continued
Next, put on the top. Cut two lengths of 5' 10" from the 12" board. Lay them in position, square lines across as guides for the nails (as before), and nail them down to the legs and cross-boards. Also drive carefully a few nails at the edge down into the sides of the bench. Sink all the nail-heads well below the surface (as much as 1/8") with the nail-set (see Nail-Set).
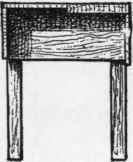
Fig. 46.

Fig. 47.

Fig. 48.
A better bench can be made by using a plank (say a 2" plank, planed) for the front of the top (Figs. 46, 47, 48). This bench with plank front is much better than the common carpenter's bench just described, and the difference in expense is but slight. It is easier to do good work on, as it is stiffer, steadier, and much better to pound on.
Of course a thicker plank can be used if available. Hard wood is best. Maple is excellent for a bench-top. Take particular care to select a good sound plank, from the centre of the tree if you can (see Chapter III (Wood).), as straight and free from winding as possible, and have it planed so as to be straight and true. This can easily be done at any properly equipped planing-mill.
To make this bench with a plank in front, you can proceed exactly as with the bench just described, except that the front legs should be as much shorter than those at the back as the plank you have is thicker than the 7/8" board used for the top of the bench just described. That is, if your plank is 1 7/8" thick the front legs should be 1" shorter than the back ones. Pieces must be cut out of the cross-boards in order that the top may be even (Fig. 46).
The simplest way, however, is to make the bench just like the preceding one until you come to the top. Then, after putting on the front plank, raise the back top-board to be flush with the plank, instead of lowering the plank to be flush with the board. You can do this by putting small pieces of board of the required thickness under the back part of the top (Fig. 47).
Some workmen prefer having the back board of the bench top lower than the front by an inch or so, with a strip fastened on the back, and sometimes at each end, so as to be level with the top of the front plank, thus forming a sort of tray (Fig. 48) where tools, nails, small bits of work, etc., can remain when in use, keeping the front plank clear for the actual operations. The work, if large, can be rested on the back strip as well as the front part, both being on a level.
The bench can be all filled up underneath with shelves, drawers, cupboards, compartments, or in any way that you wish, but at first, and for a simple bench like this, it is as well to have only one shelf, as shown in the frontispiece. You can easily put this shelf in after the bench is put together. You can tell better whether you want drawers and compartments after you have worked for some time and wish to make a more complete bench.
A nice bench should, of course, be built independently of the shop, - that is, be complete in itself, so that it can be readily moved. But a common bench can sometimes be best built against the wall, using the side of the building to support the back. Sometimes one or both of the ends of the bench can be advantageously carried to the walls of the room, thus requiring legs only in the middle or at one end. But such arrangements are not to be advised if you are likely to wish to move the bench before you have used it enough to pay for making it.

Fig. 49.
Figure 49 is merely suggestive. The process of construction is the same as already shown, except that you omit some of the legs and the back side-board, a saving sufficient to allow you to use a plank for the front of the top. As the floor is likely to be uneven, you can first saw the posts a little too long, stand them in line, stretch a cord or a chalk-line (see Chalk-Line) along the line of the front edge of the bench at the proper height for the tops of the posts, cut the posts off where this line crosses them, nail on one end of the cross-boards at right angles, and then fasten the other end to the wall-studding, sighting and testing to have the top straight and true, as in the case of the bench already described. If instead of vertical studding the joists of the wall run horizontally
(as is often the case), you can easily nail cleats on the wall if there is no horizontal timber at the right height to nail to.

Fig. 50.
Continue to:
My Books

