Toy Boats. Continued
Description
This section is from the book "Woodworking For Beginners: A Manual for Amateurs", by Charles G. Wheeler. Also available from Amazon: Woodworking For Beginners.
Toy Boats. Continued
In your first attempts at making small boats it may be well to omit the deck sheer, leaving the top flat (Fig. 354), as this simplifies matters in the beginning. Also, saw off the superfluous wood shown by the shaded parts of Fig. 355. Now clamp or wedge the block, bottom up, firmly on the bench, in case you have no vise arrangement by which it can be properly held, and rough it out approximately to shape with a wide chisel (see Paring) or the draw-knife (see Draw-knife).

Fig. 355.
The operation of shaping and hollowing out is slow work and requires much care. A little haste may spoil the work of hours. As the bottom begins to approach the desired shape you must have something more than the eye by which to gauge your cutting, for a very little deviation from the true curve may spoil your boat. It is very important to get both sides of the boat alike. On cardboard or stiff paper, mark a series of patterns of the different sections shown on the body plan. Cut out each of these patterns so as to save the part which is the reverse of the shape of the section of the boat, thus forming a series of templates, which you can apply to the hull at each section to test your cutting, until the templates just fit the wood at their respective sections, when the shape of the hull will, of course, agree with the plan.
The spokeshave, and sometimes the plane, can be used to good advantage in the final shaping (see Spokeshave). Especial care is required not to slice off too much, and you will, of course, work, as a rule, from the centre (or amidships) towards the ends. The block can be held in the lap or between the knees for this shaping, but it is better for all kinds of crooked work to have the material firmly held by a vise or some other contrivance, so that not merely the hands of the worker are free, but the whole body as well.
This form of hull is simple to make, in that the curves of the outside are all convex. There are no concave surfaces and reversed curves. The surface can be finally shaped by the use of the rasp, followed by a file, and finally smoothed with scraper or glass (see Scraper). Do not use sandpaper until the hull is finished.
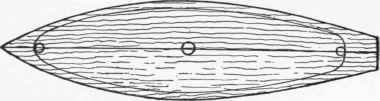
Fig. 356.
The inside must next be hollowed. Gauge a line around the upper side, £" from the edge, except at the bow and stern, where a greater distance should be allowed (Fig. 356). The hull must now be held firmly in some way. If you cannot contrive to clamp it firmly without bruising the outside, you should arrange some blocks (padding them with cloth or leather) in such a way that it can be held securely. It is better to spend an hour in fastening the block firmly than to attempt to steady it with one hand and to cut with the other. In all the shaping of the boat, both hands should be free if possible. Grasp the blade of the tool with the left hand, or lay the hand across it, so as to exert a back-pressure on the tool. This gives great control of the tool (see Paring).
Bore one or more holes (according to the size of the boat) downward from the top (Fig. 356), being very careful not to bore too deeply, but to leave at least half an inch of wood below the hole (see Boring). Now run a groove with the gouge around the deck, inside of the line marked, and hollow out the inside with the gouge, cutting towards the middle. The holes bored will help in this process. Cut down straight from the line marked on the upper side until the thickness of the sides of the hull is reduced to perhaps 1/4 of an inch (Fig. 357). The object of the increased thickness at the gunwale is to stiffen the sides and give a better bearing for nailing down the deck. Below this point make the thickness as uniform as you can, except for a narrow space at the very bottom where the keel is to be fastened, where it is often well to leave a thicker ridge (Fig. 357).
Extreme care is required in hollowing the inside. It is best not to attempt to make the sides thinner than one fourth of an inch, unless you are a pretty good workman with a fair degree of patience, for it is hard to repair the damage if you cut too deeply. Templates can be made for the inside. You can tell quite well whether you are making the thickness uniform by the sense of feeling, gauging the thickness between the thumb and finger. Do not try to cut away too much at the bow and stern, as it will weaken the boat, but leave a sufficient body of solid wood. Smooth the inside neatly with a flatter gouge (if you have it) than that with which you removed the bulk of the wood.

Fig. 357.

Fig. 358.
Next, with a thin strip or batten, mark the line for the sheer of the deck by the saw-kerfs already made and remove the wood carefully to this sheer line. The outside can now be thoroughly sandpapered, first with, perhaps, No. 1 1/2, and finally with No. oo. Get the surface as smooth as possible (see Sandpaper). Next paint the outside and inside with two coats of white lead and oil (see Painting). It is a good plan to apply a coat of hot oil first. Now to make this same simple model by the method of layers you will readily see that if you take a piece of board of a thickness equal to the distance between the water lines in the sheer plan (Fig. 353), and cut from it pieces of the shape of the water lines as shown in the half-breadth plan (Fig. 353), and also cut out the centres of the two upper pieces as shown in Figs. 358, 359, 360, and then fasten these pieces one upon another as shown in Fig. 361 - you will see that you have built up the general form of the boat, and saved much of the labour of shaping and hollowing.

Fig. 359.

Fig. 360.

Fig. 361.
Before cutting out these layers, a centre line must be accurately marked along both sides and at the rounded ends, so that the layers can be put together in the correct positions. Also, for the same reason, mark the midship lines across each side and on the edges, as shown. In drawing the inside lines (for the part to be cut out), care must be taken to leave sufficient thickness at the sides to allow for the final shaping. The sawing of the layers had best be done at a mill with a band-saw and jig- or scroll-saw, but can be done by hand, of course.
The boards or planks must be accurately dressed so as to make as perfect joints as possible when put together. If not convenient to make the thickness of the boards agree with the water lines of the plan, you can easily draw in new water lines to agree with the thickness of the board you may have - say, 3/4-" or 7/8" apart. Glue must now be applied to the joints, and the pieces firmly clamped together between boards, or laid flat (bottom side upwards) and weights applied. It is best not to cut out and glue up more than two or three layers at a time, lest they become bent or sprung. Care must be used in applying the pressure to make it uniform and not cause the somewhat flexible sides to be sprung or twisted out of shape (see Gluing and Clamps). Do not delay this building-up operation needlessly. Do not leave the pieces lying around for a fortnight. Keep them all clamped up in the proper position, or under pressure, if you can, until the whole form is glued together, as such pieces spring out of shape very easily.
After the glue is thoroughly dry, complete the shaping of the outside and inside as in the case of the solid block, care being taken to pare off the projecting angles on the outside gradually, so as not to cut within the curve marked on the plan.
The fin (when flaring at the top and not too thin) can also be made of wood, glued and screwed on, the lead being screwed to the bottom with brass screws.1 Be sure that the fin is in line with the centre line of the boat.
Unless the boat is quite small it is best to fit in two or three deck beams to connect the sides and support the deck (Fig. 357). These should be of thin stuff (perhaps 3/16" thick and 1/2" wide), set on edge and very slightly arched, the ends being fitted into gains cut in the sides, and nailed with fine brads. They can also be glued.
The deck should be of thin stuff (perhaps 1/8" planed). Mark carefully on the piece the deck outline and cut it approximately to shape, but well outside of the line. Fasten small blocks of wood to the under side of the deck wherever any attachments for the rigging are to be fastened. Paint the lower side, and when dry bore a row of holes with a very small brad-awl (see Awl) all around the edge, 1/8" inside of the line. Smear the top edge of the hull with thick white lead, or white lead putty, and nail the deck in place with very fine wire brads, perhaps 1/2" in length. Care must be used not to split the deck or drive the nails through the sides of the hull. Fine brass screws can be used if necessary. The overhanging edge of the deck can be trimmed down carefully with chisel, plane, or knife. The outside of the deck can now be painted.
The rudder can be fixed in a brass tube, the ends of which can be set in lead. The mast can also be stepped in a brass tube, or simply pass through the deck to the bottom, where it can be stepped in a smaller hole, which must be bored with care lest it go through.
1 The fin can be cut from sheet metal (brass or sheet-iron) and inserted in a thin saw-kerf cut exactly in the centre of the bottom, being set in thick white lead, or it can be riveted to thin plates screwed to the bottom of the boat, or lips can be bent over alternately on either side of the upper edge of the fin and screwed to the bottom.
The amount of lead required for the bulb at the bottom of the fin can be determined by loading the hull with weights until it is sunk to the water line. The weights will, of course, represent the weight of lead required. This can be cast in a^ mould and riveted to the bottom of the fin,
When you come to making models of less simple form- those having hollows and reversed curves in their outside form, as the majority of boats do - the difficulty of shaping accurately is much increased and more care is required, but the principle of construction remains the same.
Suppose, for example, you are ambitious enough to undertake such forms as those which compete for the America's Cup, for instance, you will find it difficult to carry the process of building by horizontal layers below a certain point (Fig. 362) but the keel and lower part can be added by gluing (or gluing and screwing) a piece of board or plank on edge (or two pieces, if necessary) to the bottom. The lead can, in turn, be fastened to the lower edge of the keel by screws. Models of such yachts are not always the best forms for toy boats, however desirous you may be to reproduce in miniature these famous boats.
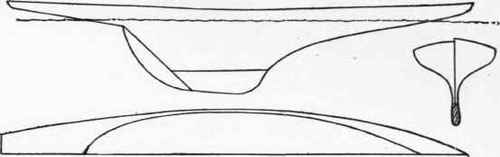
Fig. 362.
Continue to:
My Books

