


Taboret. Part 4
Description
This section is from the book "Design and Construction in Wood", by William Noyes. Also available from Amazon: Design And Construction In Wood.
Taboret. Part 4
Fig. 136. Method of squaring- up angles.
Fold a piece of sandpaper, sand side in, hold it near a dowel as a buffer, and with a chisel, bevel side down, resting on this sandpaper, slice off the arris of the projecting dowel as in Fig. 140. When the arrises are neatly trimmed, sandpaper the end of the dowel into a button shape, holding the sandpaper over the thumb. Finish the remaining dowels in the same manner. Instead of shaping the protruding dowel pins into buttons, an easier way to finish is to drive the pins flush with the face of the legs, smooth off the surface, and drive upholstery nails, Fig. 141, of the appropriate color into the surface of each dowel. The taboret shown in Fig. 142 is finished in this way.
If the processes so far have been neatly done, there should be very little superfluous glue to clean up. If there is any, clean it off with a chisel and scraper. This process may sometimes be facilitated by dampening the glue with a little hot water on cotton waste. Use as much heat and as little water as possible.
If any bruises appear on the surface in which the fibers of the wood are crushed but not cut, wet such places, cover with a piece of paper, and lay on them a flat-iron, sizzling hot. This will swell the fibers back into shape. Finally sandpaper all over.
Next cut out the recess for the brass plates with which the top is to be fastened to the frame, as in Fig. 125. This dado is cut at both the extreme ends of each upper stretcher, and is ½" wide and as deep as the thickness of the plate.
To fasten the plates to the frame, it is first necessary to bore holes, with a twist-drill, in the middle of the plates and countersink this hole on the side opposite to the other countersinks. It may then be screwed into place, using ⅝" No. 4 screws, Fig. 125.
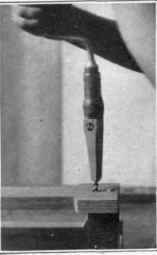
Fig. 138. Improvised bit-gage.

Fig. 139. Sawing off projecting end of dowel-pin.
The top is made as follows: Assuming that it is to be made of two boards jointed together, cut them slightly longer than wanted (13½"). If they are warped at all, joint them so that the warp will be reversed in the two pieces, as in Fig. 143. Then proceed as in the directions for a rubbed joint given in Handwork in Wood, p. 172. When dry, plane the board to the proper size, 13" square and ¾" thick, following the order given in Handwork in Wood, p. 72.
To lay out the octagon, either the 8square measure on the steel square may be used {Handwork in Wood, p. 108) or the following method:
Draw the diagonals of the square (13") as in Fig. 144. With the compasses take the distance from any corner, (say A) to the center, E, and lay this off along A B and A D, getting the points F and F', G and G', etc.
Connect F and G, F and G' etc., and the octagon is drawn. Saw off the corners and plane true. If the design calls for it, the chamfer may be taken off at this time from each upper arris.
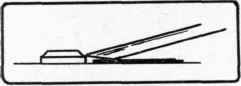
Fig. 140. Method of trimming-arris on dowel-pin.

Fig. 141.
Upholstery nail.

Fig. 142. Dowel ends covered with upholstery nails.

Fig. 143. Method of jointing two boards.
To fasten the top to the frame, lay the top, bottom side up, on the bench, taking care that there is nothing rough on the bench to mar the top, and accurately locate the frame on it. Be sure that the grain of the wood of the top runs parallel to one stretcher. Screw it firmly in place. If the top has become slightly warped, do not try to force it flat by means of the screws, but clamp it carefully in place first with hand-screws and then drive the screws home.
Continue to:


My Books

