


The Candlestick. Part 4
Description
This section is from the book "Design and Construction in Wood", by William Noyes. Also available from Amazon: Design And Construction In Wood.
The Candlestick. Part 4
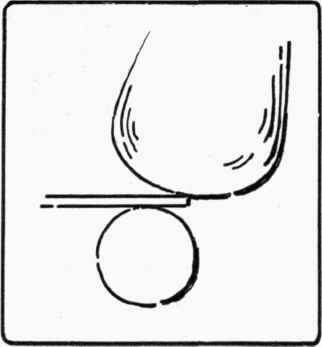
Fig. 109. Method of hammering a cylinder out of a strip.

Fig. 110. Cylinder wired to hold joint in place.
To hammer this strip into shape, you need a cylinder of iron ⅝" thick with flat surfaces filed at one end, as in Fig. 107, so that it can be held firmly in the iron vise. A piece of gas pipe, with one end crushed together will do. For the hammering, use a small wooden or horn mallet, so as not to mar the surface of the copper. See Fig. 108. To curve the copper strip on this improvised anvil, hold one end of it so that it projects slightly to one side of the anvil, (cylinder) and hit this projecting end with the mallet. Push out the copper a little more and hammer again. See Figs. 108 and 109. Continue this process until the strip becomes a cylinder. If any part has been bent too much lay that part directly on the anvil and hit there. If any part needs bending more to make the circle perfect, lay that part on the anvil and hit just off the point of contact. Be particularly careful to curve the extreme ends, and see that they butt exactly thruout, in order that they may be soldered well later.
Now wrap and twist a piece of binding wire, Gage No. 24, to hold the butted edges tight together, Fig. 110, and solder the joint. *A simple way to do this is as follows: Touch the joint thruout its length with a little stick dipped in soldering fluid. (This may be bought prepared at a hardware store, either in fluid form, or as soldering salt, (Yager's) to be dissolved in water according to the directions given, or may be made by digesting zinc in muriatic acid.)

Fig. 111. Pan for candlestick.

Fig. 112. Socket and pan wired together for soldering.
*See Simple Soldering, by Edw. Thatcher. Pub. by Spon & Chamberlain.
On the joint lay a small piece, say ¼", of wire solder. By means of a pair of pliers, hold the cylinder, joint down, over the gas flame of a bunsen burner or gas stove, till the solder melts. With a small stick wipe the solder back and forth in the joint and set aside to cool.
To make the pan proceed as follows: With the snips cut out a square of copper, l⅝" square, snip off the sharp corners, and file the edges square and smooth. See Fig. 111. Use fine sandpaper or emery cloth to polish up the surface. Turn up the edges slightly all around as follows: Set a bar of iron, say ¼" thick and ¾" wide, upright in the iron vise. File the end so that it will be slightly rounded and smooth, and with the horn hammer, hammer the edges over this "stake", as it is called. See Fig. Ill & for the cross-section of the pan. Be particularly careful to make the corners all alike, and to keep the bottom of the pan flat. If it becomes concave turn it upside down on a flat surface and tap the bottom gently with the horn hammer.
With a twist-drill, held in a hand-drill, (see Handwork in Wood, p. 106, Fig. 187,) bore and countersink two small holes in the bottom of the pan to fit ⅜" No. 2 screws, as in Fig. 111. These holes should be inside a circle ¾" in diameter at the center of the pan, so as to be included in the socket.
Scrape the surface to be soldered together bright and clean, and tie the socket already made, firmly to the pan with binding wire as in Fig. 112. Cover the joint of the socket with rouge made into paste with water. This is to prevent its unsoldering when the pan is heated.
Continue to:


My Books

