Construction By Measurement. Advanced First
Description
This section is from the book "Raphia And Reed Weaving", by Elizabeth Sanborn Knapp. Also available from Amazon: Raphia and Reed Weaving.
Construction By Measurement. Advanced First
After having worked out many lessons in paper construction by folding, the pupil is led to pattern-making with the use of the ruler, and here the lap is introduced. As yet, however, we keep this troublesome feature of construction as large as possible, since it is in the execution of fine details that the child becomes discouraged. These models have been worked out by pupils in the advanced first year. By previous training they have become familiar with the use of the ruler and are able to draw lines to given lengths and lay out simple surface coverings. The forms, being made from drawing paper, are easily folded on the line, no scoring being necessary, as is the case when using bristol board.
All patterns are based on the square, and are purposely made very simple in order to introduce decoration, using water colors or colored lead pencils. The squares vary in size from 1 1/2 to 2 inches. The rulers are marked in one inch and half-inch spaces.
In Fig. 1 the squares are three inches across. The rulers are placed on the edge of the paper and the spaces marked here, with black pencil, as a finer dot may be made with the black than with a colored one. The cross lines are drawn with the colored pencil and the nine squares needed are now cut away. Cut away the triangles as indicated in the drawing and decorate with diagonal lines.

Fig. 1.
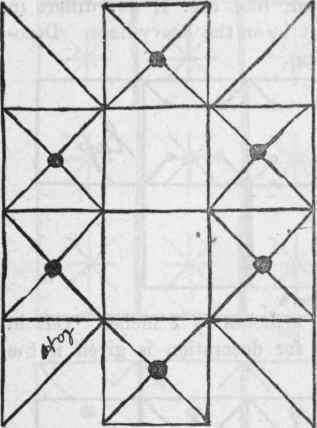
Fig. 2.
In Fig. 2 the squares are two inches in size. Proceed as in Fig. 1 and decorate as in the drawing.
In Fig. 3 the size of the square is one and one-half inches. Proceed as in Fig. 1. For decoration add the diagonal lines and at the points of intersection cross with a line extending one-half inch in each direction.

Fig. 3.
Fig. 4 is, when completed, like Fig. 1, but differs in manner of development. Cut in on the heavy lines. Decorate as indicated in the drawing.

Fig. 4.
Fig. 5. Size of squares, 2 inches by 2 inches. Cut in on heavy lines. Suggestion for decoration is given in the drawing.

Fig. 5.
Fig. 6. Size of squares, 3 inches by 3 inches. Cut in on heavy lines for the bottom, and the cover. Decorate as suggested in the drawing.
Fig. 7. Size of squares, 2 inches by 2 inches. Cut in on heavy lines to form the cover and the, bottom. Suggestion for decoration given in the drawing.

Fig. 6.

Fig. 7.
When these models (VI. and VII.) are used for candy boxes, they are made more attractive by the addition of a ribbon band.
Continue to:
My Books

