Construction In Paper. Series II. Advanced First Grade
Description
This section is from the book "Raphia And Reed Weaving", by Elizabeth Sanborn Knapp. Also available from Amazon: Raphia and Reed Weaving.
Construction In Paper. Series II. Advanced First Grade
Model XII. - Pincushion
Material. - Two strips of fawn. Five strips of scarlet.
Using scarlet for weavers, make a strip ten inches long. Shape as for circular box and fit double bottom of cardboard. Make a simple form of cushion to fit this box and glue it to position.


Model I. - Ash Cart
Using one square of paper, 6 in. x 6 in., fold and cut as indicated at Fig. 1. As the wheels are too large to be cut from waste pieces, it will be necessary to give each pupil onehalf a square of paper from which the wheels may be cut. This piece is not to be folded into squares. Use toothpicks for axle and thills and peas for hubs.


Fig. 1.


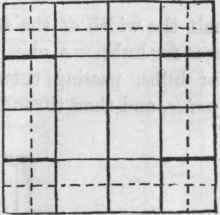
Fig. 2.
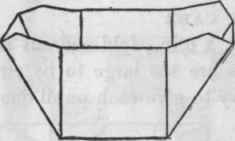
Cut as indicated at Fig. 2. Fold back at dotted lines and bring laps into position, placing them under the edge folded down.
Model III. - Button Box
Cut as indicated at Fig. 3, bring laps into position and paste.
Model IV. - Express Wagon
Fold and cut square 6 in. x 6 in., as indicated at Fig. 4, using for Fig. 5 one of the pieces cut away, and making the seat from the other piece. The depth of the box is but onehalf the width of the square. Use toothpick for handle and peas for hubs. A cheap quality of collar button may be used for hubs, passing them through the wagon box from the inside, and then through the wheel.
Model III. Button Box.

Fig. 3.

Model IV. Express Wagon.

Fig. 4.

Fig. 5.

Model V. - Sleigh With Box
Fold and cut the sleigh as indicated at Fig. 6, and the box at Fig. 7. Pass the end of a piece of cord eight inches long through the holes, and fasten.

Fig. 6.

Fig. 7.
Model VI. - Egg Box
Cut box as indicated at Fig. 8, and cover at Fig. 9, using one-inch semi-circular tablets for tracing thumb places.
Use for partitions pieces cut away from Figs. 6 and 7, and cut as indicated at Fig. 10.
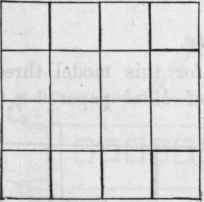
Fig. 8.

Fig. 9.


Fig. 10.
Model VII. - Shopping Bag
Fold and cut as indicated at Fig. 11, saving for handle the piece cut away, and folding it in the middle - lengthwise. Cut and use one piece for handle, folding it lengthwise and using double. In pasting bring the inside corners of outside squares together and place the middle square inside these two, with the ends of the handle between.


Fig. 11.
Model VIII. - Stove
Use for this model three squares of black paper 6 x 6 inches.

Model VIII. Stove.

Fig. 12.
Fold and cut as indicated at Fig. 12 for body of the stove, making lines for grate with a red lead pencil. Indicate, with black pencil, the hinges and knobs on oven doors.
Cut and fold hearth as indicated at Fig. 13, showing hinges and knobs on doors. Bring Fig. 12 into shape and paste. Use Fig. 14 for the bottom of the stove, fastening it onto the inside of front and back of stove, so as not to interfere with the use of the oven. Place the hearth in position and fasten, then open front doors. Cut and fold the pipe as indicated at Fig. 15 and glue to the stove.

Fig. 13.

Fig. 14.

Fig. 15.
Model IX. - Trolley Car
Cut as indicated at Fig. 16, cutting out for windows, or the windows may be indicated by pencil lines and not cut out. Cut the bottom of the car as indicated at Fig. 17. Use toothpicks for axle and peas for hubs, making wheels from the piece cut away from

Model IX.

Fig. 16.

Fig. 17.
Fig. 16, and the pole from the other waste piece, fastening it to the car as indicated in the drawing.
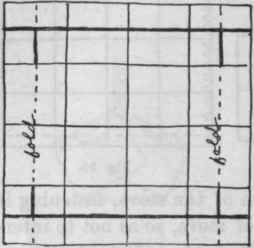
Fig. 18.

Fig. 20.

Fig. 19.
Model X. - Bed
Two squares are needed for this model, using for the legs the pieces cut away from previous models.
Cut and fold the body of the bed as indicated at Fig. 18, making it three squares in length and two in width. Fold the legs as indicated at Fig. 19 and glue body and legs to position.
Cut Fig. 20 into halves, as indicated by full line, making the headboard four squares in length (before folding), and the footboard three squares. Now fold both pieces across the width and use these doubled pieces for the head and footboard and glue to place. Both these pieces may be cut across the top, to any desired shape.

Model X. Bed.
Model XI. - Washstand

Fig. 21.

Fig. 22.

Fig. 23.
Three squares are needed for this model.
For the body, fold and cut as indicated at Fig. 21. Bring laps into position and glue to place.
Fold and cut two models as indicated at Fig. 22. Glue into shape, and stand the two oblong boxes thus formed on end inside the square box formed from Fig. 21. Locate the points for the knobs and here place two roundhead paper fasteners. Shoe buttons may be used instead. Shape the back as indicated at Fig. 23 and glue to the body of the wash stand.

Model XI. Washstand.
Model XII. - Dressing Table
Four squares are needed for this model. Fold and cut the body as indicated at Fig. 21, and the two drawers at Fig. 22.
Glue to shape and place the oblong boxes horizontally inside the square box, using paper fasteners for knobs.
For the back, fold as indicated at
Fig. 24, and then turn one thickness down toward the front from point X. This will form a square on its diagonal. Cut away the middle portion of this square leaving about one-fourth of an inch around the edge. This forms the width of the frame. Inside this insert a square of tin foil to form the mirror,
Model XIII. - Go Cart
But one square is used for this. Fold and cut as indicated in Fig. 25.
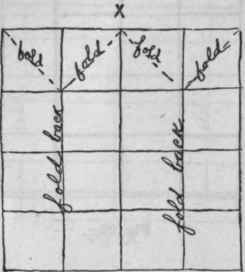
Fig. 24.

Model XII. Dressing Table.

Fig. 25.

Model XIII. Go Cart.
Turn up the squares forming the back and glue the laps into position. Crease the step into shape and add toothpick for axle, using peas for hubs. Save the four squares, cut away from one side, for the handle. Out this through the middle, lengthwise. Fold each piece through the middle, lengthwise, join the two pieces, bend for the handle, and glue into position. Use the squares cut from the corners in making the wheels.
Model XIV. - Cradle
Two squares are needed to form the body of this model. Fold and cut two forms as indicated at Fig. 26. Glue to shape and stand one, on end, inside the other one. This will form the hood. Variety may be given to the shape of the body of this model. For the rockers divide one six-inch square into four smaller ones, and on one of these trace a circle, using a two-inch tablet. Cut to line, fold through the middle, and cut. It will be necessary to cut away that portion of the rocker touching the floor in order to have the cradle stand upright.

Fig. 26.

Model XIV. Cradle.
Continue to:
My Books

