


The Mitered Picture-Frame. Part 6
Description
This section is from the book "Design and Construction in Wood", by William Noyes. Also available from Amazon: Design And Construction In Wood.
The Mitered Picture-Frame. Part 6
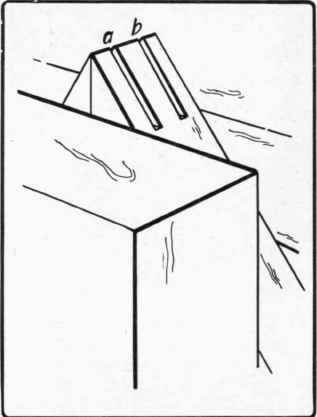
Fig. 83. Kerfs cut in corner of picture-frame to receive slip feathers.
Then wash the glass. An easy way to do this is with Bon Ami soap, rubbed on with a damp cloth, allowed to dry and polished off. Now lay the frame, face down, on the bench. Place the glass in position, the picture on top of it, and the picture back on top of that, fitting the pieces of it in place. Now nail all down in place, using

Fig. 84. Cutting-glass. (Stepl.)
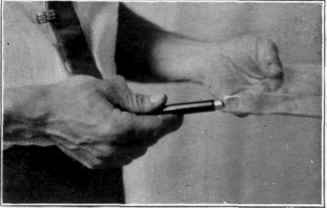
Fig. 85. Tapping under the scratch in the glass to start a crack. (Step 2.)
⅞" brads, No. 18 as follows: Lay a brad flat down on the backing, point to the frame. Press it down with one finger, and tap the head with the hammer sliding on the backing. It will facilitate matters to let the frame rest against a bench-stop or a weight.
The next step is to paste a piece of Manilla paper over the back of the frame to keep out dust. Spread a thin film of liquid glue over the back of the frame, near the outer edge. Dampen one side of the Manilla paper with a wet cloth passed over it. Lay the dry side down on the back of the frame, as flat as possible. When it dries it will be stretched taut and the superfluous paper can be trimmed off with a sharp knife.

Fig. 86. Breaking the glass. (Step 3.)

Fig. 87. Breaking off a narrow piece of glass with the pliers.
Next locate the screw-eyes in the back of the frame, say 2" from the top. Start a hole with a brad awl, and screw home the screweyes, (Brooks No. 214 ½".) Stretch a flexible wire straight between the screw-eyes, twisting it back around itself, and the frame is done. III. Additional Suggestions for Frames. The frame just described is the plainest and simplest one possible. With but little difficulty, however, before cutting the miters, it may be considerably embellished. For examples see Fig. 88. Chamfers can be planed on the front arrises of the members of the frame, as at a, or the front surface may be rounded, as at b. Instead of making the frame flat, it can be bevelled in or out, as at c and d. This should be done with the plane after the rabbet is plowed. A thin line may be grooved near the inner edge so as to make it, in cross-section like e. This is done by means of a veining tool after the frame is joined together. Draw the line to be grooved carefully with a pencil. Lay a straight edge along this line and with the veining tool running along the straight edge, cut out the groove. Take care to keep the depth as even as possible. See Fig. 176, p. 130.

Pig. 88. Sections of moldings for picture-frames.
A considerable variety of beads and flutings may be made by means of the Universal Hand Beader, (Stanley's No. 66) a tool which costs about 75c. See Fig. 89.
More complicated moldings, such as that shown in Fig. 90 may be made with a cabinet scraper, filed to the desired shape, and clamped between a pair of blocks of wood by means of screws as shown in Fig. 91. The two edges A and B serve as guides sliding along both edges of the molding.
A nosing may be added to the outside of a molding, as in Fig. 88, f, as follows:
Continue to:


My Books

