Lesson I. Placing Work In The Lathe
Description
This section is from the "Elementary Turning" book, by Frank Henry Selden. Also available from Amazon: Elementary Turning.
Lesson I. Placing Work In The Lathe
There are several good methods of centering pieces which are to be placed between the lathe centers. A method seldom used is to draw diagonals across the end, as shown in Fig. 2, and also in Figs. 230 and 259.
If a common marking gauge is at hand, it may be set for a space a little less than half the width or thickness of the piece, and four lines drawn, making a small rectangle or square at the center.
Another method is to draw four lines on the end with the compasses, as shown in Fig. 3. This is a very good way to do, and it is used by many turners. Care must be taken to have the end of one leg of the compasses against the bench, as the other leg draws the line. Hold the compasses so that one leg will be exactly above the other leg.

Fig. 2. Finding the Center by Drawing Diagonals.
Perhaps the best way in which to find the center is to lay a piece on the bench, and draw lines by moving a pencil along the top edge of the strip and against the piece to be centered, as shown in Fig. 4. The rule may be used for this purpose. It sometimes happens that the cleat on the bench-hook is just the correct thickness for use in centering.
After the piece has been properly centered, place one end against the live-center, the left hand holding the end nearest to the dead-center (Fig. 5). Then grasp the hand wheel, and turn the screw in the tail-stock until both centers have been forced into the piece sufficiently to hold it securely, while it revolves

Fig. 3. Using the Compasses to Find the Center.

Fig. 4 - Finding the Center with Pencil and Strip.
against the tools (Fig. 6). Next loosen the tail-screw so that you can put a little oil into the depression made by the dead-center (Fig. 7). The oiling must not be done while the lathe is in motion.
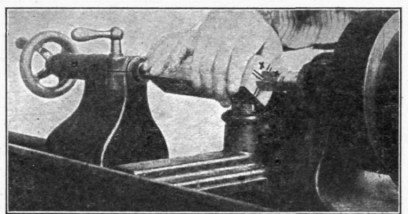
Fig. 5. Placing a Piece Between the Lathe Centers.
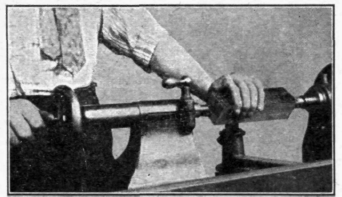
Retighten the tail-screw, making it as tight as it can be, and allow the spindle to revolve freely. By placing the hand on the cone pulley, as in
Fig. 6. Tightening the Tail-screw.
Fig. 10, and revolving the live-center while adjusting the tail-screw, the proper tension can be determined. After the dead-center has been adjusted, turn the clamp screw handle,
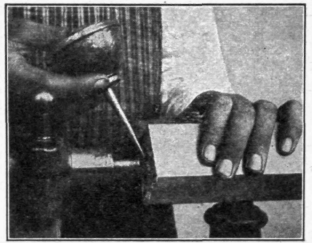
Fig. 7. Oiling the Dead-center.
H, Fig. 8, until it is tight. This is to hinder the dead-center from moving away from the work.
Do not use a mallet to drive the piece on to the live-center, for it is quite as essential that the dead-center form a good bearing, as that the live-center be forced into the piece.
Revolve the piece until a line through the two opposite corners will be horizontal. Loosen the set screw, A, Fig. 9, and adjust the tee rest until the
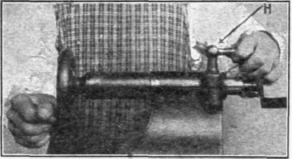
Fig. 8. Tightening the Clamp Screw.
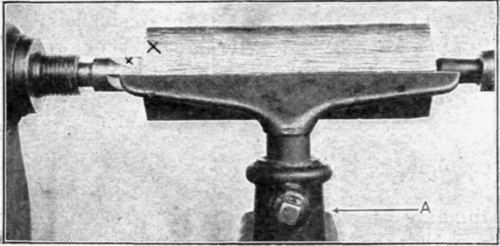
Fig. 9. Setting the Tee Rest.
top is on a level with this line. Use the rest at the same height for all turning similar to the twenty exercises. Very tall pupils may use the rest a little above the center, and very short pupils may use the rest a little below the center. Each one should determine at the beginning the proper height, and not change it for any of the twenty exercises. It should remain at the same height for both skew chisel and gouge turning.
The rest should be as close to the wood as will allow the piece to revolve. After you have become familiar with the use of the tools, the rest need not be moved up to the piece after it has been turned to a cylindrical form; but in turning the first exercises, it will probably be better to move the rest close up to the piece, as soon as it has been made cylindrical. Sometimes the ends will remain square, and you will be obliged to turn while the rest is at some distance from the part you are cutting.
In advanced turning the rest will need to be adjusted to a variety of positions; and in some cases the height will have to be changed, but for all ordinary turning the rest should be kept at the same height.
Before placing any piece of wood in the lathe it should be carefully examined. Small defects, such as worm holes and sap, need not be considered in the first exercises. Small knots are usually not difficult to work in the lathe, and pieces containing them should not be discarded. Wain at corners does no harm, if it is not so large that the blank will not form a cylinder the full size of the piece.
The one defect that must be carefully watched is shake. Sometimes pieces, which at a glance appear all right, on close inspection will be found to contain latent checks which render them unfit for turning. These seams or shakes sometimes allow the piece to separate as it revolves, spoiling the exercise, and wasting time. Usually, the best end of the blank should be placed on the live-center, as this center tends to split the wood.
Before removing the piece from the lathe, make a pencil mark, as shown in Figs. 9 and 10, on the end to correspond with the mark on the live-center, so that after the piece has been removed from the lathe, it can be replaced exactly in the same position.
Before starting the lathe, examine the belt to see on which step of the cone pulley it is running. For these exercises it should be on a step that will give about 3,500 revolutions per minute. Larger work should not be revolved so rapidly. If the piece is of an irregular shape, it should not be revolved at so great a speed until it has been turned down to a cylindrical form.
Caution
If you wish to stop the lathe, do not do so by grasping the work, but place your hand on the cone pulley, after the belt has been shifted to the loose pulley. If, for any reason, you wish to touch the work while it is revolving, bend your finger, as is shown in Fig. 10, and allow only the end of your finger to touch the piece. To grasp the piece, even though it may be quite smooth, is not the proper thing to do. Do not attempt to touch it on either the upper or the lower side, but always use the end of one finger against the back side.
Continue to:
My Books

