23. Bits
Description
This section is from the book "Elements Of Construction", by Charles A. King. Also available from Amazon: Elements of construction.
23. Bits
Bits (A.) are of many different types, the most common being the auger bit (Fig. 41). The use of the "worm " (A) is to draw the bit into the wood, thus making a heavy pressure upon the bit unnecessary. The "lips" (bb) make an incision on the wood below the cut made by the "cutters " (cc), which take the shavings out and into the "twist," this in turn lifting them out of the hole.
(B.) Care should be used when boring a deep hole that the bit is removed before the shavings clog in the twist, which will happen if the hole becomes full of shavings that cannot be lifted out. Should clogging occur, do not use a great deal of strength in trying to back the bit out, or its "shank" may be twisted off; it is better to pull it out with a straight pull by means of a lever, if sufficient strength cannot be otherwise exerted, the pull being straight over the center of the bit from the "chuck," not from the head of the bitbrace. After boring the hole to the desired depth, do not turn the bit backward to remove it, as shavings will be left in the hole, but give it one turn back to loosen the worm, then turn as though boring the hole deeper, lifting under the head of the bitbrace in the meantime, by which process the shavings will be lifted out. These bits are numbered by 16ths from 3/16 ths to 16/16 ths of an inch. Sizes larger than these are known as augers.

Fig. 41. - Auger Bit.
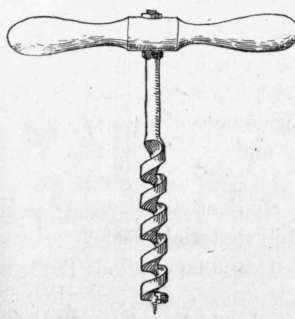
Fig. 42. - Cross-handled Auger.
(C.) Large auger bits generally are fitted with cross handles, as in Fig. 42, as a bitbrace will not give sufficient leverage to make the bit cut the wood; these are called augers. The form shown is known as a " Ford " auger.
(D.) The German bit (Fig. 43, A) is used for boring small holes for screws and nails, and has entirely supplanted the gimlet of our forefathers, as its action is much more rapid. Its progression in sizes is from 1/16" to 12/32" by 32ds of an inch; this tool is also called a screw bit.
(E.) The twist drill (Fig. 43, B) is a valuable tool; every carpenter should own an assortment of twist drills for use in places where other bits may come in contact with iron. The sizes range from 1/16" to 5/8" by 32ds.
The round shank drill may be purchased in any size up to 3" by 64ths of an inch. (F.) The extension bit (Fig. 44, A) is a very convenient tool for boring a hole of any size within certain limits, and is at times extremely valuable.
(G.) The center bit (Fig. 44, B) is often used in boring holes through thin material which would be apt to be split if an auger bit were used.
(H.) In filing an auger bit, it should be held as shown in Fig. 45, and a small, fine file used on the inside of the lips and the bottom of the cutters; in no case should the outside of the lips be sharpened, as the size of the bit will be reduced. In filing the cutter, be sure that its under side back of the cutting edge is filed enough to clear the wood after the cutter has entered it.
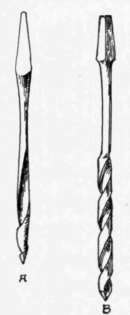
Fig. 43. A, German bit; B, twist drill.
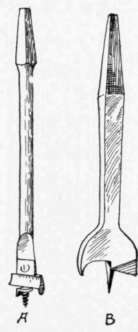
Fig. 44. A, extension bit; B, center bit.
In doing this, it should be remembered that the bit progresses into the wood as it cuts, and unless the under side of the cutter is filed properly, it will bear upon the wood beneath it, back of the cutting edge, and prevent the bit from advancing. To remedy this, be sure that the cutter is kept filed thin, and that the under side is straight from the edge to the beginning of the twist.
(I.) If the lips (Fig. 41, bb) are filed off, an auger bit bores into the end wood easily.
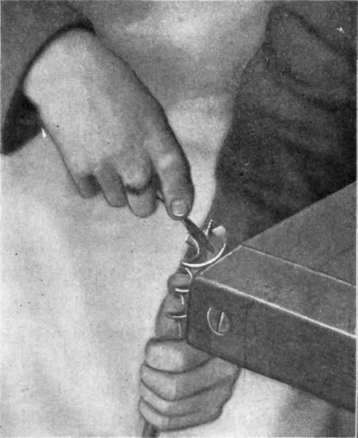
Fig. 45. - Filing an Auger Bit.
Continue to:
My Books

