


Cutting. Part 3
Description
This section is from the book "Wood-Block Printing", by F. Morley Fletcher. Also available from Amazon: Wood-Block Printing.
Cutting. Part 3
For all shallow cuts where the mallet is not needed, the Japanese hold the chisels as shown in fig. 11. With practice this will be found a very convenient and steady grip for the right hand. It has also the advantage that the chisel can be held against the centre of the body and exactly under one's eyes.
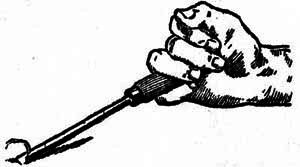
Fig. 11. - Method Of Holding Gouge
In the diagram (fig. 12), if the wood from A to A1 is to be cleared away, gouge cuts are made at b and b1, then the space between b and b1 may be quickly cleared without risk to the edge of the form at A. When this rough work is done the little ridge between A and b may be cleared with small round or flat tools, as is most convenient. But this final clearing should not be done until all the large spaces are roughed out.

Fig. 12. - Clearing Of Wood Between Knife Cuts
The depth to which the spaces must be cleared will depend on their width, as, in printing, the paper will sag more deeply in a wide space than in a narrow one. In spaces of half an inch the depth of the first V-cuts is sufficient, but the proportionate depth is about that of the diagram above. The small spaces are cleared by means of small flat or round chisels without the mallet or the preliminary gouge cut: this is only needed where a large space has to be cleared.
There remain now only the placing and cutting of the two register marks or notches for controlling the position of the paper in printing.
These are placed relatively to the design as shown in fig. 13.
The corner of the print fits into the notch at A, and one edge of the print lies against the straight notch at B.
The register marks may be even closer to the space covered by the design, but must not actually touch it, as some margin of paper is necessary in printing: they should also be cut always on the long side of the printing block. It will be seen from the drawing on page 70 that these register marks correspond to the position of the thumb of each hand in laying the paper on the block for printing.

Fig. 13. - Position Of Register Marks
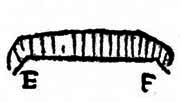 Fig. 14. Register marks.
 Fig. 14. Register marks.
The corer mark, ABC, is made by cutting from A to B and B to C, with the knife held perpendicularly, and its flat side against the line, then the shaded portion is cut with a flat chisel, sloping from the surface of the block at AC to a depth of about 1/16 inch along AB and BC. The straight notch, EF, is similarly cut, first with a perpendicular knife along EF, and then the shaded portion is chiselled sloping down to the line EF.

Fig. 15. - Register Marks (Section Of)
In section the two register marks would be as above.
The register marks must be smoothly and evenly cut so that the paper, in printing, may slide easily home to its exact place.
When the design of the key-block and the two register marks have been cut and cleared, the trace of paper and paste on the uncut parts of the wood should be carefully washed off with a piece of sponge and warm water. The block is then finished and ready for use. The key-block, however, is only one of the set of blocks required for a print in colour, but the colour blocks are simpler and require, as a rule, far less labour.
Continue to:


My Books

