


Model XX. - An Ink-Well With Swinging Lid
Description
This section is from the book "Manual Instruction: Woodwork. The English Sloyd", by S. Barter. Also available from Amazon: Manual Instruction: Woodwork.
Model XX. - An Ink-Well With Swinging Lid
Fig. 249
The chief exercise in this model is the grooved and tongued joint.
The drawing shows the plan and elevation of the box with the lid turned back. The plan shows the seat of the ink-well and the section on a b, the supports under it.
Any ornamental wood, as mahogany, walnut, beech, teak, or sycamore, will be suitable for this model. The following will be required: -
For sides, one piece ..................................... ,, top and bottom, one piece ...................... . ,, arms, one piece ....................................... „ seating and supports, one piece ................ .
12 in. x 2 5/8 in. x 1/2 in. 6 1/2 in. x 31/4 in. x 1/2 in.
6 in. x 3/4 in. x 1/2 in.
4 in. x 2 in. x 3/8 in.
Plane up the wood as usual; but the long strip should be wider than the finished measurement - 2 3/8 in., as some material will be removed in planing the edge of the lid. Mark out the length of the four sides and saw them apart. Set out the opposite similar sides together, as in the previous exercise; make the grooved and tongued joints. Glue up the joints and make the top and bottom a little larger than the size of the finished box. Nail these on, so that the end grain of top, bottom, and sides are together, as in fig. 250. Plane off the outside of the box, and take great care not to break out the end grain. This is especially likely to happen in this small piece of work. Gauge the depth of the lid and saw it off. Plane the edges of both box and lid true, till they make a good fit in all parts. Plane up the strip for the arms, cut it in halves, and model the rounded ends.
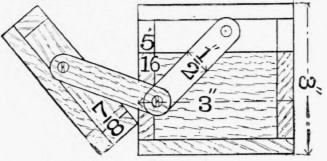
Side elevation.
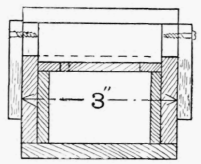
Section on ab.
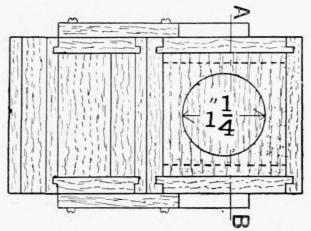
Plan.
Fig. 249.

Fig. 250.
Bound-headed screws should be used, and the socket in the arms should be large enough to allow them to be freely pivoted. Saw the remaining strip in halves across the grain, and then cut one of the halves into two strips with the grain. Plane the edges of the oblong strips till they can be fitted in well and tightly; they must, of course, be of the same width. The shelf to take the ink-well should now be planed true on the edges, till it will just slip into its place, resting on the top of the supports.
Draw the diagonals, and insert the point of the centre bit at their intersection, so that the hole is in the centre.
Continue to:


My Books

