


Hints For Photo-Micrography
Description
This section is from the book "Workshop Receipts For Manufacturers And Scientific Amateurs. Supplement Aluminium To Wireless", by The Chemical Publishing Co.. Also available from Amazon: Workshop Receipts For Manufacturers And Scientific Amateurs.
Hints For Photo-Micrography
For the taking of Photo-Micrographs, an ordinary microscope may be used with its objectives and substage condenser, but it requires to be suitably fitted to, and connected with, the camera that is to be employed with it, special care being taken that the Microscope, the Illuminant, Condenser System, and Camera shall be exactly centred. This is essential for successful work.

Fig. 157.
In addition to the camera and the microscope, with its usual equip-I ment of objectives and substage condenser, the following accessories, in one form or another, should be chosen :
1. ;A Projection Eyepiece.
2. ;A Bull's-Eye Condenser, with an iris diaphragm.
3. ;A suitable Illuminant.
4. ;A pair of light-tight connecting flanges between the camera and microscope.
A focussing glass will also be found useful.
If the equipment as specified be carefully aligned on the baseboard and the condensers accurately focussed, the worker can scarcely fail to attain success.
The following brief directions for setting up the apparatus have been found useful.
Re provided with a piece of cardboard - preferably glazed--about six inches square, in order that the lighting and the image from the microscope may fall upon it, and enable what is going on to be seen clearly.
1. ;Set up the microscope with the microscopic " object and the substage condenser centred to the best advantage visually. Then place the microscope in its position on the camera base, sliding back the camera front 10 or 12 inches.
2. ;Light the illuminant and set the bull's-eye condenser central with it, and in a position to give parallel rays. In the case of the Watson-Conrady bull's-eye this would be about 3 inches from the flame, and in the Nelson aplantic form about 11/2 inches.
3. ;See that the parallel beam from the bull's-eye falls centrally on the iris diaphragm at the back of the substage condenser. Adjust the position of the centering both of the light and the bull's-eye until this is attained. The cardboard screen should be interposed between the bull's-eye and the substage condenser to ascertain that the desired lighting is produced.
4. ;This having been done properly, the card is now placed 6 or 8 inches beyond the eyepiece and the object focussed sharply upon the card. The iris diaphragm attached to the bull's-eye condenser is treated as the source of light, and should be closed down considerably. If the substage condenser be rocked to or from the stage very slightly, the image of the central aperture of the iris diaphragm fitted to the bull's-eye condenser will be seen in focus in the disc on the cardboard. It probably will not be quite central. This can be readily corrected by using the adjusting screws provided on the bull's-eye until the centre of its iris diaphragm corresponds with the centre of the projected disc.
5. ;The centering having been done, the iris diaphragm of the bull's-eye should be opened until it illuminates the projected disc to its margin, and no more. Produce a sharp edge to the disc by turning the adjusting collar of the projection eyepiece. Finally, the centering of the light to the bull's-eye should be checked, the screen of card for this purpose being placed at the back of the substage condenser.
When all these adjustments have been made, an evenly illuminated disc will result, and it will only become necessary to view and finally focus the image upon the focussing screen and take the photograph, using such coloured glasses or light filters as the objects may necessitate.
Fig. 158 illustrates a miniature photo-micrographic camera designed for use without an eyepiece, and is not a toy, but an instrument of practical value. The front of the Camera is pushed on to the eyepiece end of the Microscope draw tube, the whole arrangement then being ready for immediate use. The body of the Camera is of polished mahogany measuring about 41/2 x 3 x 31/2 inches, and is fitted with a removable ground-glass focussing screen. The double dark slide is of the hinged book-form, with vulcanite shutters, and takes plates in. x 1| in. In the interior of Camera is fitted a hinged flap shutter worked from the outside, for making the exposure. The above is an easily used and efficient apparatus for rapidly obtaining an accurate photographic record ol any interesting micro, object.
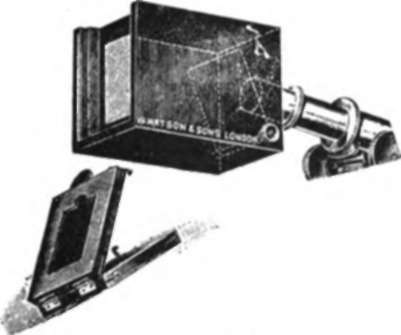
Fig. 158.
Continue to:


My Books

