38. Saw Filing
Description
This section is from the book "Elements Of Construction", by Charles A. King. Also available from Amazon: Elements of construction.
38. Saw Filing
Saw Filing. (A.) This is an accomplishment which every young woodworker should master, as its possession will save expense and inconvenience, and add much to his efficiency as a workman.
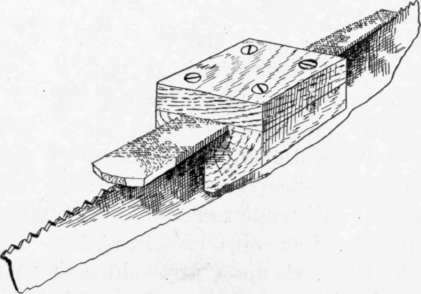
Fig. 65. - Jointing a Saw.
(B.) The first step in sharpening a saw is to examine the edge carefully to see if the teeth are of an even length ; if they are not, they should be jointed. This is done by using a flat file held perfectly square in a block, as shown in Fig. 65. One or two light strokes usually will be enough to make all the teeth of the same length. The edge of , the saw should round slightly in the middle, say about J" for a 24" or a 26" saw. If the edge is perfectly straight, it should not be jointed to this shape at once, but a little at each time for several filings.
(C.) After jointing the saw, be sure that it is properly set. This may be done by a saw set, of which there are several patterns in use; these are all of two types, the hand set (Fig. 66) and the anvil set (Fig. 67). Either of these forms is efficient, but as it is more convenient, the hand set is more commonly used. Do not give the saw too much set, as it will hot cut smoothly, but will break the wood badly on the back side of the cut; there is also greater danger of breaking the teeth, and as more wood is cut out, more muscle must be applied. The point of the teeth only should be set, and care should be used that the blade of the saw is not sprung, which will be apt to result from setting the teeth too far from the point.
A saw to be used upon green lumber should have coarser teeth and more set than one which is to be used upon thoroughly dry, seasoned wood. A panel saw intended for use upon fine finishing work usually is ground so thin upon the back that it needs little or no set. Some workmen set a saw so heavily that it will do for several filings; while this is satisfactory for a soft saw to be used upon common work, it is not a good plan to treat a fine, hard saw this way, though the latter may be touched up once or twice.
(D.) In filing, it is important that the file should be carried at the same angle the entire length of both sides of the blade. For a cutting-off saw, the file should be carried at an angle with the side of the blade of from 60° for soft wood to 70° for hard wood, as shown in Fig. 68; and for general work, at an angle about halfway between the two.

Fig. 66. - Hand Saw Set.

Fig. 67. - Anvil Saw Set.
The file may be carried horizontally, as at aa, Fig. 69, which makes all the teeth of the same size ; as at A, Fig. 70; or it may be carried as at bb, Fig. 69, which will make the teeth of the shape shown at B, Fig. 70. The third method is preferred by many workmen, as it allows the file to run more smoothly, thus lengthening its life a little. There is no difference in the efficiency of the saws filed by these methods, but if filed as at bb, Fig.
69, it is more difficult to keep the teeth of the same size.
and to make a good-looking job.
In filing a cutting-off saw, the top of the file should be held more or less slantingly, as shown in Fig. 71, according to the hook which it is desired that the teeth shall have. The more hook a saw has, the faster it will cut, but the cut will be rougher in proportion. Experience is necessary to discover just the right angles at which the file should be held ; after considerable practice, the file will drop naturally into the correct position.
File every tooth upon each side of the saw to a perfect point, one half of the filing being done from each side; file the entire length from one side, then reverse the saw and file from the other side. This cannot always be the exclusive practice if a saw is in very bad shape, because if the teeth are of uneven sizes, care must be used, and more filed from some teeth than from others. It may, in such a case, be necessary to go over the saw two or three times, but it should be done very carefully, so that the bevel of the teeth may be preserved and their length kept the same. Observe each tooth, and press toward the point or the handle of the saw, as may be necessary. The file should be carried with its point toward the point of the saw, filing the cutting or the front side of the tooth of the farther side of the saw, and the back of the tooth next ahead on the nearer side with the same stroke. If the point of the saw is carried toward the handle of the saw, it makes the teeth chatter, and upon a hard saw, may make them break. It also causes an excruciating noise, and shortens the life of a file, as the continuous chatter against its teeth will soon break them and destroy the file.

Fig. 68. - Angle of the File with the Edge of the Saw.

Fig. 69. - Angle of the File with the Sides of the Saw.
A ripsaw requires more set than a cutting-off saw, and if, as usual, the file is carried square with the blade both ways, the saw may be filed from one side.
After a saw is filed, it should be laid upon a perfectly flat surface, and given a light touch with a flat file or a whetstone, to remove the burr caused by the file, as in Fig. 72.
The teeth of the compass saw should be a combination of the rip- and the cutting-off saw, as it does the work of both as occasion requires. The teeth should be nearly as hooking as those of a ripsaw, and the front teeth filed at an angle of about 80° with the side of the saw. In filing the back of the teeth, the hand should be carried a little lower than horizontal. Figure 17, C, shows three views of the teeth of a compass saw.
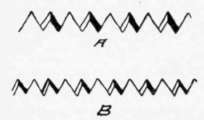
Fig. 70. - Results of Filings as at aa and bb, Fig. 69.

Fig. 71. - Method of Carrying a File to obtain the hook of a cutting-off Saw.

Fig. 72. - Removing the Burr after Filing a Saw.
Continue to:
My Books

