76. Coped Joint
Description
This section is from the book "Elements Of Construction", by Charles A. King. Also available from Amazon: Elements of construction.
76. Coped Joint
Coped Joint. Fig. 142 (sash joint).
Material:
1 piece, 6" X 2 1/2" X l 3/8". 1 piece, 4" X 1" X 1 3/8".
Molded on one edge. Molded on two edges.
This material may be secured at a sash factory or a planing mil though the student may make his own molding, as a straight bev will answer all the purposes of this problem.
"Coped joint" is the term applied to that form of butt joint in which the end piece, a, is fitted to the molded edge of piece b, the end of piece a being cut to fit the contour of piece b. The fact that the connection may be strengthened by a mortise, as it is in Fig. 142, or by a tongue and groove, as it is in C and E of
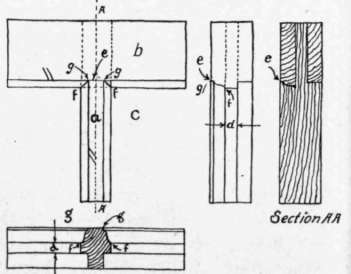
Fig. 142. - Coped Joint.
Fig. 143, does not alter the fact that the coped joint itself is an elaboration of the square butt joint.
Uses of the coped joint: A coped joint shows a miter on its face, as in the face view at C, Fig. 142; it is used in many places where moldings intersect, and it is desirable to show a miter, as in cutting in base moldings, as at A, Fig. 143, or room moldings, as at B. It is chiefly employed upon moldings of small dimensions. In practice, if an inside joint is mitered, the joint will be nailed open when the nails are driven; but if it is coped, the full length piece, 6, of A and B, Fig. 143, is nailed firmly into its permanent place, and the coped pieces, a, are cut long enough to allow them to be sprung and forced into making a perfect fit.
Fitting a coped joint: In describing this exercise, the joint of a sash has been taken as a model. After the pieces are prepared, proceed as follows:
1. Mark tenon on a, and mortise on b of Fig. 142, so that they will each come in the flat inside edge, d; cut them, working only to the shoulder, e.
2. Place a in a miter box and cut the miters f, g, mitering the molding only. As a coped joint shows a miter, this will give the edge, or line, to which the end must be cut.
3. With convenient sizes of chisels and gouges, cut away the wood, leaving the mitered edges f, g, of piece a, as shown in section A A ; cut back far enough so there will be no wood to prevent piece a from fitting perfectly against the edge of b, but be careful not to cut back of the edges, /, g, on the surface of the molding, or back of the shoulder, e, on the face of piece a. Cut the pieces to the desired length, smooth and sandpaper them.
Forms of this joint are used in making ordinary grades of panel-work and stock doors; see C, D, E, Fig. 143.
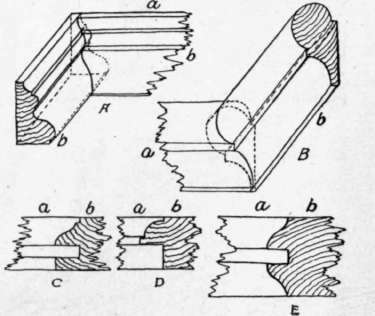
Fig. 143. - Uses of the Coped Joint.
Continue to:
My Books

