86. Drawing Board
Description
This section is from the book "Elements Of Construction", by Charles A. King. Also available from Amazon: Elements of construction.
86. Drawing Board
Drawing Board. Fig. 163. (See Handbook: Fig. 39.)
Material:
6 pieces, 25" X 3 1/4" (about) X 5/8".
2 cleats, 19" X 5/8".
18 F.H.B. screws, 1" No. 9.
A. Gluing a wide board: This is an exercise in gluing up a board so that the effect of the tendency to warp will be minimized, which may be accomplished by so placing narrow pieces that the concave and convex sides of the annual rings will alternate in forming the surface of the board. These sides may be determined by examining the annual rings of the boards, which may be seen at either end. As the tendency of a board is to warp with its concave side toward the outside of the tree, the warp of each narrow piece will offset that of those which join it. (See Fig. 8, "Elements of Woodwork.") The joints should be carefully fitted and doweled; see Topic 69, Method 1.
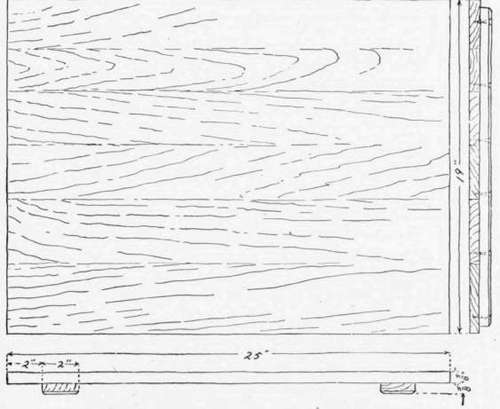
Fig. 163. - Drawing Board.
B. Cleating across the grain: The cleats should be screwed upon the back as shown; the holes for the screws being slotted by boring two holes beside each other, parallel with the grain, which will allow the screws to move a little back and forth as the board shrinks and swells. A cleat should never be glued across the grain, as when the board begins to shrink, the glue will not allow it to do so, and the result will be that the joints will open, or the board will warp and twist badly. The cleat may be glued in the center for two or three inches, if desired, though this is not at all necessary; but it allows the board to shrink from the edges to the middle, and the screw holes being slotted, will permit this movement to take place without its surface or shape being affected.
C. Squaring the board: The ends of the board should be jointed perfectly straight, and square with the face and sides of the board, so that the T square will move accurately upon either end, or edge.
D. The surface of a drawing board: After the board is carefully straightened and smoothed, it should be sandpapered diagonally from each corner, and finished parallel with the grain. It needs no finish aside from the sandpapering.
Continue to:
My Books

