


Exercise III. Sawing With Tenon Saw. - Simple Face And Edge Planing. Planing To A Thickness And Breadth
Description
This section is from the book "Manual Instruction: Woodwork. The English Sloyd", by S. Barter. Also available from Amazon: Manual Instruction: Woodwork.
Exercise III. Sawing With Tenon Saw. - Simple Face And Edge Planing. Planing To A Thickness And Breadth
Tools Used
Jack plane, small try-square, marking gauge, tenon saw, and § -in. or 3/4-in. chisel.
The drawing of this exercise, which should be to scale 1/2, need only be made in isometric projection, and the isometric scale need not be used. The drawing should be as in fig. 106, showing one of the inlaid pieces removed.

Fig. 106.
Two pieces of wood will be required for this exercise, one of yellow deal 1 ft. long by 21/4 ins. by 7/8 in., and the other some coloured wood, as cedar or sequoia, 8 ins. by 1 1/8 in. by 1/4 in. The yellow deal should first be reduced to the proper dimensions by planing.
This is the pupil's introduction to the plane, and great care should be taken to attempt the use of this tool as well as maybe possible. Before commencing to plane, the pupil should be taught to take the plane to pieces and set it. The operation is simple, but much bungling will result if care is not taken to teach it systematically. This is another good opportunity for collective teaching. The pupils should stand facing the bench, the plane, with the sole down, being on the bench, with the nose pointing away. The hammer should be placed near at hand, on the right side of the plane, which should be grasped firmly with the left hand, the thumb being in the escapement, and pressing on the plane-iron, with the fingers round the side and sole, or face.
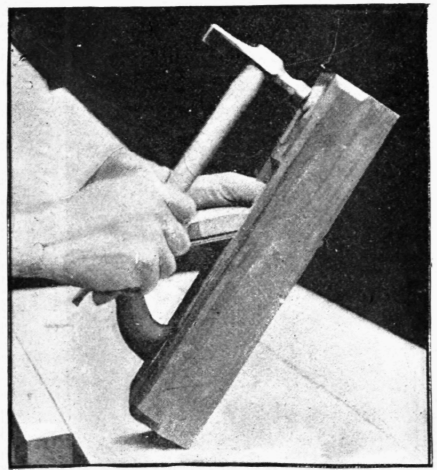
Fig. 107.
The plane should be raised, as in fig. 107, at an angle, and the hammer taken up, with the right hand holding it at the end of the handle. Observe this as an invariable rule.

Fig. 108.
Rest the head of the hammer on the button of the plane, or on the nose if there is no button, and strike two or three sharp blows. Take care in hammering always to strike with the whole of the face of the hammer, or the nose of the plane will be dinted by the edge. The effect of the blows given will be to loosen the wedge and irons, but, if the left hand has held the iron and wedge firmly, they will not fall out and damage themselves, or cut the operator.
Put the hammer down and take out the wedge and iron, and lay them and the plane on the bench. Hold the iron as shown in fig. 108, and loosen the screw with the turnscrew, but do not take it out. Now take the cutting iron away from the back, and if necessary sharpen it (see pp. 133-5). When this is done, screw up the irons again as tightly as possible, with the edge of the back or cap iron about 1/32 in. back from the edge of the cutting iron. Take the plane in the left hand again, and hold as shown in fig. 109, and with the right hand place the irons in the escapement of the plane till the centre of the cutting edge protrudes from the mouth beyond the face of the plane as much as the thickness of the shaving required - in this case about the same as a sheet of note-paper.

Fig. 109.
Keep the irons in their right position with the thumb of the left hand, and with the right push the wedge tightly in, and with a few taps of the hammer make it secure, but do not drive it too hard in. Care should be taken not to move the irons.
Glance frequently down the face while tapping the wedge, to see that no error arises in the amount of iron showing. If, however, on tightening, either corner of the iron should appear on the face, strike the iron on the edge near to the wedge on the same side as the corner that is out. If insufficient iron shows in the centre of the plane, a light tap on the free end of the iron will put this right. Sometimes too much of the edge is out, in this case a light blow on the button will cause it to set back.
Having finally adjusted the iron the wedge should be firmly driven home. This can be done too effectually, and in extreme cases the plane gets damaged, and even split.
If it is not necessary to sharpen the plane-iron, it can be adjusted by simply striking the nose or the iron, as the case may be, and in actual work planes are often adjusted in the middle of an exercise without removing the irons.
The larger of the two pieces of wood for this exercise is 1 ft. by 2 1/4 ins. by 7/8 in., and it will be found a useful size to commence teaching the use of the plane. If a much longer piece is taken, the result generally is to plane it hollow in length, and if much shorter, it is often planed round in the length.
A short piece will allow the plane to dip at the end on the forward stroke. A long piece generally only gets planed in the middle at first, as the pupil does not usually take good sweeping strokes at commencing. A broad surface is too difficult to master at beginning. Place the end of the wood firmly against the stop and hold the plane as in fig. 110, standing with the feet apart and behind the plane. It will be seen that the left hand is on the front portion of the plane which rests on the wood.

Fig. 110.
Press the nose firmly down with the left hand at the com mence-ment of the stroke, and push the plane forward in a straight line. As the tool progresses, press the base of the right hand with gradually increasing force on to the rear of the plane, and as the blade passes over the further end of the wood release the pressure with the left. In short, the iron should be kept well down while it is cutting, but no longer.

Fig. 111.
The surface of the wood having been planed till it is thought to be level, it should be tested for accuracy by placing the straight-edge across it diagonally, in opposite directions, holding the wood and straight-edge up to the light to see if any inequalities of surface exist.
The face side now being true, turn the wood on its edge in the vice with the face side towards the operator, and plane or shoot the edge.
Hold the plane as in fig. 111. The fingers of the left hand are allowed to run along the face side of the piece of wood while the plane is in motion, to steady it in its course.
Again be careful to press the plane as before, and when it is thought that the face and side make a right angle, try it with the square, as in fig. 112, and with the straight-edge, to find if it is straight. If not correct, plane off more as required.
Having made the edge true and at right angles to the face, gauge the width of the wood to a shaving or two more than it is required to finish at (2 ins.), this is left a little wider than is wanted, as, on finally cleaning the exercise off, a little more will be removed, and it will then be true to the dimensions.
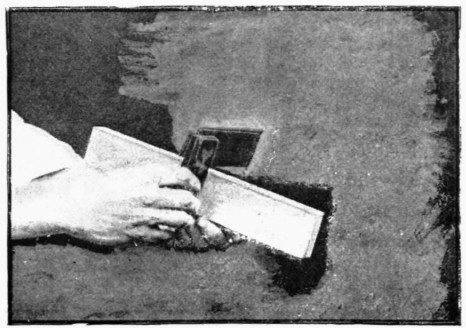
Fig. 112.
Turn the wood over in the vice and plane the opposite edge down to the line already gauged, taking care to make it like the other edge - true, and at right angles to the face. Now gauge from the face side and on the face edge the thickness of the finished exercise - 3/4 in., and leave the extra amount for the cleaning off.
The next step, having overcome the difficult task of planing, is to make cut lines on the face where the grooves are to be.
Commence by marking a cut line at right angles to the edge, about 1/4 in. from the end (see fig. 106), and then alternately, at 2 ins. and 7/8 in. apart, to the other end, where nearly 1 in. surplus will be found after marking off four spaces 2 ins. wide and three 7/8 in. wide. Both this and the 1/4 in. first marked will be finally sawn off.
Gauge down to the depths of the grooves, and saw and chisel them out as in Exercise I.
Now prepare the thin coloured wood to insert in the grooves by shooting the edges true.
To do this lay the strip on the piece of wood already finished and projecting a little from it. Rest the plane on its side, with the face against the edge of the wood. A good illustration of this form of planing is shown on pp. 197-8. In that case, however, a shooting board is used, but for the present it is enough to make use of the true edge of the wood, already planed, as an improvised shooting board.
Press the wood down hard with the left hand when planing, and, having got one edge true, try it against the groove to see how much is to be taken off the other side. Plane the required amount off and saw the strip of wood up into lengths, which should be a shade over 2 ins. each. Fit the several pieces into the grooves, where they should hold tightly, or, they may be glued in. Now clean off the face and edges with the plane set fine - i.e. with the iron barely showing, and saw off the end pieces not required. No glass-paper should be used.
Continue to:


My Books

