


Exercise VIII. The Angle Bridle, Or Open Mortice And Tenon Joint
Description
This section is from the book "Manual Instruction: Woodwork. The English Sloyd", by S. Barter. Also available from Amazon: Manual Instruction: Woodwork.
Exercise VIII. The Angle Bridle, Or Open Mortice And Tenon Joint
Fig. 167. A fresh tool - the mallet - is introduced in this exercise. The drawing should be an isometric projection of the finished joint, but with the small projection of the tenon cut off smooth.
A piece of yellow deal, 1} in. by 1 in. and 1 ft. long, will be required, and should be planed up true to 1 1/2 in. by 7/8 in. Mark with a square and pencil completely round one end at the depth of the mortice, 1 5/8 in., as at a in fig. 168, and at the other end a cut line, b, at a similar distance from the end, for the tenon. The reason of this is, that the cut line will be obliterated in sawing out the shoulders of the tenon, but, on the other hand, it would not do to mark outside of the mortice cheeks with cut lines, as they would spoil the appearance of the joint when put together.
In setting out the wood, as in fig. 168, the mortice and the tenon should be 1/4 in. thick. This will allow for cheeks 1/16 in.
thicker than the mortice, and will provide for sufficient strength in both the mortice and the tenon. The general rule is to make the mortice a third, or a little less than a third, of the thickness of the wood.
There are two ways of marking out the mortice and tenon. If the marking gauge is used, take a chisel nearest in size to the width of the required mortice - in this case 1/4 in., place the edge in the centre of the mortice and parallel to the end, and, with a blow of the mallet on the chisel handle, stamp a cut line which will serve as an index to the gauging of the parallel lines of both mortice and tenon. Set the marking-gauge to the end of the stamped line, nearest the face side, and gauge a line to the end, across the end, and down the back edge to the pencil line.

Fig. 167.

Fig. 168.

Fig. 1G9.
At the other end, gauge corresponding lines for the tenon. Reset the gauge to the other end of the stamped line, and gauge similar lines to those first made, at both ends.
The other plan is to use the mortice-gauge. First set the teeth of the gauge to 1/4 in. apart, and adjust the stock to 5/16 in. from the nearest tooth.
The accuracy of this adjustment can be tested by trying it from the face and opposite sides of the wood, and, when satisfied that it is correct, mark out both mortice and tenon.

Fig. 170.
Great care must be taken in sawing out the shoulders and mortice, as in fig. 169, to ensure a well-fitting joint. Commence to saw, as in fig. 170, of course, cutting just outside the lines if the tenon end, just inside them if for the mortice. In sawing, it is as important that the cut of the saw should be true on the back edge as on the top and face edge, which can be seen while guiding the saw.
To ensure a true cut on both front and back edges, let the saw gradually assume the positions shown by the dotted lines in fig. 171, till the depth on the face edge is reached. When both cuts on the face edge have been sawn in this manner, turn the wood round in the vice, and finish the cuts from the back. Those on the face edge now act as guides, but this time the strokes of the saw should be horizontal, as shown in fig. 172.
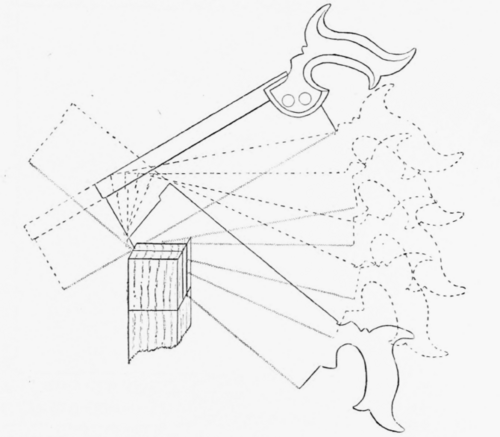
Fig. 171.
When the mortice and tenon are sawn down in this way, the shoulders of the tenon can be cut with the tenon saw, and the mortice completed by removing the core. Hold the 1/4 -in. firmer chisel vertically, near the end of the mortice, and give the end of the handle a rather smart blow with the mallet, grasping both tools as shown in fig. 173. Do not attempt to drive the chisel completely through when commencing. After making one vertical cut about 3/8 in. deep, so that the chisel is just driven in, but can be easily removed, make another cut further away from the end of the mortice, with the chisel sloping away from the body. This cut removes a small wedge-shaped piece of waste, and the next blow, with the chisel held vertically and a little closer in towards the end of the mortice, sinks deeper into the wood. The next cut should be a little further out, and will make the wedge-shaped pit deeper and larger. Fig. 174 shows the effect of the alternate vertical and inclined cuts. The waste, or 'core,' will work out in pieces after each blow, and the chisel should be used as a lever with the inclined side of the cut as a fulcrum, to assist in its removal.

Fig. 172.
After mortising about halfway through, finish from the reverse side, and finally pare the end of the mortice quite smooth, but do not touch the sides, which should give a true fit from the saw, and the shoulders of the tenon also should not require any paring. Indeed, it may be regarded as a general rule that a joint which does not fit from the saw alone is to some extent a failure.
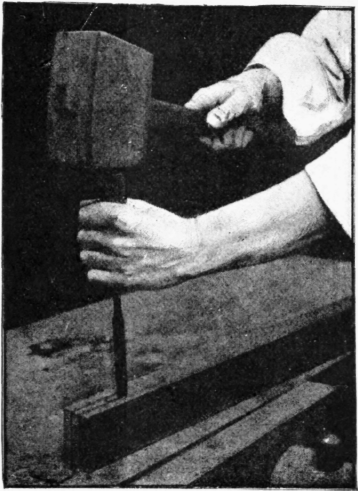
Fig. 173.

Fig. 174.
Besides the obvious desirability of performing the sawing as accurately as possible, and so saving time and trouble in using another tool, there is this important objection to paring - viz., the smooth surface left by a chisel does not hold the glue so well as does the slightly rough surface of the saw cut.
Now cut the wood in halves at c, fig. 168, and put the joint together, as shown in fig. 167. As a consequence of the depth of the mortice and tenon, 1/8 in. of both mortice cheeks and tenon will extend beyond the joint. These projections should be removed by edge planing from the corner of the joint inwards. The fibres would be broken out if the planing were done in the opposite direction. The faces of the joint should be cleaned off with the smoothing plane, but no glass-paper should be used.
Continue to:


My Books

