


Model IX. A Bracket
Description
This section is from the book "Manual Instruction: Woodwork. The English Sloyd", by S. Barter. Also available from Amazon: Manual Instruction: Woodwork.
Model IX. A Bracket
Fig. 177. - Stop sawing is the new operation introduced here. The drawing should be plan, elevation, and side elevation, as shown.
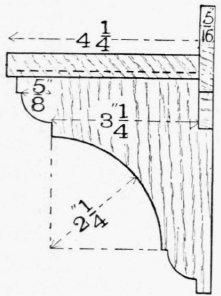
Side elevation.

Front elevation.

Plan.
Fig. 177.
Two pieces of bass-wood or yellow deal will be required, one 7 ins. by 2 3/4 ins., 3/4 in. thick, and the other 1 ft. long, 4 1/2 ins. wide, and 3/4 in. thick. These are large enough to allow of waste in preparation.
After planing up the wood true, set out on the large piece the shelf and bracket, as in fig. 178, and on the small piece, the back. It will be found advisable to commence the work by cutting out the bracket. First cut out a large concave curve to the dotted line, as shown, and then with the tenon saw cut the shoulders of the small convex curves, which can be completed by vertical paring. The large curve should be completed with a spokeshave, and the small ones with a flat file, but this should be used as little as possible, being only intended to do what is impossible with the chisel. The bracket can now be cut off, and the groove in the face side of the shelf may be made. This groove is at right angles to the grain of the wood, and after making cut lines for the sides over the pencil lines, cut from the back end of the groove along both edges for a little distance with a chisel, and inserting the point of the saw, as in fig. 179, making very short strokes, saw out the sides of the groove.
Remove the waste, or core, by horizontally paring with a 3/8-in.
chisel.
Saw off the waste pieces at the ends of the shelf and shoot all the edges true with trying plane or jack plane. Make the outside corners of the shelf round, the curve extending, as shown, 1/4 in. along each edge.
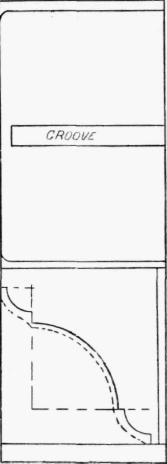
Fig. 178.
Saw the notch in the back of the bracket as in the side elevation, 1 in. long and 5/16 in. deep, and saw and plane a similar amount off the back of the shelf.
The small piece for the back, which has already been planed to 5/16 in. thick, should now be made to the proper width, and the waste at the ends cut off. Cut off the corners to be subsequently rounded and plane the ends true and square. The fibres will not be broken if the planing is done after the corners are cut off, and, on the other hand, these must not be rounded till the ends are planed. Finish the corners and bore the two holes, using a 3/8 -in. centre bit. Complete the back by sawing off the bottom corners and shooting them with the trying plane. Put the model together by nailing the shelf on to the bracket with about three oval steel brads 1 in. long, at regular intervals, and then nail the back to the bracket and shelf similarly.

Fig. 179.
Continue to:


My Books

