


Model XXVIL. - A Box With Common Dovetailed Joints
Description
This section is from the book "Manual Instruction: Woodwork. The English Sloyd", by S. Barter. Also available from Amazon: Manual Instruction: Woodwork.
Model XXVIL. - A Box With Common Dovetailed Joints
Fig. 281
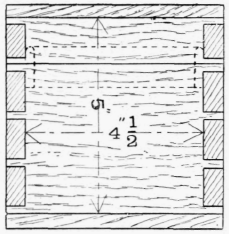
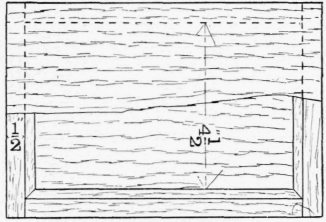
The drawings should be the usual orthographic projections, as shown, but in the plan of the box a portion of the lid is removed in order to show the fillet round the lid.
Presuming that a box of the size shown in fig. 281 is to be made, the timber required - yellow deal or bass-wood - will be as follows: -
Four pieces, each .........................
Two „",....
8 1/2 ins. long x 5 3/4 ins. x 5/8 in. 5 3/4 " x 53/4 " x 5/8 " for the sides of the box ; a strip l 1/4 in. wide, 3/8 in. thick, and 2 ft. 2 ins. long for the fillet.
It will be noticed from the measurements of this wood that no separate provision is made for the lid.

Side elevation.
End elevation.
Plan, with half of the top removed to show fillets.
Fig. 281.
The practice is to make the box like a solid rectangle, and then saw off the portion for the lid.
After planing up the wood for the sides, and shooting the edges quite true, but a little wider than they are required to finish, say, 1/8 in., the opposite sides are put together, and the depth of the mortice or the tenon, as the case may be, is marked with a cut line across the pair of face edges at each end. These lines are then continued across both faces of each piece, and on the opposite edges also.
Now take the two short sides on which, as usual, are the pins, as the dovetailed projections are called, and mark out on the end the shape of the pins, as in fig. 282. It will be noticed that the second one from one end is made wider than the others. This is to allow for a sufficiently substantial pin after sawing the lid from the box, and planing the edges of both true.
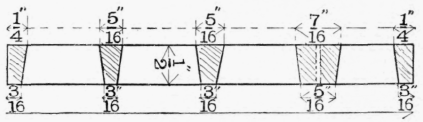
Fig. 282.
Having marked both ends of each short side carefully, saw and pare out the waste between each pin. When this has been done, place one of the rows of pins over the end of one of the long sides touching the cut, as in fig. 283, and mark with a chisel, as shown. Make similar marking for the other joints, and to avoid confusion make a distinguishing mark or number on each side, so that the pins may ultimately be fitted into the mortices to which they properly belong.
The face sides may show either outward or inward, but they should be continuous on either the inside or the outside.
After marking the four rows of mortices in this way, they should be carefully sawn and pared out, just leaving the cut lines showing along the edges of the mortices. These are now very slightly smaller than the pins, and some force will be required to put the sides of the box together. This mutual crushing of fibres by the pressure of the broad and narrow pins against each other is an essential feature of the dovetailed joint, but it should not be too great, or splitting may ensue. If the joints are satisfactory they should be glued, and the trued-up lid and bottom glued or nailed on.

Fig. 283.
A hollow oblong figure is now obtained, and should be sawn in halves, to a gauged line passing round the sides through the middle of each of the wide pins on the short side.
The rough edges left from the saw cut must now be very carefully planed true, till the lid will fit close down to the box without pressure being necessary on any part. The fillets may now be prepared by planing the strip true, rounding one edge, as in fig. 284, and cutting it into the required lengths. The simple mitred joints at the angles should be planed in the shooting board, and each of the four pieces may then be either glued or nailed round the top of the box, so that they project equally above the edge, and form a ledge to keep the lid on. If the work has been done well, the lid will fit easily but not loosely, and in putting it on there should be no friction, but simply the pressure from the air within the box, unable to find a ready exit.

Fig. 284.
One angle of this box may be taken as a preliminary exercise if it is considered necessary.
Continue to:


My Books

