Construction In Cardboard. Second Year
Description
This section is from the book "Raphia And Reed Weaving", by Elizabeth Sanborn Knapp. Also available from Amazon: Raphia and Reed Weaving.
Construction In Cardboard. Second Year
Third School Year.
The following models may be constructed in cardboard, oak tag, or Essex bristol. The latter comes in a variety of artistic and pleasing colors, and the light weight is quite as inexpensive and much more attractive than oak tag. There is no saving in expense, but a great waste of the teacher's time, if she attempts to cut the material for each lesson, to the size designated in the following directions.
The material is usually ordered for a year's work, and of one size throughout. In all these models a saving will be effected if, placing the ruler along the top and bottom edge of the paper, the spaces for the vertical lines are dictated, these lines drawn, and the cardboard be now cut to the exact width required.
Now locate on the edges of this piece the spaces for the horizontal lines, and after drawing these lines, cut the paper to the exact length.
The teacher having placed the drawing on the board as she dictated to the class, now indicates the parts to be cut away, by using colored crayon; thus making the details less confusing. The pieces cut away will often be large enough to use for another model.
Le Page's glue is used for joining all models constructed of any material heavier than paper.
As the pupils come to see how folding boxes may be constructed they become intensely interested, and specimens of all shapes and sizes are brought in, with the request, "May we make this?"
A quantity of oak tag may be kept where the pupils have free access to it, and scissors and glue conveniently near. For "busy work" nothing can be better than to encourage the developing of any box brought in, always insisting that the drawing be made by measurement, and not traced. For the pupils who cannot work unaided, the teacher should mount, on a large sheet of heavy cardboard, working drawings of different models, and also fasten to this, by a piece of cord, two models of each drawing; glue one to shape, and leave the other flat. Hang these sufficiently low, so the pupils can handle the models, and study the drawing.
Model 1 - Button Box
Material. - Essex bristol, six inches square. Draw the diagonal lines. Place a dot on each line, one inch from the point of intersection. Draw lines connecting these dots. The square thus formed becomes the bottom of the box. To form the sides of the box, find the middle of the upper edge; from this point measure one and one-half inches to the right and left, and here place a dot, marking these points A and B, as in Fig. 1. Draw lines from these points to the corresponding corners of the inner square. Repeat this drawing on the other three sides. To form the laps, measure on the upper edge, three-eighths of an inch from the points marked A and B, and from the corresponding corners of the inner square, measure three-quarters of an inch on the diagonal lines. Connect these points with opposite ones. As laps are needed on two sides only, lines similar to these are drawn on the opposite side of the box.
Now cut to line, and cut off the upper corners of the lap. This may be done free hand, or by measuring down threeeighths of an inch, and drawing lines to A and B. Cut to these lines. Before folding, it will be necessary to score all lines forming edges. This is done by using the sharp point of the scissors, a knife or a pin.

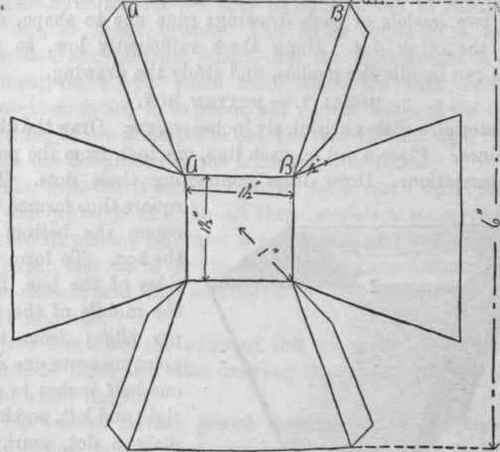
Fig. 1.
Model II. - Tent
Material. - Oak tag; size, 12 in. x 12 in.
Place the tag board with two edges parallel to the edge of the desk.
Placing the ruler along the upper edge of the paper, measure to the right one and one-quarter inches, and here place a dot, marking this point A, as in Fig. 2. Repeat this at the lower edge, and draw lines connecting these two dots. From each of these dots measure to the right four inches, and again draw connecting lines. Locate point B. From the ends of this line, measure two and one-half inches to the right, draw connecting line, and cut to this line. Lay aside the piece cut away and place the drawing on the desk in the same position as before. From the upper left corner, measure down three-fourths of an inch, place a dot and draw a line from this dot to A. From the lower left corner measure up three-fourths of an inch and draw a line from this point down to the end of the line opposite point A. Cut to these lines. From the upper right corner, measure down one and one-fourth inches, place a dot, and draw a line from this dot to point B. From the lower right corner, measure up one and one-fourth inches, place a dot, and draw a line to end of the line opposite point B. Cut to these lines. Locate points C, D, E and F. From points A and B, measure down five and three-fourths inches and draw a line across. Now draw a line from the ends of this line to points C, D, E and F. Cut to these lines and score all remaining lines. Fold for the body of the tent. For the floor of the tent use the piece cut away, and place it with its long edges parallel with the front edge of the desk. From the upper left corner, measure one-half inch to the right, and place a dot. Repeat this at the lower left corner and draw a line across.

Fig. 2.

Model II. Tent.

Fig. 3.
From the ends of this line, measure to the right five and three-fourths inches, and draw a line across. See Fig. 3. From the ends of this line, locate points one-half inch to the right and draw a line across. Cut to this line. Placing the drawing on the desk in the same position as before, measure down four inches from the upper right and upper left corners, place dots and draw a line across. Cut to this line. Score all remaining lines, fold, and glue into position.
Continue to:
My Books

