Construction In Cardboard. Second Year. Part 2
Description
This section is from the book "Raphia And Reed Weaving", by Elizabeth Sanborn Knapp. Also available from Amazon: Raphia and Reed Weaving.
Construction In Cardboard. Second Year. Part 2
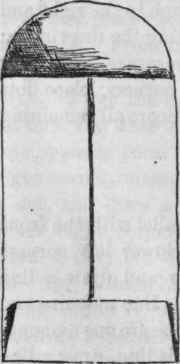
Model III. Coin Bag
Material. - Oak tag; size, 7 in. x 7 in.
Place the paper with its short edges parallel with the front edge of the desk. From the upper and lower left corners measure to the right one inch, place dots and draw a line across. See Fig. 4. From the ends of this line measure two inches to the right and draw a line across. Measure one and one half inches to the right from the ends of this line, draw a line across and cut to this line. From the two upper corners measure down one and one-half inches, place dots and draw a line across. Cut away the two corner oblongs thus formed, lay a two-inch semi-circular tablet with its straight edge coinciding with line A, and trace around the curved edge, using a sharp lead pencil. Cut to this curved line. From the two upper outside corners measure down four inches and draw a line across. From the ends of this line measure down one inch, draw a line across and cut to this line. Cut away the square formed in lower left corner and the oblong formed in lower right. Locate points 1, 2, 3, 4, 5, 6. From point 1 measure down one-fourth inch, draw a line to the inner upper corner and cut to this line. From points 3 and 4 measure up one-fourth inch, draw lines down to the inner corner and cut to these lines. From point 2 measure down three-eighths of an inch, draw a line up to the inner corner and cut to this line. Measure one-eighth of an inch to the right of point 5 and to the left of point 6. Draw lines to the upper corners, cut to these lines, score all remaining lines, fold and glue into shape.

Fig. 4.
Model III. Coin Bag.

Model IV. Card Case.
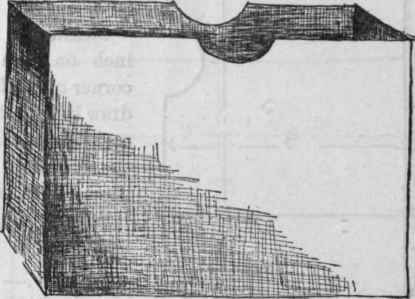
Model IV. Card Case
Material. - Essex bristol; size, 11 in. x 8 in.
Place the paper with its long edges parallel with the edge of the desk. Measure down one inch from the upper right and upper left corners, and here place dots on the edge of the paper. Draw a line connecting these dots. See Fig. 5. From both ends of this line, measure down five inches, place dots, and draw connecting line. Measure down one inch from both ends of this line, place dots, draw connecting line, and cut to this line.
From the upper and lower left corners, measure to the right two inches, place dots, and draw connecting line. Three inches to the right of this line, draw another line, and again a second line, at the same distance, three inches. Locate points two inches to the right of the last line, draw connecting line, and cut to this line. Now cut away, from both sides, the oblongs three inches by one inch. There are now four projecting pieces, size, two inches by one inch.

Fig. 5.

Fig. 6.
Measure in one-half inch on each outside corner of all four, and draw lines to the other corners, as shown in the drawing. Out to these lines, score all remaining lines, fold, and glue to position.
Model V.- Letter Case
Material. - Essex bristol; size, 12 in. x 5 in. Place the paper with its long edge parallel with the edge of the desk. From the upper left and upper right corner measure down three inches and draw a line across. From both ends of this line measure down one inch, draw a line across, and cut to this line. From the upper and lower left corners measure one inch to the right and draw a line across. See Fig. 6. Four inches to the right of this line draw another one. Again, one inch to the right of this one, and now four inches to the right of this last line. Again measure one inch to the right, draw a line, and cut to this line. From the lower edge cut up as indicated by the heavy lines in the drawing.
Model V. Letter Case.
Find the middle of the upper edge of each four-inch space, and place a dot. Place a one-inch semi-circular tablet with the middle of its straight edge at this dot. Using a sharp pointed pencil, trace around this tablet. Cut to this circular line. Score all remaining lines, fold and glue to position.
Model VI. - Card Holder
Material. - Essex bristol; size, 10 in. x 6 in. Place the paper with its short edge parallel with the edge of the desk. From the upper and lower left corners, measure to the right one and one-quarter inches, and draw a line across. See Fig. 7. Three inches to the right of this line draw another one, and again one and one-fourth inches to the right of this last line, draw another one, and cut to this line. From the upper corners measure down three inches and draw a light line across. Place another line two and three-fourths inches below this line, and again three inches lower down draw another one. Cut to this last line. Cut the oblong spaces away from the upper corners. Measure down one and one-half inches from the upper corners of the projecting piece, and here place dots. Find the middle of its upper edge, and from here draw lines to the dots just located, and cut to these lines. From the outside corners A and B, draw lines to C and D. Cut to these lines. Score all remaining lines, excepting the light one crossing the back of the case. Perforate the hole for hanging, fold and glue.

Fig. 7.

Model VI. Card Holder.
Continue to:
My Books

