84. Tool Box
Description
This section is from the book "Elements Of Construction", by Charles A. King. Also available from Amazon: Elements of construction.
84. Tool Box
Tool Box. Fig. 159.
Material: Pine or poplar.
1 bottom, a, 20" X 12" X 1/2".
1 partition, b, 18 1/2" X 7" X 5/8".
2 sides, c, 19" X 3 1/2" X 1/2". 2 ends, d, 10 1/2" X 3 1/2" X 1/2"
1 handle, e, 7 1/2" X 1 1/4" X 1 1/4".
A. The bottom and sides: The bottom of this box should not be cut to the exact size until the ends and sides are nailed together, on account of the possibility of variation, as the bottom is to fit the rim, and not the rim the bottom. The student will notice that the partition is halved, or housed, into each end, as at g, and the ends into the sides, as at f, each joint being cut halfway through the thickness of the stock. The curves of the partition should be carefully studied, and accurately worked out.
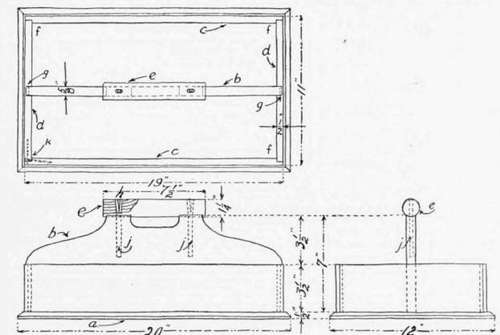
Fig. 159. - Tool Box.
B. The rim: The sides and ends of the rim should be smoothed upon both sides, and sandpapered upon the inner sides before being put together ; the outer sides of these pieces may be sandpapered better after they are nailed together. The grooves in the ends for the partition should be cut before the pieces are sandpapered on the inner side.
Glue should be used sparingly on the joints of the rim, so as not to be squeezed into the inside of the box, thereby causing unnecessary work in cleaning it off. The bottom should be made square, and of a size to project beyond the rim 1/2" upon all sides, after which the corner should be chamfered as indicated, or rounded to a true quarter round. If the latter form is adopted, care should be used that the curve does not extend upon the top of the bottom far enough to prevent the rim of the box from fitting.
C. Fitting the rim to the bottom: In order to insure that the joint between the bottom of the rim and the bottom of the box is as nearly-perfect as possible, the inside of the bottom of the rim should be planed under a little. This may be accomplished by resting the plane upon two sides of the box rim, and making the stroke as shown in Fig. 160, the iron cutting between its center and the outside of the face of the plane. This will allow the middle of the iron to cut upon the inside of the box more than upon the outside, thus " cutting under," and making the outside of the box fit the bottom closely where it is the most conspicuous.
D. The partition and handle. The partition, b, Fig. 159, should be smoothed and sandpapered and put in its place and nailed; and the round handle, e, prepared and fastened by 1/4" dowels, which should be thoroughly glued and wedged, as at h, to prevent the handle from being pulled off. Be sure that the wedges are driven at right angles with the grain, or they may split the handle. Extreme care should be exercised not to bore the holes which are to receive the dowels through the sides of the partition at j. Long, slender, round-headed screws may be used instead of the 1/4" dowels, if desired.
E. Nailing: In nailing the box together, \\" brads should be used, which should be driven both ways of the joint, as shown at k, Fig. 159. Do not use common nails, as they should be used only upon the roughest work, and where the greatest strength is necessary.
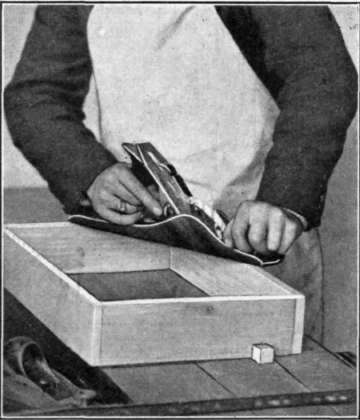
Fig. 160. - Planing the Edge of a Box to Fit the Bottom.
F. Nails: The nails used by carpenters, illustrated in Fig. 161, are of four different kinds, as follows: Common nails, A, which range in size from 3d (3 penny) to 60d box nails, other nails for common use being generally of this type.
Finish nails, B, which range in size from Gd to lOd, and are used for moldings, picture frames, and other places where it is required that the nails should be as nearly invisible as possible. This shape of head may be set beneath the surface with the least danger of splitting the wood. The smaller sizes of this type of nail are called brads, or sprigs, and range in sizes from 3/8" to 1 1/2" and are of different sizes of wire.
Casing nails, C, used for fastening casings, or inside finish, though the finish nails are often used for this purpose. The heads of these nails are supposed to enter the wood without tearing it, making only a clean round hole.
Flooring nails, D, the most essential difference between this type of nail and the finish or casing nail being the size of wire from which it is made, which will, in most cases, allow the nail to be driven into moderately hard wood without the necessity of boring a hole for each nail.
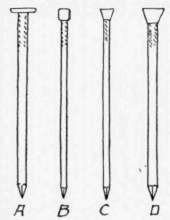
Fig. 161.
A, common nan.
B, Finish nail, or brad.
C, Casing nail.
D, Flooring nail.
Continue to:
My Books

