


Exercise X. A Shield
Description
This section is from the book "Manual Instruction: Woodwork. The English Sloyd", by S. Barter. Also available from Amazon: Manual Instruction: Woodwork.
Exercise X. A Shield
Fig. 185 Bow sawing, and modelling with the chisel and spokeshave, are the chief exercises in this model.
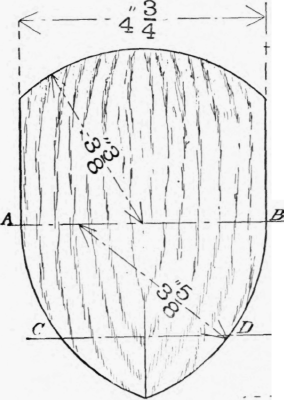
Front elevation.

Side elevation.

Section on a b.

Section on c d.
Fig. 185.
The drawing should be attended to very carefully in order to impress upon the mind the general form of the curve, as well as the correct measurements. All the drawings in fig. 184 should be made.
The model should not be made of a very large size: the dimensions given will be found suitable. Take a piece of some soft-working wood, preferably lime or bass-wood, and having trued the face and opposite sides, draw the outline of the edges on the face, and with the bow saw cut out the shield, smoothing the edges with the spokeshave. Mark the depth of the curve on the edges, and on the back glue a block of wood of about 2 ins. square and screw this in the vice.
The work of cutting down the curve is done with the chisel. A broad-bladed firmer chisel, say 1 in., should be used, and the method of cutting is to sweep the edge, held almost horizontally, in curves, which follow the shape in the drawing, and by this shearing action the wood is gradually cut down to the proper form. In this exercise the eye alone can be relied on, and constant references should be made to the drawing, to see that the shield gradually assumes the correct form. It will be found well to take the exercise out of the vice occasionally, to see that it is being modelled on both sides correctly.
Do not attempt to finish any one part before cutting away the other parts. This would inevitably prove fatal. The wood should be gradually reduced all over the surface, and finished almost simultaneously.
The spokeshave should be taken up after the chisel has practically completed the work, and finally, glass-paper should be lightly used, but the edge all round, and ridge from the point at the bottom of the shield, which gradually dies away in the middle of the surface, should be noticeable and sharp.
When the modelling of the front is complete, the block on the back can be chipped off with a chisel, and the surface cleaned off with jack and trying planes.

Front elevation.

Side elevation.

Section.
Fig. 186.
From Series V. ' Hand and Eye Training ' Cards, by kind permission of Messrs. Cassell & Co. Lim.
The shield in fig. 186 can be made in the same way as the former, but first make the groove, and insert the strips to make the cross, before cutting out the shield, or modelling the curve. The mitred joints in the middle should be planed in the shooting board with the stop set at 45°.
Continue to:


My Books

