


Model XVII. - An Inlaid Handled Tray
Description
This section is from the book "Manual Instruction: Woodwork. The English Sloyd", by S. Barter. Also available from Amazon: Manual Instruction: Woodwork.
Model XVII. - An Inlaid Handled Tray
Fig. 220
This is an attractive model, and gives a good drawing lesson. Both side, end elevation, and plan should be made.
The inlaying in the base of this model is the new tool operation introduced here, involving the use of the router.
The base is made from a stout piece of green-coloured bass-wood 1 ft. long, 6 3/4 ins. wide, and 3/4 in. thick. The long sides, each 1 ft. long, 2 1/4 ins. wide, and 3/8 in. thick, and the short sides, 6 1/2 ins. long, 3 1/8 ins. wide, and 3 1/8 in. thick, should not be of the same material as the base, but made of some pretty wood, such as sycamore, or, if a dark colour is preferred, of walnut or mahogany. The inlay pieces, pairs of contrasting colours, one of which should be the same as the material selected for the sides, can be made from wood 1/4 in. thick, and a saving can be effected by cutting the pieces for several models out of one strip of wood.
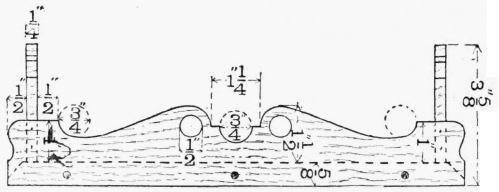
Side elevation.

End elevation.

Plan.
Fig. 220.
The base should first be made true on both faces and edges, and then the pieces of thin wood for the inlay work should be shot true on the edges in the shooting board, and then carefully glued together, and to a sheet of paper face side downwards. No hard projecting pieces of glue must be allowed to show on either the edges or the surface of the inlay pieces when dry. The glue, therefore, should be very sparingly used, very little being really required.
When dry, the arris of the back edges of the inlay plate should be just taken off with a file, and, placing it in its proper position on the base, mark the outline with the point of a 1/4 -in. chisel.
The inlay must be held firmly down, and if the fingers cannot be trusted the holdfast should be used.
A bevel-edged chisel will be found best for this purpose, or an ordinary firmer chisel can be readily ground as a substitute.
The corner will now be found more suitable for marking the exact outline of the inlay plate than that of an ordinary chisel.
The inlaying will be a little less than 1/4 in. deep, say 3/16 in. In order to facilitate the use of the router, the surface can be bored a little all over; or with the chisel used vertically and horizontally, the pupil can remove some of the waste, and when enough has been so cut out, the router should be taken up to make the surface smooth. Adjust the router to give the proper depth - 3/16 in. - and grasp it as in fig. 221, which shows the recess of this inlaying being made.
The router cannot be used to cut out the waste completely into the acute angle, but this can be finished with the bevel-edged chisel or the point of a bradawl. When the base is prepared for the inlay and the recess is quite clear, the plate may be glued in with the face side, i.e. the paper, upwards. The greatest care must be taken in pressing this into its place, and the reason for removing the arris on the under side will now be apparent. When the plate is put exactly into its place, it should be gently forced into the socket. To prevent the breakage of the middle joints, place a large piece of wood across the whole inlay, and lightly tap this with a hammer till the inlay is in its place. The base of the model may be left now till dry. The long sides being similar can be tacked together where the housed joints are to be made, and after shooting true the face edges, which will go downwards in the finished model, the outline of the top should be drawn at the proper distance from this edge. Bore out the holes, partly from both sides, and finish the curved form with the bow saw and spokeshave. The two handled ends are made similarly, the curved opening of the handle should be finished with a chisel.
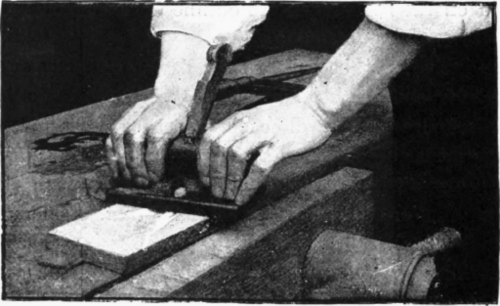
Fig. 221.
The housing joint in the sides can now be made, and then the bottom planed up, to clean off the paper. The ends of the base may now be levelled and shot true, and the long sides nailed on with three brass pins, or brass screws, as shown in side elevation, the housing joint being secured by oval steel brads.
Continue to:


My Books

