Construction In Cardboard. Second Year. Part 3
Description
This section is from the book "Raphia And Reed Weaving", by Elizabeth Sanborn Knapp. Also available from Amazon: Raphia and Reed Weaving.
Construction In Cardboard. Second Year. Part 3
Model VII.- Photograph Holder
Material. - Bristol board; size, 11 in. x 10 in. Lay the paper with its long edges parallel with the edge of the desk. From the upper and lower left corners, measure to the right two and one-half inches, and draw a line. See Fig. 8. Five inches to the right of this line draw another; measure again two inches and one-half to the right, draw a line and cut to it. From the upper corners, measure down four inches, and draw a line across.
Two inches and one-half below this draw another line, and again, two and one-half inches, another one. Cut to this line. Measure, for one-quarter inch lap, to the left of line C-E, and to the right of line D-F. Cut to these lines, and shape the lap as indicated on drawing.
From the upper corners, measure down one and one-half inches, and place dots on the edges of the paper. From these dots, draw lines to points A and B, and cut to these lines. Find the middle of the upper edge (the five-inch space), and here form the semi-circular opening. Repeat this at the lower edge. Score all remaining lines, fold, and glue to position.

Model VII. Photograph Holder.
Model VIII. Wall Letter Case
Material. - Essex bristol; size, 12 in. x 7 in.
Place the paper with its long edge parallel with the edge of the desk. Measure in on top and bottom edge, four inches, and draw a line across. See Fig. 9. Form another space of one and one-half inches, another of four inches, and still another of one and one-half inches in width. One-quarter inch to the right of this last line, draw another one, and cut to this line. From the upper corners, measure down one and one-half inches on the edge of the paper, and draw a line across. Three inches below this line draw another one, and again, one and one-half inches, another one. Cut to this line.
Cut away the oblongs in the upper corner, leaving the projecting piece as indicated. Find the middle of this upper edge, and draw lines from this point to a point one-half inch below each corner. Cut to these lines.
From points A and B, measure down one-quarter inch, draw line and cut for laps. Shape as indicated. Score all remaining lines, except the line across the back. Fold to position and glue. Perforate the hole for hanging.

Fig. 8.
Model IX. - Egg Box
Material. - Essex bristol; two pieces, size, 11 in. x 9 in.
Lay the paper with its long edge parallel with the edge of the desk. From the upper corners measure down two inches and draw a line across. Place another line four inches below this and still another one two inches below. Cut to this line. Two inches to the right of the left edge draw a line, another one four inches, and still another one two inches. Cut to this line. Draw the diagonals of the corner squares. Cut out the triangles as indicated. The remaining ones form the laps. See Fig. 10.
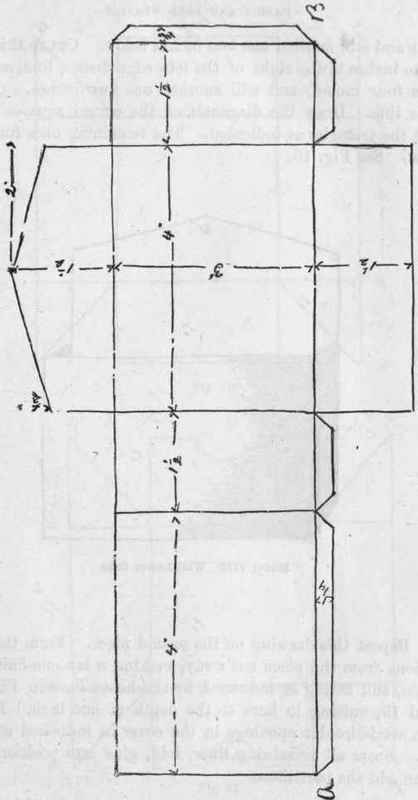
Fig 9.

Model VIII. Wall Letter Case.
Repeat this drawing on the second piece. Form the partitions from the piece cut away, making a lap one-half inch wide, and fitting as indicated by the heavy lines in Figs. 12 and 13, cutting in here to the depth of one inch. Locate the semi-circular openings in the cover as indicated at Fig. 11. Score all remaining lines, fold, glue into position, and then add the partitions.

Fig. 10.

Fig. 11.
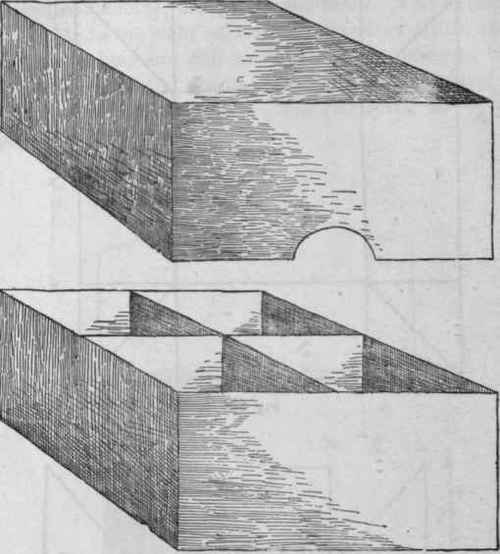
Model IX. Egg Box.

Fig. 12.

Fig. 13.
Reed Weaving
Third School Year.
This line of manual work follows the weaving with paper strips, and is here introduced into the second grade (third school year). The course consists of the weaving of mats, trays, baskets of various shapes and sizes, and a complete set of doll's furniture, the making of which is interesting to boys and girls alike.
The educational value of this form of manual training can not be overestimated. First, it is pleasing to the child, and thus the desire to create is stimulated and the inventive faculties cultivated. Symmetry, form and proportion are taught and both hand and eye trained to accuracy, while the observing faculties are aroused to notice designs and shapes in various manufactured articles.
Tools. - Scissors, knife, 1 pair flat pliers, 1 small hammer,
1 package one-inch No. 18 brads, 1 four-inch scratch awl, and a small iron vise, which, while not absolutely necessary, will prove of great convenience in holding the work for fastening.
Materials. - Round reed, Nos. 2, 3 and 4; split reed, Nos. 2, 3, 4, 6; flat and oval pith, sizes, 5, 5 1/2 and 6 1/2, fine cane (for binding), light linen cord and raphia.
Foundation Work With Cord
As it is difficult for children to manage the weaving, when starting with round reed, the first lesson is given with cord as a weaving strand. For the foundation rays, use No.
2 reed. Give each pupil eight pieces seven inches long, one piece four inches long, and two yards of cord. Divide the strands into fours, and cross at right angles, placing the ones passing from left to right on top the other four, being careful to cross at centers, and hold the work firmly between the thumb and fore finger of the left hand.


Designs for a Border. No. 1.
Hold the cord as a weaver in the right hand, leaving a free and the length of the extended arms. Pass this weaver over the four rays on the left (No. 1), then under the upper four (No. 2), over No. 3, under No. 4, and now over the cord. At this stage, insert the four-inch strand of reed, laying it alongside the cord so as to give firmness to this ray, which we treat as four. Now proceed under and over, around and around the mat, care being taken to hold the weaver firmly between the thumb and fore finger of right hand, and close up to the ray around which the cord is passing. Use the fingers of the left hand to turn the work and at the same time to press down the weaver between the rays.
Have the child first master this simple form of weaving with undivided rays before the division into twos is made.
One great advantage in starting with cord is that the work may be unwound and the material used over and over again until the pupil has learned to start his own work and weave through this step.
Continue to:
My Books

