Course In Raphia
Description
This section is from the book "Raphia And Reed Weaving", by Elizabeth Sanborn Knapp. Also available from Amazon: Raphia and Reed Weaving.
Course In Raphia
This course may be introduced into the fourth school year, but should not be given to the pupils until the muscles of the hand are strong enough to permit the use of a large darning needle for sewing. Raphia is the inner fibrous bark of a species of palm found in Madagascar. It is sold in twists, varying in size and weight from two to five pounds, and in price from fifteen to twenty cents a pound. Ten pounds will furnish material for a class of fifteen girls for this entire course, which may be given during the period when the boys have shop work.
Materials required are scissors, No. 5 darning needles, and raphia. As the raphia is braided before sewing, in order to facilitate this, we allow the girls to sit before screw hooks, fastened at intervals, in the wainscoting, on which they hang the strand while braiding. As the raphia is uneven in width, a certain thickness of braid must first be decided upon as standard for each model, and as many strands of the material used as are necessary to plait a three-strand braid of the desired thickness. The lengths are added by splicing, not by tying, and each pupil may alternately plait and sew, as it is not necessary to plait the full length needed before the sewing is started.

Model I. Bound Mat.
Small tags, to be found at a stationer's, and costing about ten cents a hundred, are marked with each pupil's name and fastened to her work. By using dyes, many artistic colors may be produced and these colored strands used for the entire model, or for sewing, etc.
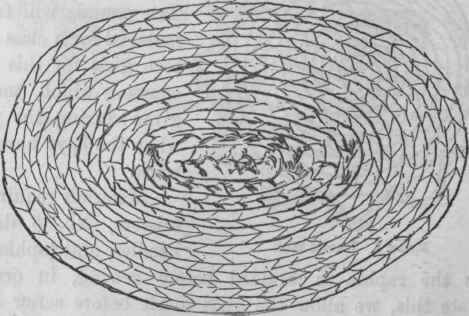
Model I. - Round Mat
The braid is laid flat and sewed edge to edge, with a large darning needle, and for thread the finest strands of raphia, which are not to be used in the braiding, but should be reserved for sewing. Have the sewing all done on one side -and not loosely - the teacher examining the work frequently in order to insure even, close sewing.
Model II. Table Mat.


Model IV. Circular Tray.
After serving to the desired size, six inches in diameter, add a border. This may be made either by sewing the braided strand in single or double points or scallops, or by making a fringe of the unbraided raphia, fastening it into the edge with a buttonhole stitch. By catching the edge together in three different places this may be converted into a very useful basket.
Model II. - Table Mat
This varies from Model I. in shape, being elliptical, and in manner of sewing, as the braid is sewed together with the flat sides touching, and edges up. A complete set of useful table mats may be made, varying in size.
Model III. - Napkin Ring
For this exercise the braid is sewed together with the face sides touching; sizes may vary.

Model V. Elliptical Tray.

Model VI. Sailor Hat for Doll.
Model IV. - Circular Tray
Diameter of bottom, four inches. Depth of side, one inch. If the braided strand is very coarse the edges may be sewed together; if fine, the sides are joined. After making the bottom the desired size, add the side to the depth of one inch, sewing round and round to the edge of the bottom, and frequently allowing the stitches to pass through the entire depth of the side. This gives firmness to the finished work.
Model V. - Elliptical Tray
Length of bottom, five inches. Depth of side, one and one-half inches. Follow directions for Model V.
Model VI. - Sailor Hat For Doll
This is started as in Model III., but the braid must be sewed flat, i. e., with edges touching. Trimming may be added, either by making a braided band and tying the ends, adding tassels of the same, or by using narrow ribbon for the band. Have the outside row double in thickness. Variety may be given to this lesson by encouraging pupils to make hats of various shapes, coloring them with aniline dyes.

Model VII. Jewelry Box.

Model VIII. Handkerchief or Sewing Box.
Model VII. - Jewelry Box
If the edges are to be joined in sewing, the braid should be very heavy, so as to give solidity to the finished model. For bottom, make circular mat four inches in diameter. Add side to depth of two inches. For cover, make circular mat to fit, and hinge it to the box by sewing loosely, adding a loop on the opposite side of the cover, which may be fastened with a peg passing through a loop projecting from the front of the box.
Model VIII. - Handkerchief Or Sewing Box
For this model make the bottom five inches long and one inch wide and add side to the depth of four and a half inches. Then add the projecting piece for flap, placing a loop on the point which is to fasten over a button sewed to the bag. Add the braided chain for hanging, and after bending a double piece of stout wire into shape for a hook, cover it with the braided raphia by weaving back and forth.
Continue to:
My Books

