54. Edge Joint
Description
This section is from the book "Elements Of Construction", by Charles A. King. Also available from Amazon: Elements of construction.
54. Edge Joint
Edge Joint. Fig. 93. Material: 2 pieces, 12" x 1 1/2" x 1".
Neither piece should be cut to length nor planed to width until the exercise is completed, when it should be treated as one piece.
A. Fitting the edges: Method 1. One edge of each piece should be made perfectly square, by using the jack plane as shown in Fig. 31, and these edges fitted to each other so that the ends will bear a very little harder than the middle, the difference being so slight that the eye cannot detect it. This does not mean that the pieces should be jointed hollowing, as they should be made as nearly perfectly straight as possible.
In doing this work, the plane should be in first-class condition, and the finest possible shaving taken off in finishing the joint. This slight difference in the center of the joint is to allow a certain amount of shrinkage to take place at the ends before the joint will open, as the ends of a board are more quickly affected by temperature and humidity than is the middle.
B. Reenforced edge joints: This joint is used for table tops and for wide boards, and if reenforcement is necessary, the joint should be matched, tongued, and grooved, or doweled, as in Fig. 94, ab c. It is also used on square-edged floors; matched flooring and beaded ceiling are elaborations of the same joint, not entirely for the purpose of reenforcement, but mainly to allow of blind nailing, as in Fig. 14, and to minimize the effect of shrinking and warping, as the tongue prevents an open joint between adjoining pieces, and keeps the face sides flush with each other. In beaded ceiling, indicated by the dotted line at h, the bead hides the joint if shrinking or warping occurs. C. Gluing the joint: Be sure that the joint is perfectly fitted before the glue is applied, and do not depend upon the clamps to bring the joint together. Any glue joint should be made wood to wood, or the glue is worthless, and if the joint does not fit perfectly, it will always be weak and apt to give way when shrinking or swelling takes place, or from a sudden blow. (See H below.)
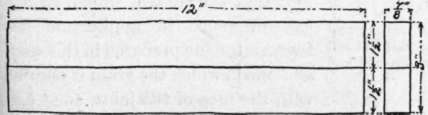
Fig. 93. - Edge Joint: Method 1.
A wide miter joint may be tongued and grooved as at d, Fig. 94. In a case of this sort, the length of the tongue, or its grain, is at right angles with the face of the joint, so as to give all the strength possible to resist the tendency of the joint to open. The joint may be held in place by handscrews until the glue sets, as described in Topic 70. It is important that the student should realize the difference in application between a tongue prepared in this way, and one in which the grain is parallel with the face of the joint, as at b. ' A cheap grade of panel work is sometimes made by the use of a tongue as shown at e, Fig. 94.
D. Jointing wide boards: In general, the face side of the work should at all times be kept toward the workman, and especially is this true in making a glue joint. The joint should be made so that the faces of adjacent boards will be as nearly as possible in line with each other. This will be difficult if the boards are warped or twisted, though the worst of them may be ripped through the middle, and the inaccuracies of one piece used to compensate those of the boards against which it is fitted. This requires more work, but if a poor grade of stock is being used, a much better job may be done.

Fig. 94. - Joints. a, Matched joint; b, tongued and grooved joint; c, doweled joint; d, tongued and grooved mitered joint; e, tongued and grooved panel work.
E. Fitting the edge joint: Method 2. Some workmen joint the edges of the two members of a joint at the same time, as in Fig. 95. It requires skill to do this well, and it is necessary that the plane iron should be nearly straight on the edge, and carefully sharpened and adjusted. By this method, if the face sides are opposite each other while the joint is being made, as indicated, and if the work is accurately done, the joint will be a perfect fit when the pieces are brought into their proper relation.
F. Fitting the edge joint: Method 3. In making a glue joint less than four feet long, many workmen do not fit the edges by means of a trysquare, as it may be done more economically by the "try " method, if the workman has sufficient skill.
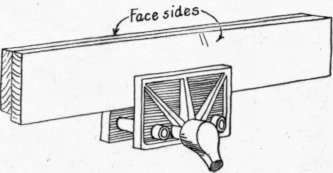
Fig. 95. - Jointing Two Pieces At Once: Method 2.
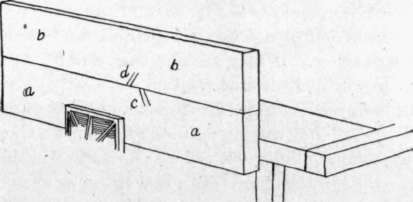
Fig. 96. - The Try Method: Method 3.
1. Mark the face corners as at c, d, of pieces a, b, Fig. 96, which is the usual face mark, and is so understood by other workmen. (This mark will hereafter be used to designate the face side and edge where necessary.)
2. Joint the edge of piece a by simply planing it straight, not using the try-square, but depending upon the "feel " of the wrist to make the edge approximately square. (The student may use the try-square until he has acquired the " feel.")
3. Remove piece a from the vise, turn it " end for end," or reverse the ends, and lay it upon the bench with the face corner, c, in position, as shown in Fig. 97. Place piece b in the vise, with the face corner, d, up, and toward the workman, as indicated.
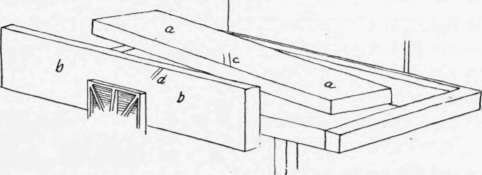
Fig. 97. - Position of the Pieces of the Joint in Fitting the Second Piece.
4. Joint the edge approximately straight, and square by the same method used in jointing piece a.
5. Place piece a upon 6, as in Fig. 96, and apply the try-square as in Fig. 98, to see whether or not the faces of the two boards are straight or fair with each other. If they are not, edge d of b may be jointed to bring both pieces in their desired relation.
Continue to:
My Books

