61. Notched Joint, Or Locked Joint
Description
This section is from the book "Elements Of Construction", by Charles A. King. Also available from Amazon: Elements of construction.
61. Notched Joint, Or Locked Joint
Notched Joint, Or Locked Joint. Fig. 114.
Material: 2 pieces, 6" X 11/2" X 7/8".
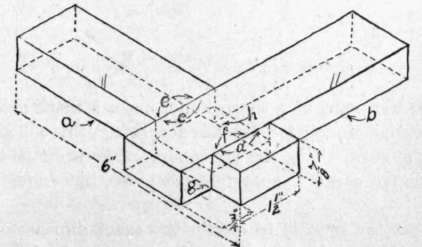
Fig. 114. - Notched, or Locked, Joint.
A. Laying out the joint: This joint is often used at corners, where a cheap and strong joint is required.
In this and the following exercises, be sure that every cut is laid out correctly before any cutting begins.
1. In making this joint, lay off with a. distinct knife mark by a try-square, as in Fig. 6, the distance of the lock end, say 3/4", upon the face side of piece a and upon the back side of piece b.
2. It is important that the size of the cut should not be measured from these cuts by a rule, but by the pieces themselves.
As the face sides of pieces a and b should be flush when the model is finished, it is plain that the width of piece b on its face side at the joint must be cut out of the face side of piece a; likewise, the width of the back side of piece a must be cut out of the back side of piece b.
3. Hence, turn piece b over so that the edge c of its face side will rest exactly over the knife mark d of piece a of Fig. 115.
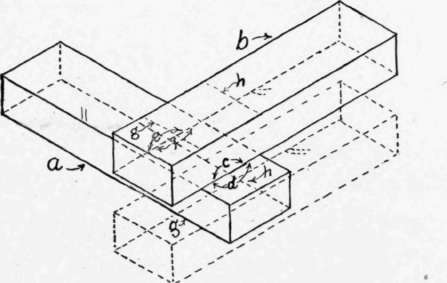
Fig. 115. - Laying Out the Cuts of the Notched, or Locked, Joint.
4. With the point of a sharp knife, make a mark at e on piece a close to the edge of piece 6. If made accurately, this will give the exact width of the cut. Using the try-square, make a distinct knife mark a little inside of e, not a measurable distance, but enough to insure a close fit.
5. Repeat the process to obtain the exact dimensions of the cut upon the back side of b, laying the pieces back to back instead of face to face.
6. From these knife marks, proceed as in 51, A, 2.
7. See 51, A, 3.
8. If the joint is too close, remedy it by using the chisel as shown in Fig. 110.
Before the joint is glued together, sandpaper the edges of the pieces; be careful not to touch the joint, however, as this may easily be made too small.
B. Smoothing surfaces which join at an angle: After the joint is fitted, the pieces glued together, and the glue set, smooth the face and back sides with a smoothing plane, being careful that the plane is in the best possible condition; also be sure that no cut is made directly across the grain; otherwise, a piece is apt to be chipped off. Plane with the grain if possible, but if it is necessary to plane across the joint, do so at an angle of about 45°, and use care that the plane cuts in the direction of the grain most favorable for smooth work.
If the lock end is left off, we have a halved joint, sometimes erroneously called a lap joint, which is used in the construction of frame buildings in fastening the plates and sills at the corners, as in Fig. 99. The lock joint should be fitted so closely that glue is unnecessary, but it may be glued together if desired.
Continue to:
My Books

