67. Dovetailed Brace Joint, Or Halved Joint
Description
This section is from the book "Elements Of Construction", by Charles A. King. Also available from Amazon: Elements of construction.
67. Dovetailed Brace Joint, Or Halved Joint
Dovetailed Brace Joint, Or Halved Joint. Fig. 125.
Material: 2 pieces, 6" X 11/2" X 7/8".
This joint is sometimes used to fasten braces into corner posts, girts, and sills, where they will be subjected to both tensile and compressive strains. A very strong joint may be made in this way, though piece b is weakened 50 per cent on account of the wood being cut away for the dovetail, and piece a still more.
1. Fitting the joint: Set the bevel to the required angle for the shoulder, c, which is the angle of intersection, and cut the end of piece a at the same angle.
2. On the back of a, at a distance equal to the width of b, measure the distance d, or the width of piece b, square with the end; make a distinct knife mark by the bevel, which indicates the shoulder c.
3. Without changing the angle of the bevel, make a pencil mark across the face of 6, at the place at which pieces a and b intersect.
4. With a gauge set one half of the thickness of the pieces, mark the thickness of the dovetail on piece a, and of the slot which is to receive it, in piece b, working from the face side of each piece.
5. Saw to gauge marks of piece a and cut to shoulder c.
6. Lay out with a knife, and cut shoulder e, 3/8" from the edge of a, and cut the dovetail on one edge only. The edges of this dovetail should be made a very little less than square, or they should be " cut under " so as to make the surface of the underside of the tail a trifle narrower than the upper, or face, side. The difference on the edges should be almost imperceptible when tested by the try-square. (If this is well done, it will insure a good joint on the face, but if it is cut under too much, the model may be ruined in trying to remedy it.)
7. Trim shoulders c and e with the chisel, if necessary; see Fig. 110.
8. Lay the dovetail of a in its exact position on b, and with a sharp knife make a distinct mark beside each edge of the dovetail, and square on the edges of b to the gauge marks.
9. Cut out the slot to the gauge and knife marks, and trim them carefully with a sharp chisel.
10. If the work has been accurately done at every stage, the dovetail will have to be forced a little to bring it to its place.
11. Smooth and sandpaper. Do not glue the model together. Figure 126 shows the same joint made at an angle of 90°.
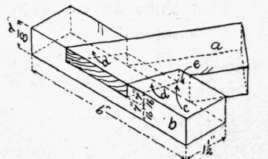
Fig. 125. - Dovetailed Brace, oR Halved, Joint.
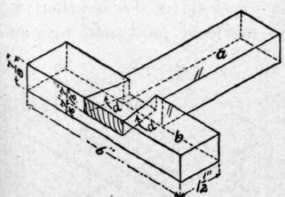
Fig. 126. - Dovetailed Locked, or Halved, Joint.
Continue to:
My Books

