65. Mortised Joint
Description
This section is from the book "Elements Of Construction", by Charles A. King. Also available from Amazon: Elements of construction.
65. Mortised Joint
Mortised Joint. Fig. 119.
Material: 2 pieces, 6" 1 1/2 X 7/8".
This is a common form of joint, and may be made at any angle.
It is used in framing girts into corner posts and the ends of braces, in the manufacture of doors, panel-work, and in nearly every place where two pieces are to be fastened together at any angle, and the greatest strength is desired.
A. Laying out the joint: 1. Lay out with a knife the length of the tenon upon d, which should equal the width of the mortise member, b.
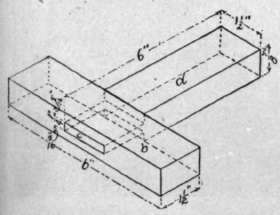
Fig. 119. - Mortised Joint.
2. Lay out the length of the mortise upon each edge of the mortise member, b, in the middle of the piece, lengthways; to insure a close fit, this mortise should be a little less than the width of the tenon in length. If made too small, a light cut will remedy it. These two marks should be made with a sharp pencil, since in transferring the lines with a knife across the face of piece b, a knife will make a scratch that will be difficult to remove.
3. Use of the mortise gauge: Gauge for the mortise in piece b, and the tenon on the end of d. Set the mortise gauge, Fig. 120, and mark both pieces at once without changing its set. It is economy to use this tool where two lines are to be made at once, as it saves handling each piece over twice, and the marks may be made more accurately than if the ordinary gauge is used. This tool is used the same as a single-point gauge, the head being set in the right relation to the outside point (in this case, 9/16"), the screw at the other end of the stick being manipulated to bring the inside point to its correct distance between the outer point and the head (in this case, 1/4" from the former, which is the important measurement).
Tighten the thumbscrew in the head to hold it in the desired position.
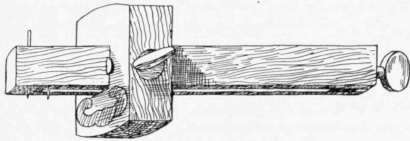
Fig. 120. - Mortise Gauge.
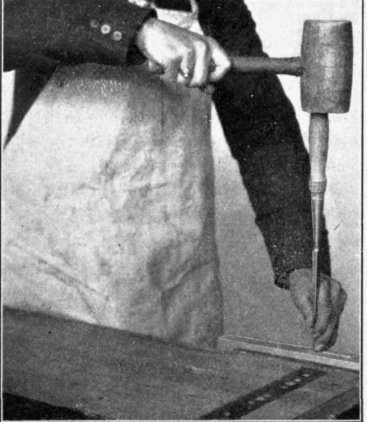
Fig. 121. - Method of Grasping a Chisel for Mortising Small Work.
Always working from the face side, mark around the two edges and the end of the tenon and the mortise, on both edges, using care not to make a scratch beyond the mortise or the tenon, as it will not work out.
B. Cutting the joint: Bore a 1/4" hole in the middle of the mortise from each side, halfway through. If bored from one side, it would probably not come through accurately. In a large mortise, or in hard wood, the mortise may be bored nearly out by boring several holes. In cutting out a small mortise with a narrow chisel, work from the hole in the center to each end of the mortise, holding the chisel at right angles with the grain of the wood, as shown in Fig. 121. In this way it may be guided more accurately at the beginning of the cut than if held as in Fig. 122, which is the usual method of grasping a chisel for heavy work. After starting a chisel accurately in a small mortise, the hand will naturally slip up toward the handle. The back of the chisel, c, should be kept toward the end of the mortise toward which the student is working. Under no conditions should chisel cuts be made parallel with the grain until after the wood in the center of the mortise has all been cut out, as the wood at the side may be split. The tenon should be made by cutting out the wood on each side of it with a back-saw, and, if necessary, trimming with a chisel, as described in Topics 59 B and C.
C. Drawboring: Figure 123. A shows a mortised and tenon joint, drawbored; the tenon shoulder, a, is less distant from the hole, c, in the tenon than the mortised shoulder, b, is from the hole, d, which pierces the wood on each side of the mortise. When the tenon is pushed into the mortise, and a pin driven through the hole, it is obvious that the joint will be drawn to a perfect fit, if the work has been well done. This joint is frequently used in the construction of buildings, for additional strength, and where it is necessary to hold the joint together while other parts of the work are being fitted. It is also used in the manufacture of sash and machinery frames, and in furniture to some extent. A section of this joint is shown at B.

Fig. 122. - Method of Grasping the Chisel for Mortising Large Work.
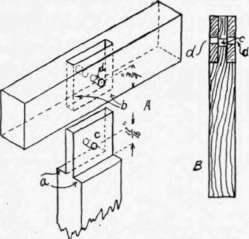
Fig. 123. - Mortised Joint, Drawbobed.
Continue to:
My Books

